> ## Documentation Index
> Fetch the complete documentation index at: https://docs.gmicloud.ai/llms.txt
> Use this file to discover all available pages before exploring further.
# List an agent
> Submit a deployed agent for listing on GMI AgentBox.
Once your agent is deployed and tested, submit the listing for review on GMI AgentBox.
## Pick a publishing path
### Path A · GMI CE Deployment
Your agent runs on GMI Infrastructure. The agent template is auto-detected and linked to the listing. Consumers access your agent through GMI's infrastructure, your internal endpoint is never exposed.
### Path B · Self-hosted + MaaS
You host the agent yourself and call GMI Models-as-a-Service for inference. Provide the public endpoint you want listed.
## Wizard steps
1. Listing Info
2. Review & Publish
## Step 1: Listing Info
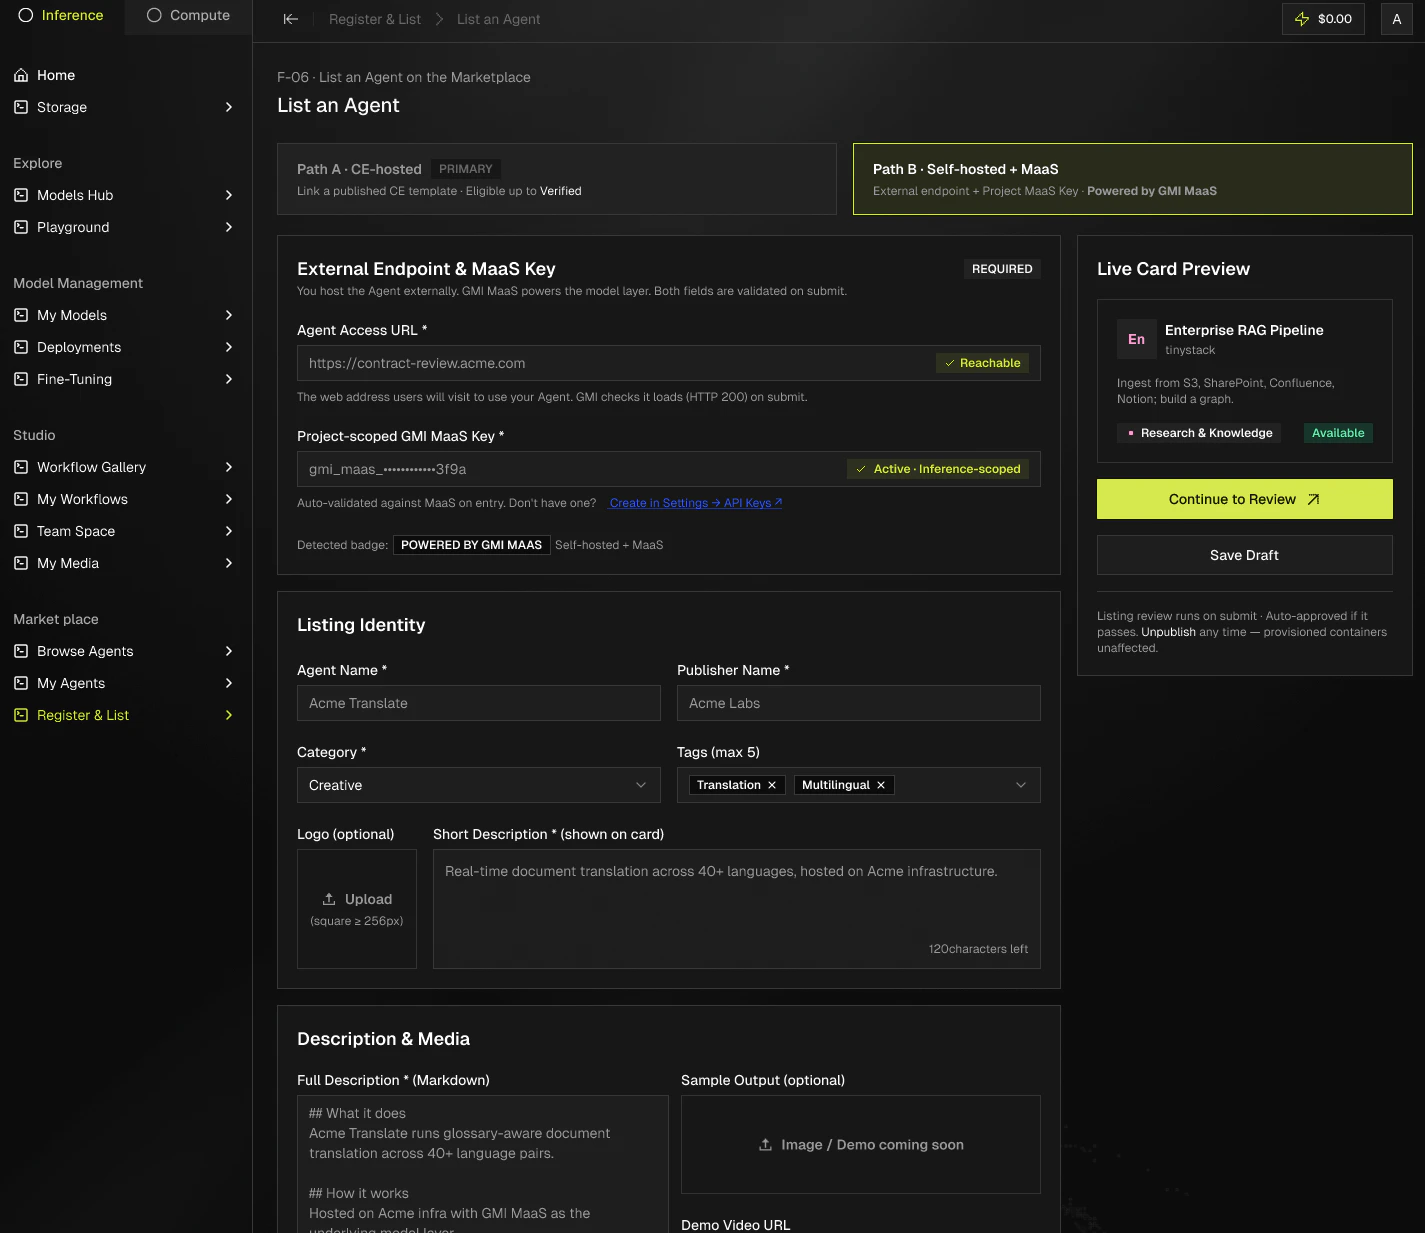 ### GMI CE Deployment template
* The GMI CE Deployment template you registered in Register an agent is detected and linked automatically.
* Example ID: tpl\_9f3a-771e-contract.
* Consumers access the agent through GMI's infrastructure. Your internal endpoint is never exposed.
### Also using GMI MaaS?
* Toggle on if your agent also calls GMI Models-as-a-Service.
* Enables the Verified badge. Without it, the listing shows Powered by GMI Infrastructure.
* Badge preview updates in real time.
### Listing Name
* Public-facing name on the Marketplace.
* Your internal project name stays private.
### Publisher Name
* Your company or personal name. Shown on the agent detail page.
### Contact Email
* Where users send questions. Not shown publicly unless you opt in.
### Agent Type
Pick one:
* Code & Dev Tools. Code review, testing, data pipelines, benchmarks, developer tooling.
* Data & Analytics. Data processing, analysis, reporting, and business intelligence.
* Customer Support. Support automation, ticket triage, and customer-facing assistants.
* Content & Marketing. Content creation, copywriting, design, and marketing automation.
* Research & Knowledge. Research, summarization, and knowledge-base question answering.
### Short Description
* One sentence describing what the agent does.
* Up to 120 characters.
* Shown on the Marketplace card.
### Full Description
* Describe what your agent does, who it's for, what inputs it accepts, and what outputs it produces.
* Shown on the detail page.
### Tags
* Comma-separated keywords used by search and filters.
* Example: Security, Solidity, Audit.
## Step 2: Review & Publish
* Review every listing field on a single screen.
* Click any section to jump back and edit.
* Click Publish. The listing goes live on GMI AgentBox within minutes.
* No review queue. You stay responsible for keeping the description accurate.
## My Agents dashboard
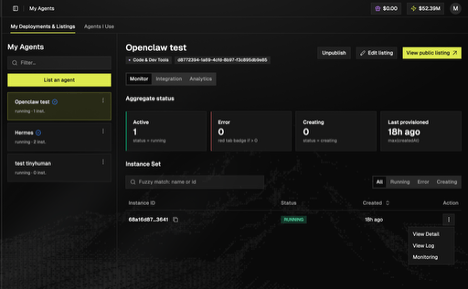
The **My Agents** dashboard (under **My Deployments & Listings**) shows every agent you've published. Select an agent to open its panel, which has three tabs — Monitor, Integration, and Analytics — and three actions at the top right:
* **Unpublish** — remove the listing from the Marketplace.
* **Edit listing** — update the public listing fields.
* **View public listing** — open the live Marketplace page for the agent.
### GMI CE Deployment template
* The GMI CE Deployment template you registered in Register an agent is detected and linked automatically.
* Example ID: tpl\_9f3a-771e-contract.
* Consumers access the agent through GMI's infrastructure. Your internal endpoint is never exposed.
### Also using GMI MaaS?
* Toggle on if your agent also calls GMI Models-as-a-Service.
* Enables the Verified badge. Without it, the listing shows Powered by GMI Infrastructure.
* Badge preview updates in real time.
### Listing Name
* Public-facing name on the Marketplace.
* Your internal project name stays private.
### Publisher Name
* Your company or personal name. Shown on the agent detail page.
### Contact Email
* Where users send questions. Not shown publicly unless you opt in.
### Agent Type
Pick one:
* Code & Dev Tools. Code review, testing, data pipelines, benchmarks, developer tooling.
* Data & Analytics. Data processing, analysis, reporting, and business intelligence.
* Customer Support. Support automation, ticket triage, and customer-facing assistants.
* Content & Marketing. Content creation, copywriting, design, and marketing automation.
* Research & Knowledge. Research, summarization, and knowledge-base question answering.
### Short Description
* One sentence describing what the agent does.
* Up to 120 characters.
* Shown on the Marketplace card.
### Full Description
* Describe what your agent does, who it's for, what inputs it accepts, and what outputs it produces.
* Shown on the detail page.
### Tags
* Comma-separated keywords used by search and filters.
* Example: Security, Solidity, Audit.
## Step 2: Review & Publish
* Review every listing field on a single screen.
* Click any section to jump back and edit.
* Click Publish. The listing goes live on GMI AgentBox within minutes.
* No review queue. You stay responsible for keeping the description accurate.
## My Agents dashboard
The **My Agents** dashboard (under **My Deployments & Listings**) shows every agent you've published. Select an agent to open its panel, which has three tabs — Monitor, Integration, and Analytics — and three actions at the top right:
* **Unpublish** — remove the listing from the Marketplace.
* **Edit listing** — update the public listing fields.
* **View public listing** — open the live Marketplace page for the agent.
 ### Monitor tab
* **Aggregate status** — live counts for **Active**, **Error**, and **Creating** instances, plus the **Last provisioned** timestamp.
* **Instance Set** — a searchable table of every instance with **All / Running / Error / Creating** filter tabs and columns for **Instance ID**, **Status**, **Created**, and **Action** (View Detail, View Log, Monitoring).
### Integration tab
The Integration tab gives you the **Template ID** (a UUID, with a copy button) and the full instance lifecycle as a 4-step `curl` workflow: provision → list tasks → poll → terminate. Replace `` with a token from your GMI account settings, and `` with the Template ID shown at the top of the tab.
```bash theme={null}
# 1. Provision a container
curl -X POST 'https://api.gmi-serving.com/v1/agents/deployments//tasks' \
-H 'Authorization: Bearer ' \
-H 'Content-Type: application/json' \
-d '{
"idc_name": "us-central-iowa1",
"instance_type": "gmi.container.intel.x4660.large",
"template_id": ""
}'
# 2. List tasks running under this deployment
curl 'https://api.gmi-serving.com/v1/agents/deployments//tasks' \
-H 'Authorization: Bearer '
# 3. Poll until status = "running", then route to your user
curl 'https://api.gmi-serving.com/v1/agents/tasks/' \
-H 'Authorization: Bearer '
# 4. Terminate when the session ends
curl -X DELETE 'https://api.gmi-serving.com/v1/agents/tasks/' \
-H 'Authorization: Bearer '
```
### Analytics tab
* **Usage By Model** — a usage chart with a **1D / 7D / 30D / 90D** time-range switcher.
* **API Key Management** — a table of keys showing key name, masked value, scope, and owner ID.
* **View billing** — a link through to your billing details.
### Monitor tab
* **Aggregate status** — live counts for **Active**, **Error**, and **Creating** instances, plus the **Last provisioned** timestamp.
* **Instance Set** — a searchable table of every instance with **All / Running / Error / Creating** filter tabs and columns for **Instance ID**, **Status**, **Created**, and **Action** (View Detail, View Log, Monitoring).
### Integration tab
The Integration tab gives you the **Template ID** (a UUID, with a copy button) and the full instance lifecycle as a 4-step `curl` workflow: provision → list tasks → poll → terminate. Replace `` with a token from your GMI account settings, and `` with the Template ID shown at the top of the tab.
```bash theme={null}
# 1. Provision a container
curl -X POST 'https://api.gmi-serving.com/v1/agents/deployments//tasks' \
-H 'Authorization: Bearer ' \
-H 'Content-Type: application/json' \
-d '{
"idc_name": "us-central-iowa1",
"instance_type": "gmi.container.intel.x4660.large",
"template_id": ""
}'
# 2. List tasks running under this deployment
curl 'https://api.gmi-serving.com/v1/agents/deployments//tasks' \
-H 'Authorization: Bearer '
# 3. Poll until status = "running", then route to your user
curl 'https://api.gmi-serving.com/v1/agents/tasks/' \
-H 'Authorization: Bearer '
# 4. Terminate when the session ends
curl -X DELETE 'https://api.gmi-serving.com/v1/agents/tasks/' \
-H 'Authorization: Bearer '
```
### Analytics tab
* **Usage By Model** — a usage chart with a **1D / 7D / 30D / 90D** time-range switcher.
* **API Key Management** — a table of keys showing key name, masked value, scope, and owner ID.
* **View billing** — a link through to your billing details.