> ## Documentation Index
> Fetch the complete documentation index at: https://docs.gmicloud.ai/llms.txt
> Use this file to discover all available pages before exploring further.
# Register an agent
> Package and register your agent on GMI Cloud through the five-step register wizard.
Registering an agent packages your code with infrastructure, environment config, and a live public endpoint, all in one five-step wizard. To get started, click Register & List in the left-side menu. Test the live endpoint before sending it to the Marketplace.
## Configure the GMI MaaS endpoint in your image
Before you wrap your agent into an image, read the GMI MaaS connection details from these environment variables. At runtime, GMI injects the API key for the models you select in Step 2, so you never ship a key inside your image.
| Variable | Description | Example |
| ------------------- | ------------------------------------------------------------------ | ----------------------------- |
| `GMI_MAAS_BASE_URL` | OpenAI-compatible base URL for GMI MaaS. | `https://api.gmi-serving.com` |
| `GMI_MAAS_API_KEY` | MaaS API key. **Injected by GMI at runtime** — do not hardcode it. | *(injected)* |
| `GMI_MODELS` | Model ID your agent calls. | `deepseek-ai/DeepSeek-V4-Pro` |
Read these variables in your code rather than hardcoding values, for example:
```python theme={null}
import os
from openai import OpenAI
client = OpenAI(
base_url=f"{os.environ['GMI_MAAS_BASE_URL']}/v1",
api_key=os.environ["GMI_MAAS_API_KEY"],
)
response = client.chat.completions.create(
model=os.environ["GMI_MODELS"],
messages=[{"role": "user", "content": "Hello"}],
)
```
Leave `GMI_MAAS_API_KEY` unset in your image — GMI injects it at runtime when MaaS integration is enabled (Step 2). Hardcoding a key is unnecessary and will be overridden.
## Pick a deployment path
### GMI CE Deployment
GMI hosts your container on GMI Infrastructure and exposes a public URL. Eligible for the Verified badge when paired with MaaS.
### Self-hosted + MaaS
You host the agent yourself and call GMI Models-as-a-Service for inference. Lists with the Powered by GMI MaaS badge.
On this path you don't go through the full register wizard above. Instead, **Connect your agent** is a short 3-step flow — **Basic** (project name) → **MaaS Key** (generate or connect a GMI MaaS API key) → **Endpoint** (provide your public-facing URL) — to connect your self-hosted agent with the GMI Models endpoint.
## Wizard steps
1. Basics & Template
2. Infrastructure
3. Networking
4. Env Variables
5. Review & Register
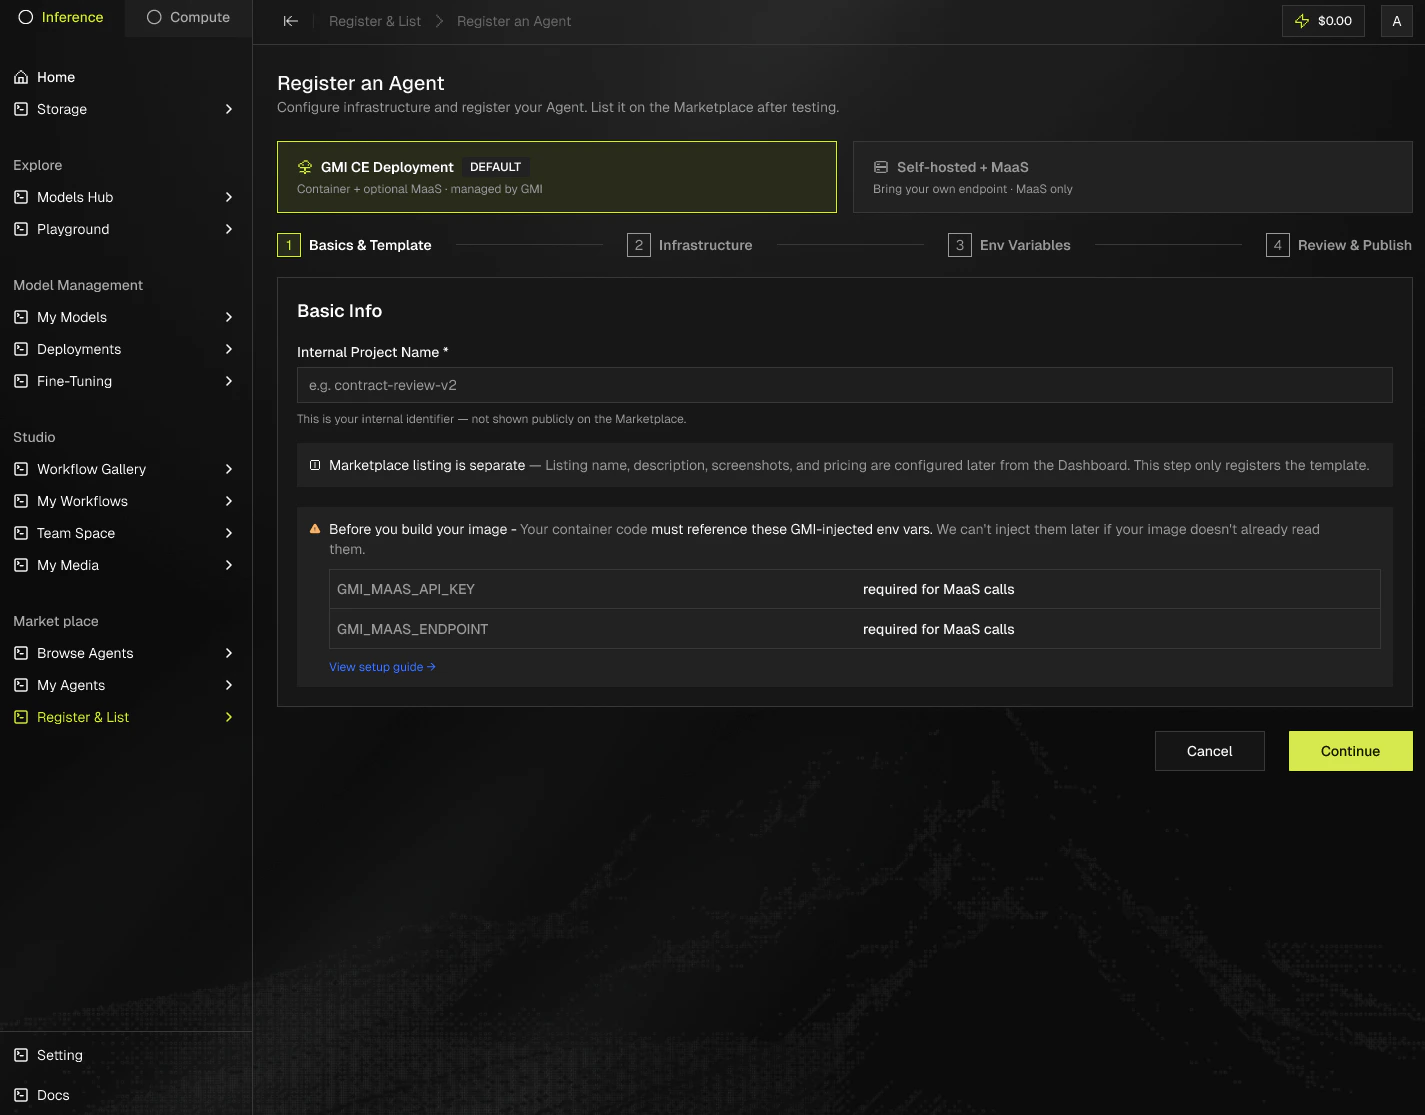
## Step 1: Basics & Template
Identity for the listing. This is what users see on the catalog card and detail page.
 If you're going with the self-hosted + MaaS path, the Basics & Template step looks slightly different:
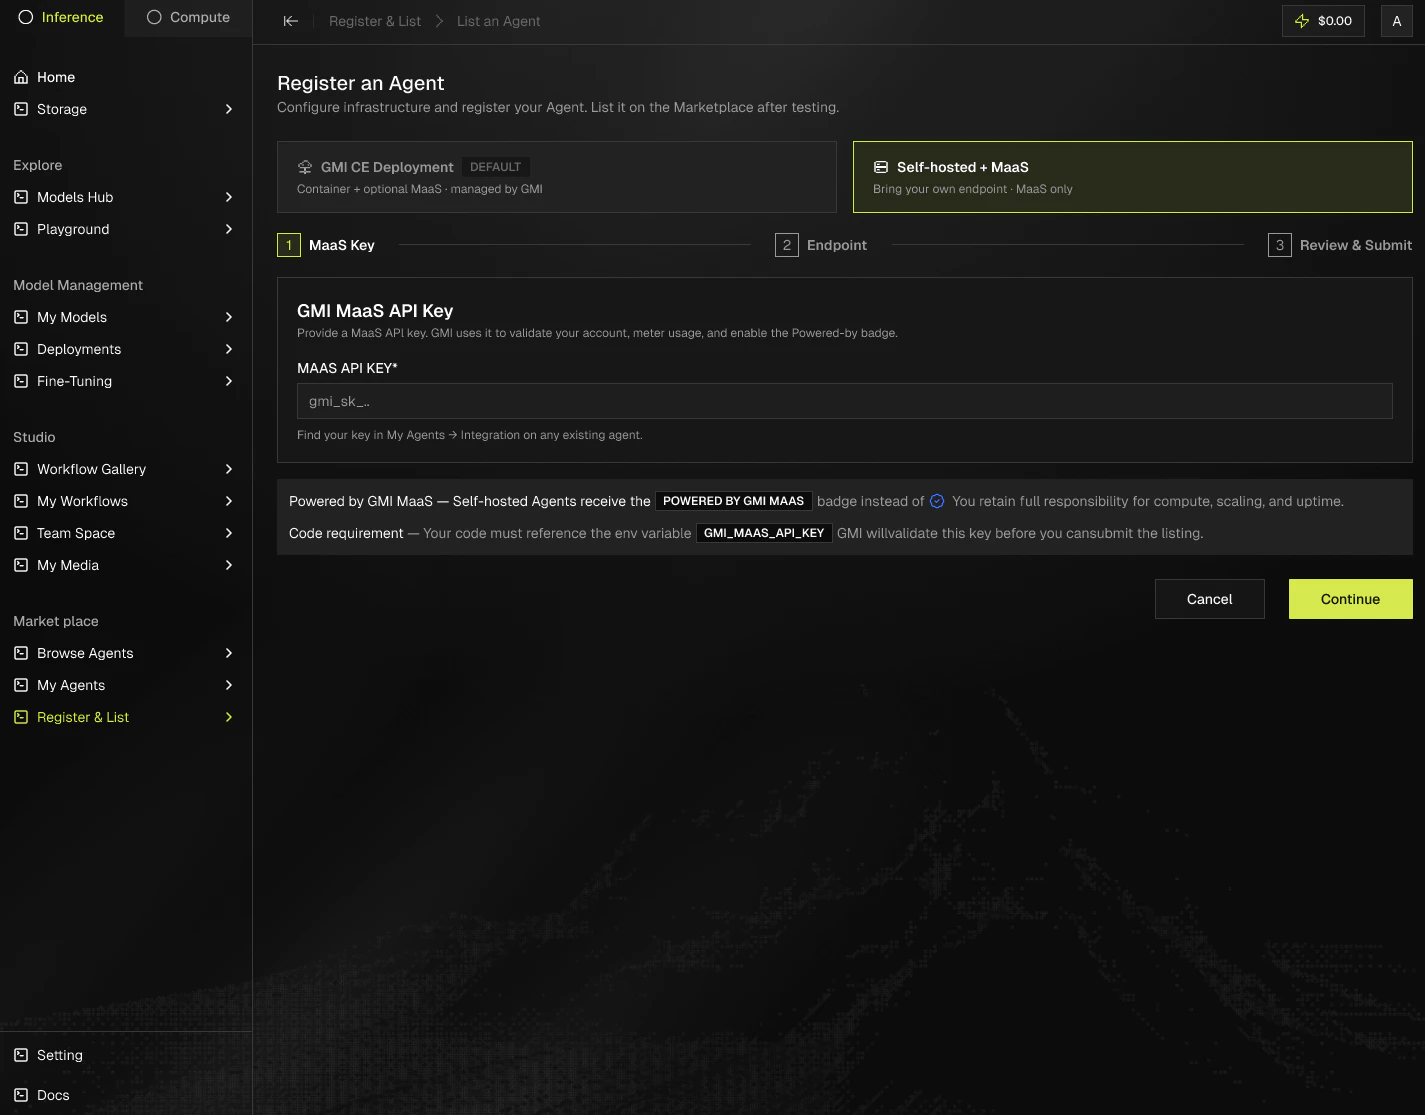 Basics & Template
* Add the internal project name
## Step 2: Infrastructure
Configure compute resources. GMI Infrastructure provisions containers on demand.
### Docker image source
* Registry URL. Pull from Docker Hub, GHCR, or any public/private registry.
* Upload Image. Push a local image directly to GMI's registry. Useful for one-off builds.
### Registry URL
* Format: registry.hub.docker.com/your-org/your-agent:latest
### Enable Credentials
Turn on **Enable Credentials** if your Docker registry requires authentication to pull images. The toggle reveals two fields inline, entered here in Step 2 (not as Env Variables):
Basics & Template
* Add the internal project name
## Step 2: Infrastructure
Configure compute resources. GMI Infrastructure provisions containers on demand.
### Docker image source
* Registry URL. Pull from Docker Hub, GHCR, or any public/private registry.
* Upload Image. Push a local image directly to GMI's registry. Useful for one-off builds.
### Registry URL
* Format: registry.hub.docker.com/your-org/your-agent:latest
### Enable Credentials
Turn on **Enable Credentials** if your Docker registry requires authentication to pull images. The toggle reveals two fields inline, entered here in Step 2 (not as Env Variables):
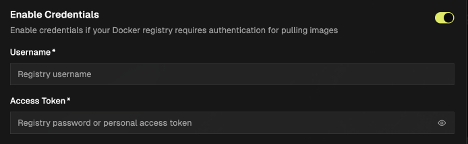 * **Username** — your registry username.
* **Access Token** — your registry password or personal access token.
### Compute tier
* **Container** — 2 vCPU · 4 GB RAM · Ephemeral Storage 10 GiB · Data Storage 30 GiB. Additional tiers coming soon.
### Region
* Currently available: **IOWA IDC-1** (US-IA, US). Additional regions are being added.
* Pick the region closest to your users to minimize latency.
* Multi-region rollouts require a separate deploy per region.
### MaaS integration
* Toggle on to give your agent access to GMI's 200+ frontier models.
* GMI injects a MaaS API key into your container at startup, no key management on your end.
* Select every model your agent may call. Selection is editable later.
* Required for the Verified badge.
## Step 3: Networking
Expose the ports your agent listens on. GMI CE routes external traffic to these container ports.
* **Username** — your registry username.
* **Access Token** — your registry password or personal access token.
### Compute tier
* **Container** — 2 vCPU · 4 GB RAM · Ephemeral Storage 10 GiB · Data Storage 30 GiB. Additional tiers coming soon.
### Region
* Currently available: **IOWA IDC-1** (US-IA, US). Additional regions are being added.
* Pick the region closest to your users to minimize latency.
* Multi-region rollouts require a separate deploy per region.
### MaaS integration
* Toggle on to give your agent access to GMI's 200+ frontier models.
* GMI injects a MaaS API key into your container at startup, no key management on your end.
* Select every model your agent may call. Selection is editable later.
* Required for the Verified badge.
## Step 3: Networking
Expose the ports your agent listens on. GMI CE routes external traffic to these container ports.
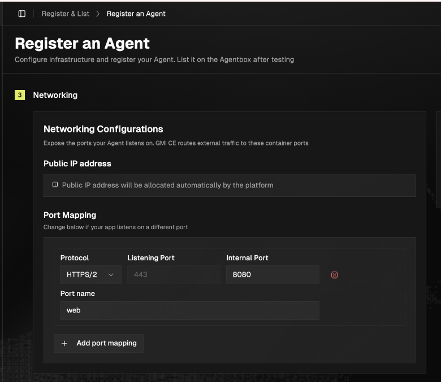 ### Public IP address
* A public IP address is allocated automatically by the platform. No manual setup required.
### Port Mapping
Change these if your app listens on a different port. Each mapping has:
* **Protocol** — for example HTTPS/2.
* **Listening Port** — the external port GMI exposes.
* **Internal Port** — the port your container listens on.
* **Port name** — a label for the mapping.
The default mapping is HTTPS/2, external port 443 → internal port 8080, named `web`. Use **Add port mapping** to expose additional ports, or the remove control to delete one.
## Step 4: Env Variables
Runtime configuration injected into your container at startup.
### Auto-Injected by GMI
GMI injects these MaaS connection variables automatically. They are locked and cannot be overridden:
* `GMI_MAAS_API_KEY` — the MaaS API key, injected at runtime.
* `GMI_MAAS_BASE_URL` — the OpenAI-compatible MaaS base URL.
### Custom Variables
Add your own variables. Each row has a **Type**:
| Type | Use for |
| -------- | ------------------------------------------------------------------------------------------------------------------------------- |
| `TEXT` | Non-sensitive config: feature flags, base URLs, log levels. Visible in the dashboard and editable anytime. |
| `SECRET` | API keys, third-party credentials, and any sensitive value. Write-once: values can be replaced but never read back from the UI. |
Secrets are encrypted at rest with AES-256. Plaintext values are never written to logs or audit history.
### Per-region overrides
* Override values per region for staged rollouts or region-specific endpoints.
* Only available when the agent is deployed to more than one region.
## Step 5: Review & Register
Confirm settings, register, and verify before submitting the listing.
### Review screen
* Every setting from the previous steps is summarized on one page.
* Click any section to jump back and edit.
### Register
* Once registered, GMI AgentBox pulls the image and builds the container on demand. Users can then call the endpoint to start or stop the instance — billing runs only for the duration the container is active.
* The endpoint provided is used for container CRUD.
Test the endpoint
### Public IP address
* A public IP address is allocated automatically by the platform. No manual setup required.
### Port Mapping
Change these if your app listens on a different port. Each mapping has:
* **Protocol** — for example HTTPS/2.
* **Listening Port** — the external port GMI exposes.
* **Internal Port** — the port your container listens on.
* **Port name** — a label for the mapping.
The default mapping is HTTPS/2, external port 443 → internal port 8080, named `web`. Use **Add port mapping** to expose additional ports, or the remove control to delete one.
## Step 4: Env Variables
Runtime configuration injected into your container at startup.
### Auto-Injected by GMI
GMI injects these MaaS connection variables automatically. They are locked and cannot be overridden:
* `GMI_MAAS_API_KEY` — the MaaS API key, injected at runtime.
* `GMI_MAAS_BASE_URL` — the OpenAI-compatible MaaS base URL.
### Custom Variables
Add your own variables. Each row has a **Type**:
| Type | Use for |
| -------- | ------------------------------------------------------------------------------------------------------------------------------- |
| `TEXT` | Non-sensitive config: feature flags, base URLs, log levels. Visible in the dashboard and editable anytime. |
| `SECRET` | API keys, third-party credentials, and any sensitive value. Write-once: values can be replaced but never read back from the UI. |
Secrets are encrypted at rest with AES-256. Plaintext values are never written to logs or audit history.
### Per-region overrides
* Override values per region for staged rollouts or region-specific endpoints.
* Only available when the agent is deployed to more than one region.
## Step 5: Review & Register
Confirm settings, register, and verify before submitting the listing.
### Review screen
* Every setting from the previous steps is summarized on one page.
* Click any section to jump back and edit.
### Register
* Once registered, GMI AgentBox pulls the image and builds the container on demand. Users can then call the endpoint to start or stop the instance — billing runs only for the duration the container is active.
* The endpoint provided is used for container CRUD.
Test the endpoint
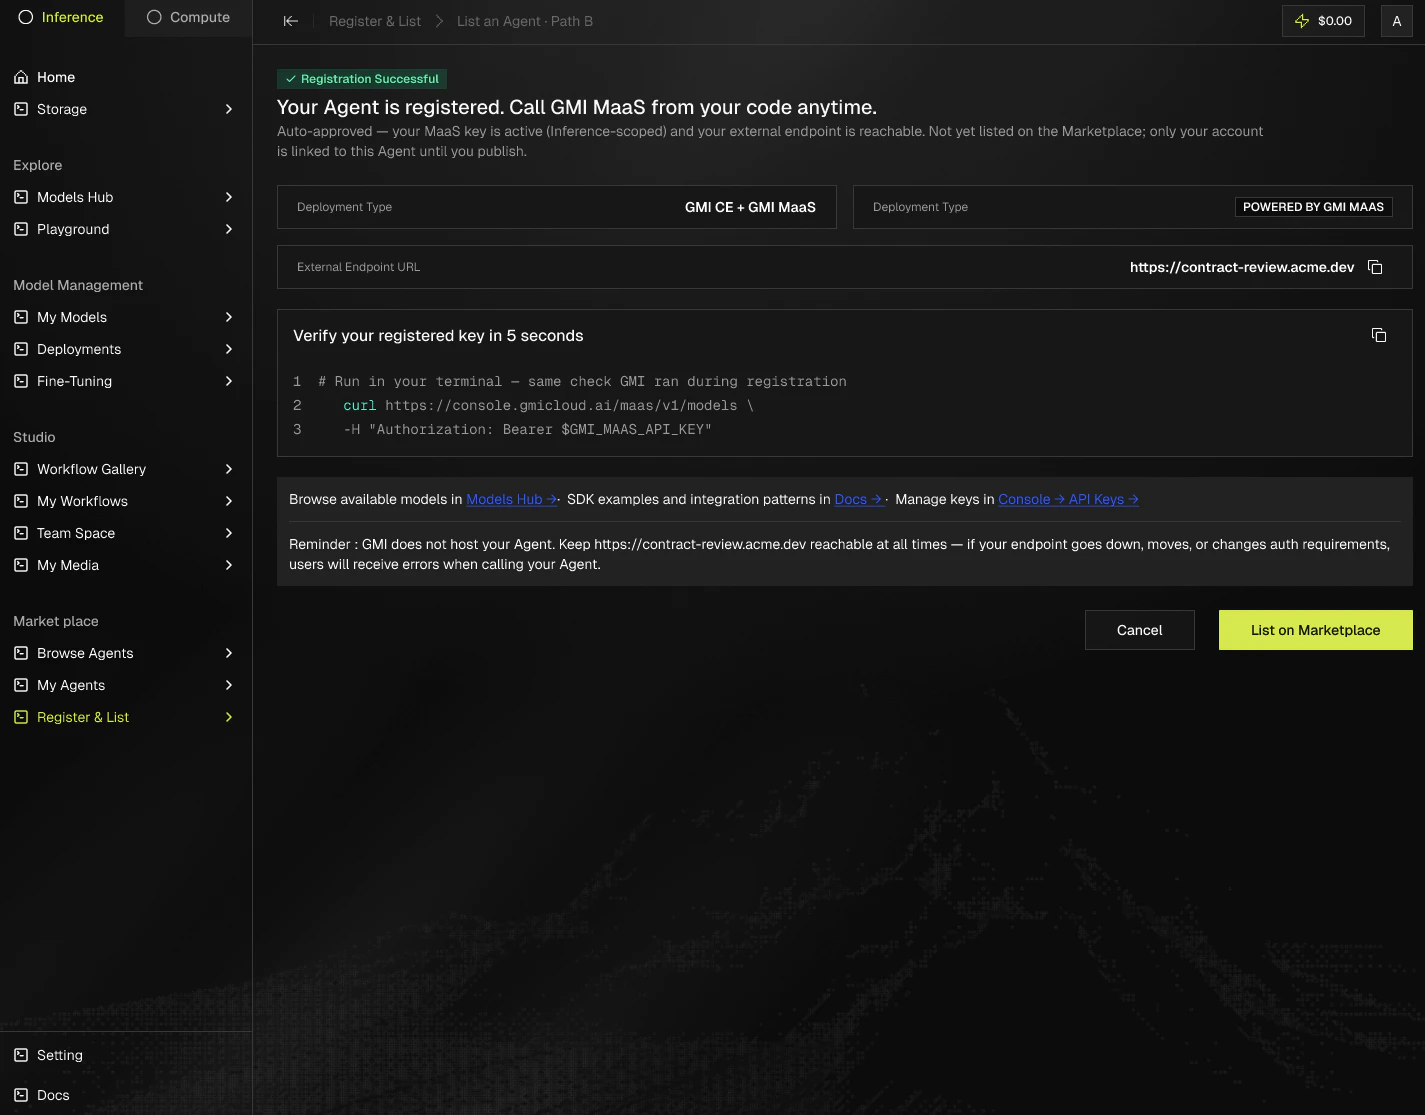 * Hit the URL with a sample request. Confirm latency, output, and error handling.
* Iterate by re-registering. URLs stay stable across updates.
Next
* When the endpoint is ready, continue to[ List an agent](/agentbox-marketplace/list-an-agent) to submit it for review.
* Hit the URL with a sample request. Confirm latency, output, and error handling.
* Iterate by re-registering. URLs stay stable across updates.
Next
* When the endpoint is ready, continue to[ List an agent](/agentbox-marketplace/list-an-agent) to submit it for review.