> ## Documentation Index
> Fetch the complete documentation index at: https://docs.gmicloud.ai/llms.txt
> Use this file to discover all available pages before exploring further.
# Container Resources
> Launch, manage, and connect to container workloads on GMI Cloud.
URL: `https://console.gmicloud.ai/user-console/ce/containers`
Container workload management. Gated by product entitlement.
 ## Gated state
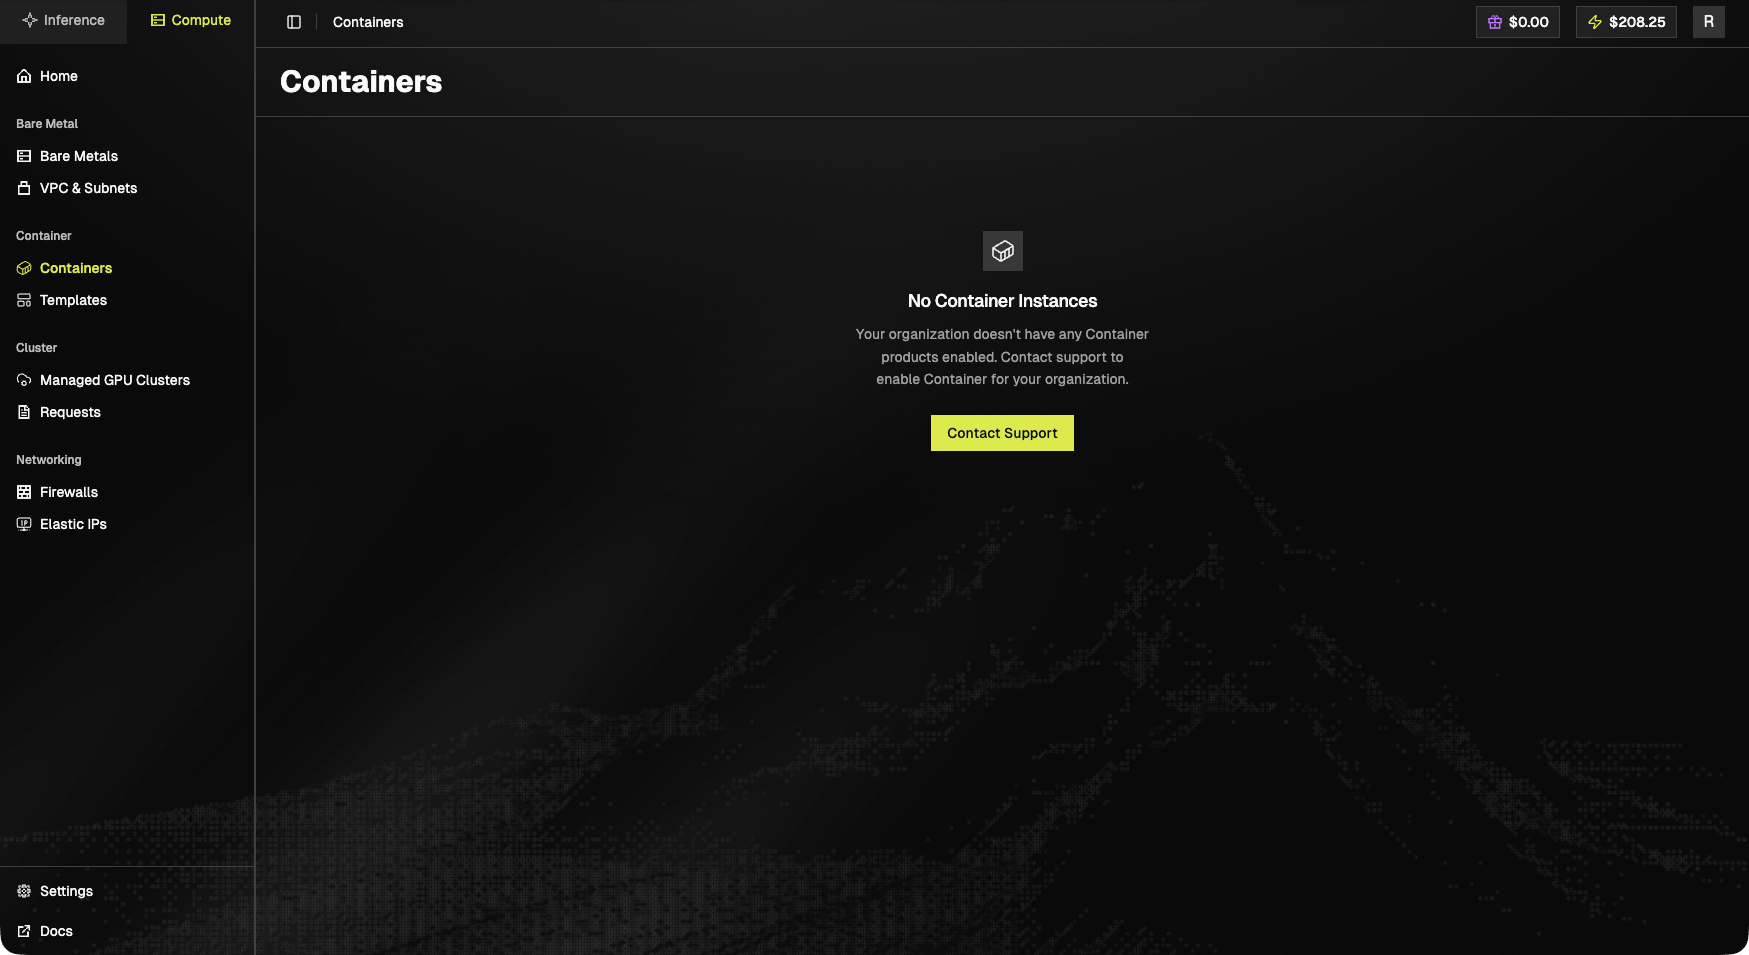
If your organization hasn't been enabled for Container products yet:
> **No Container Instances.** Your organization doesn't have any Container products enabled. Contact support to enable Container for your organization.
A **Contact Support** button is shown.
## Enabled state
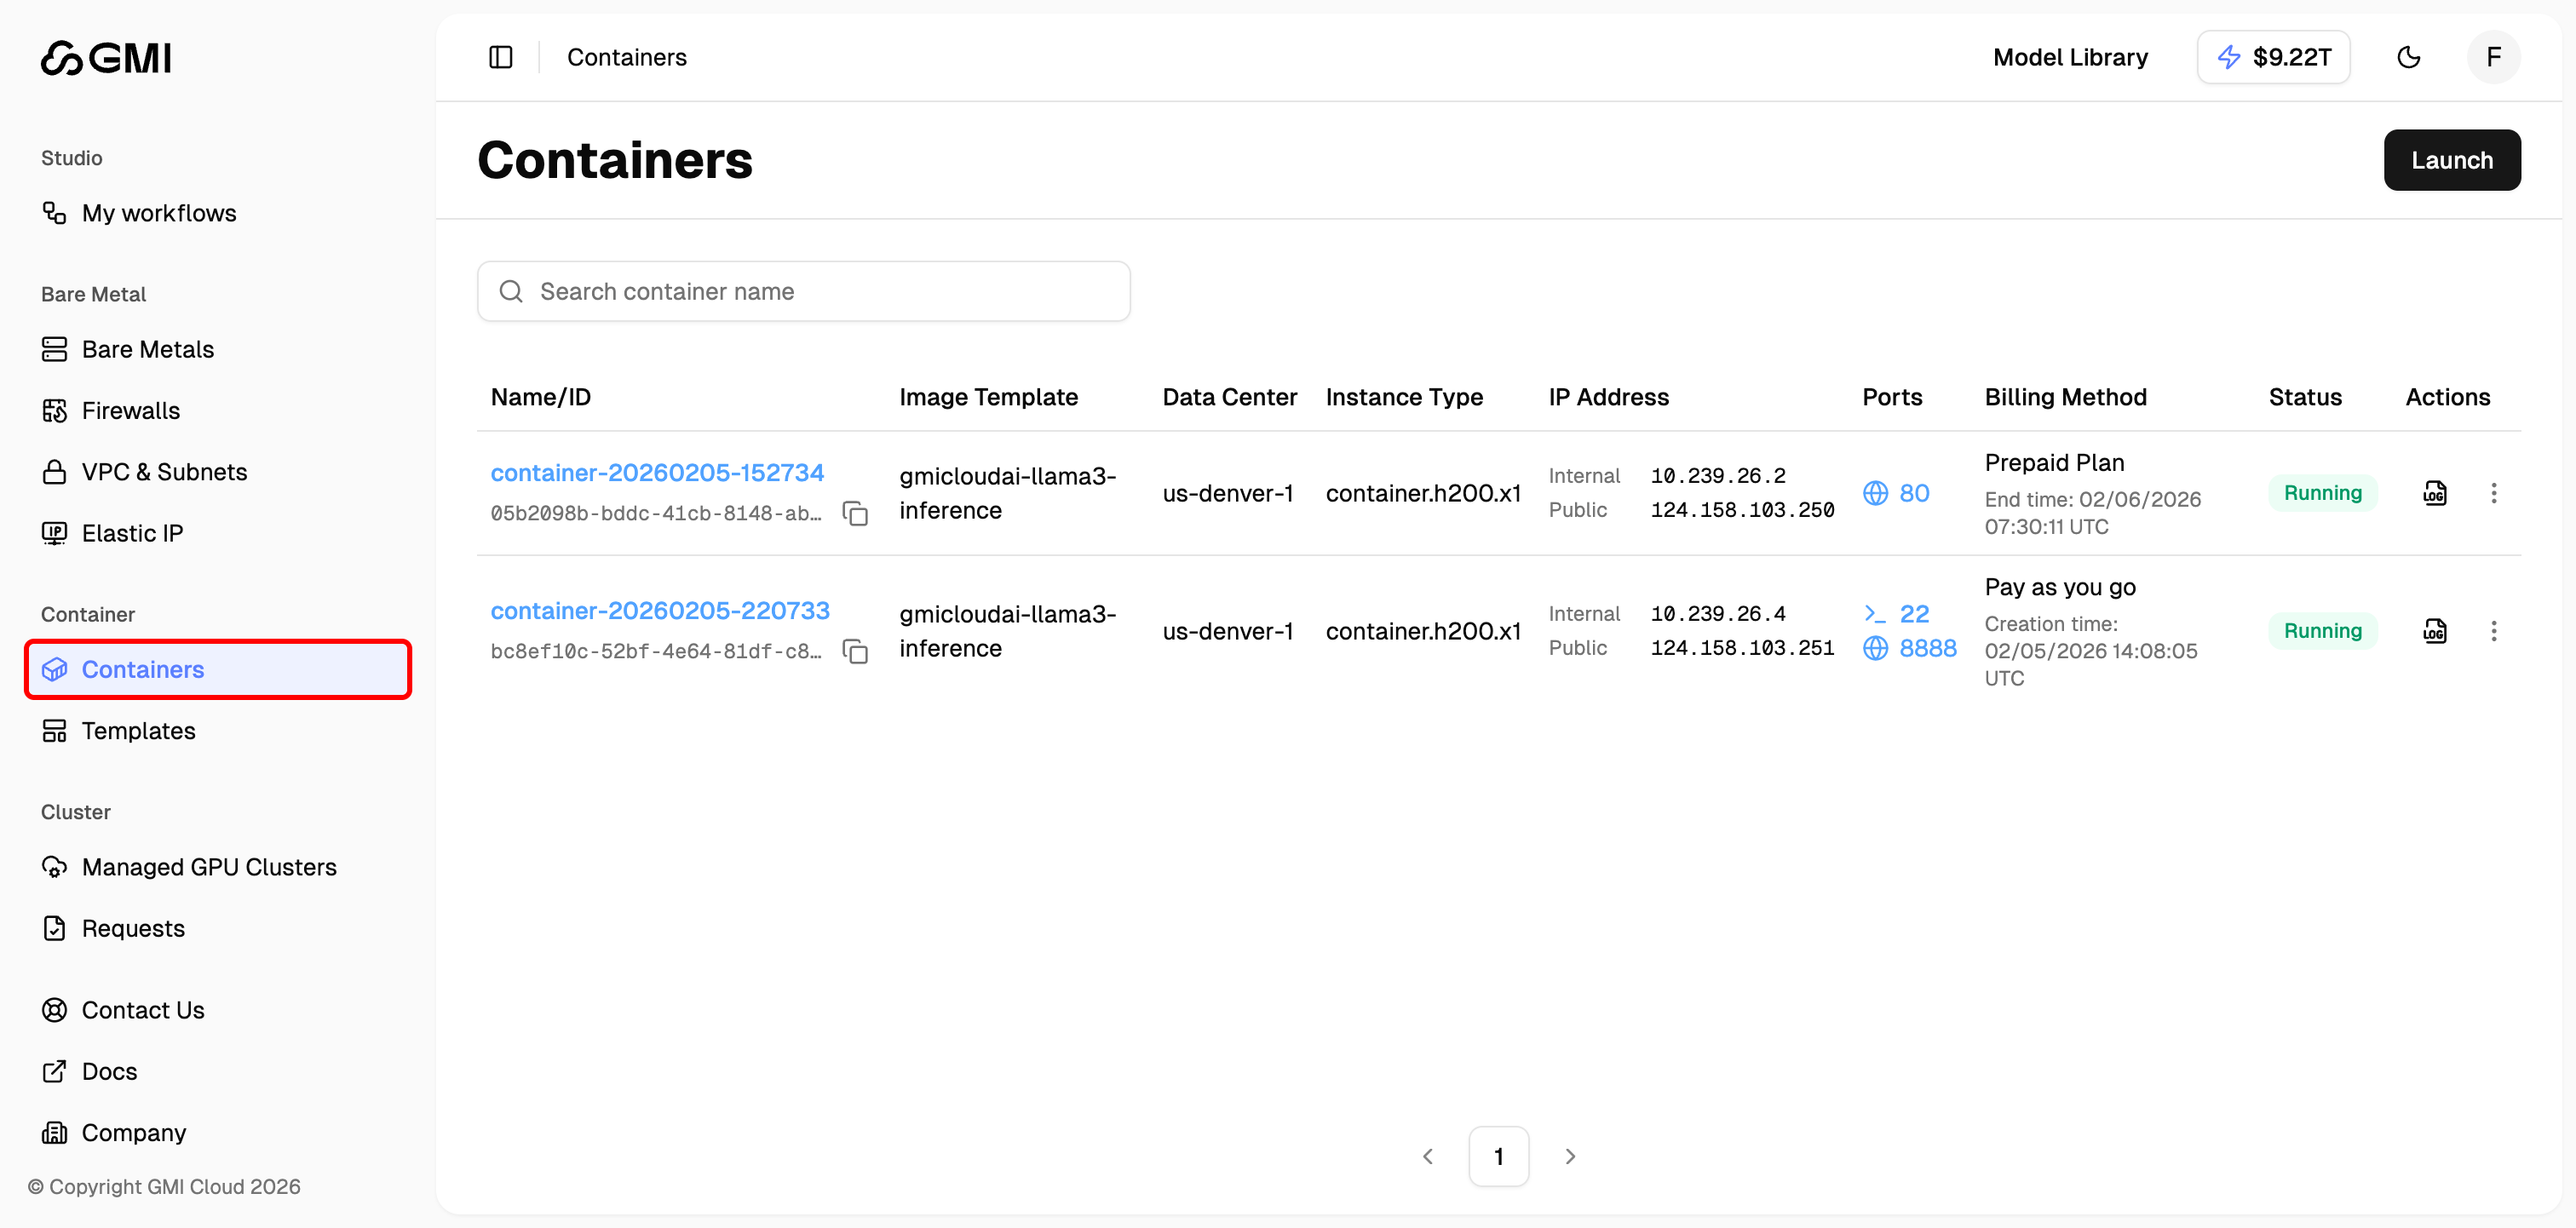
When populated, the page lists each container instance with **name**, **status**, **image**, **template**, **attached firewall**, and per-instance actions.
## Open the Containers list
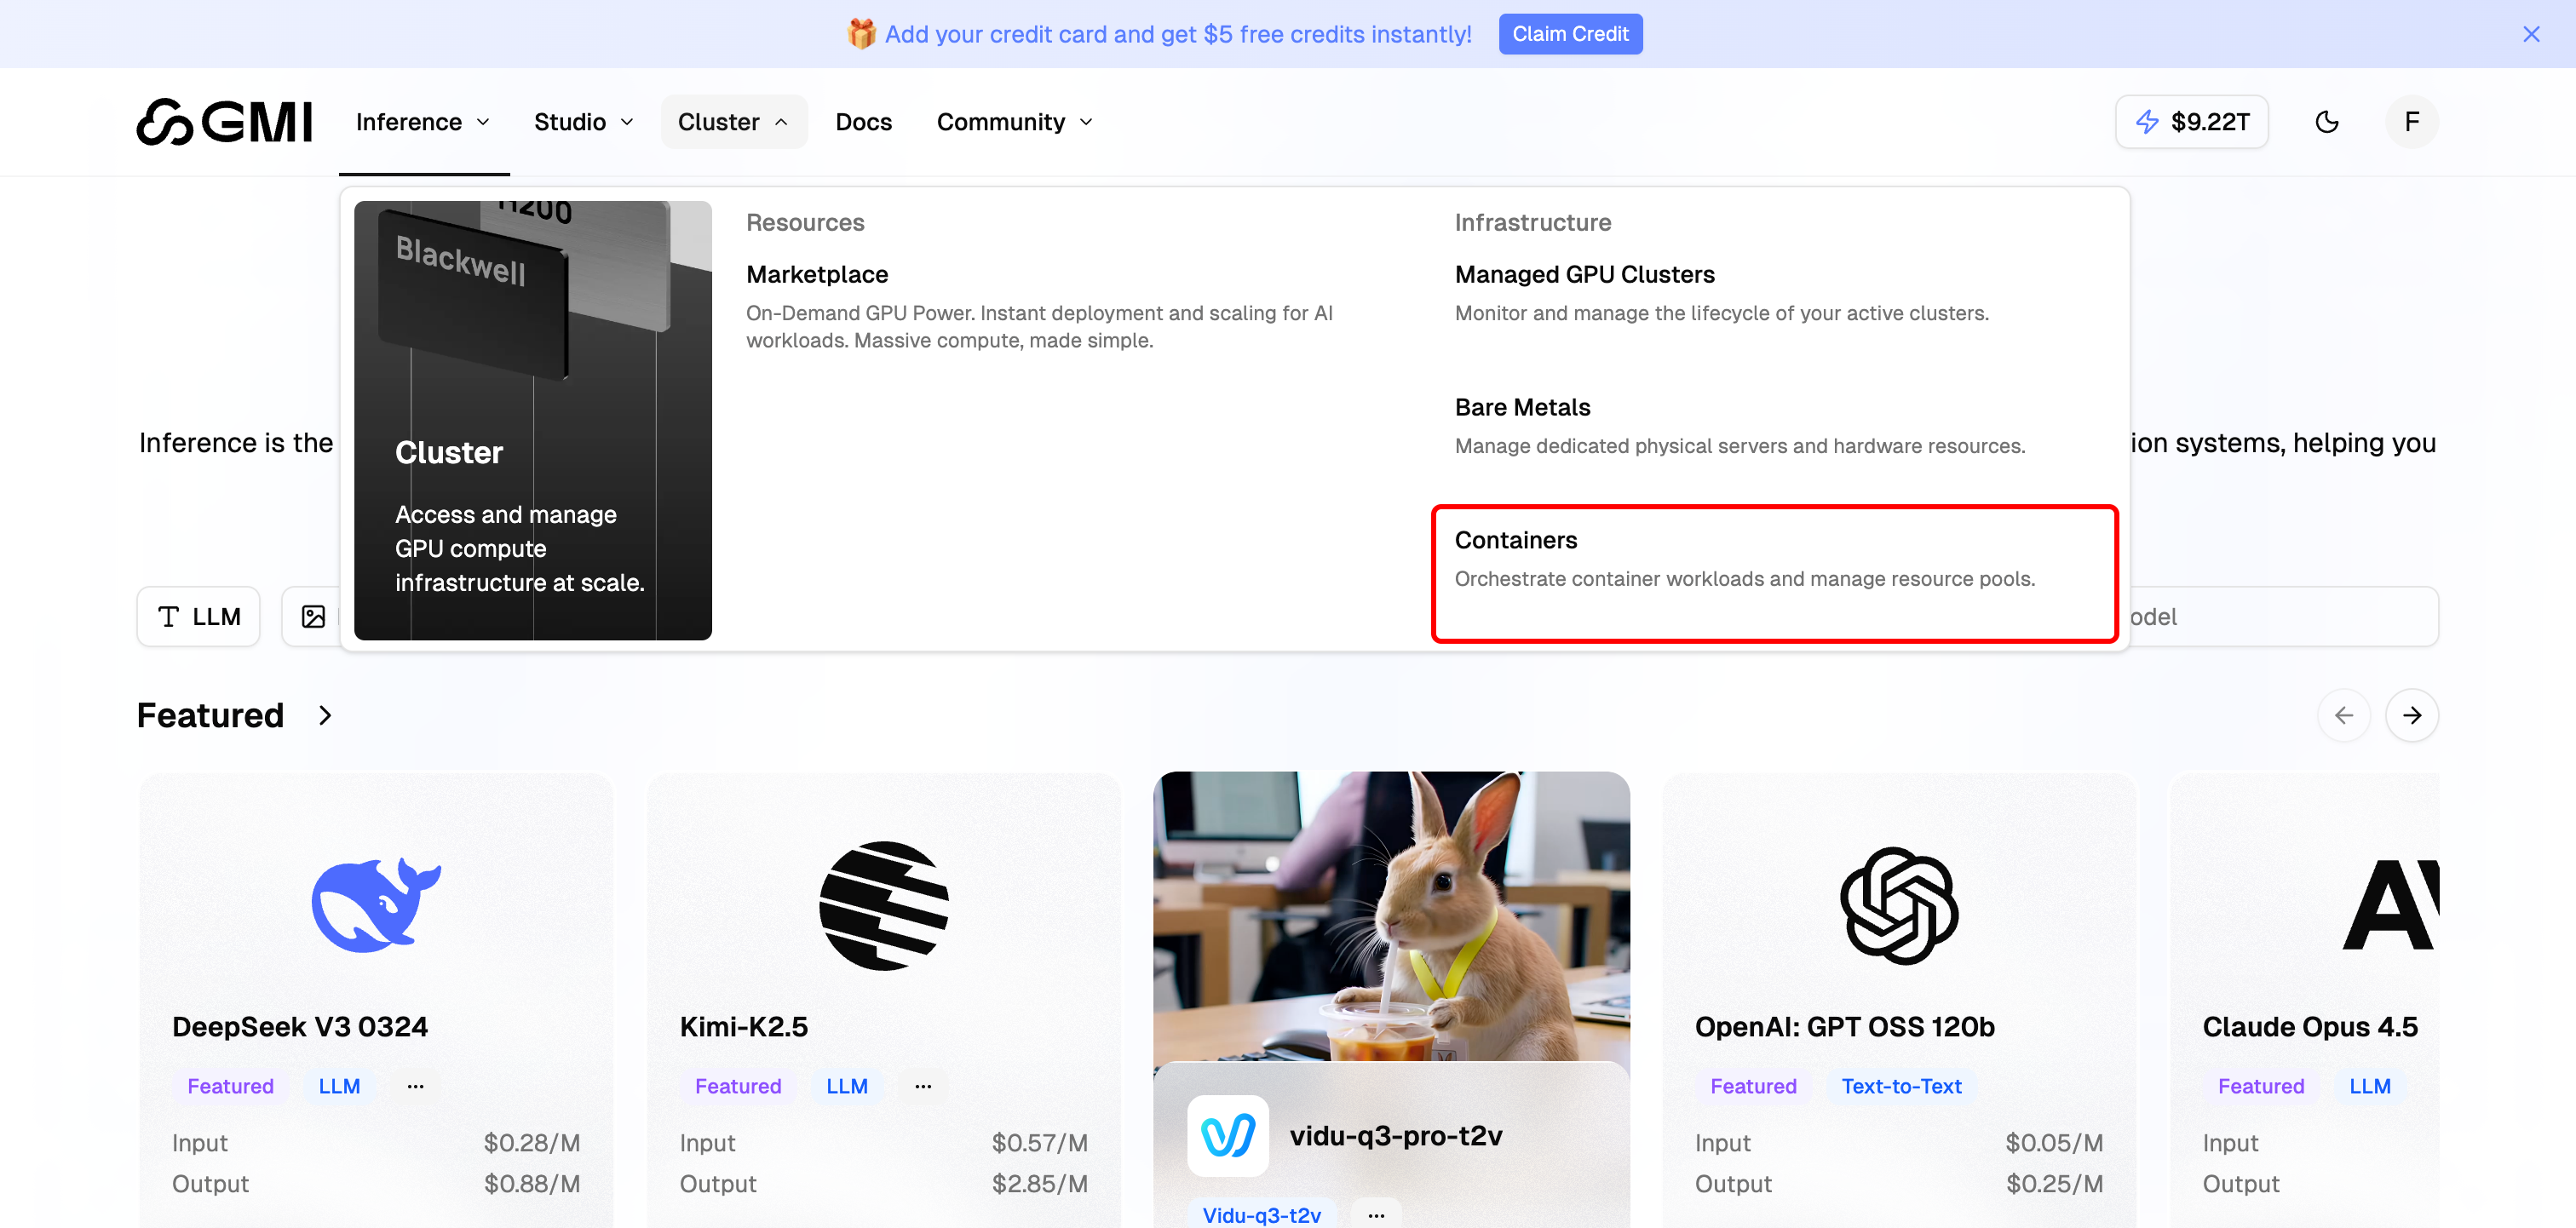
To open the Containers list, click "**Cluster**" in the top navigation bar and select "**Containers**".
## Gated state
If your organization hasn't been enabled for Container products yet:
> **No Container Instances.** Your organization doesn't have any Container products enabled. Contact support to enable Container for your organization.
A **Contact Support** button is shown.
## Enabled state
When populated, the page lists each container instance with **name**, **status**, **image**, **template**, **attached firewall**, and per-instance actions.
## Open the Containers list
To open the Containers list, click "**Cluster**" in the top navigation bar and select "**Containers**".
 The Containers page shows all your launched containers:
 ## Access Containers
There are three ways to interact with a running container: SSH (from your own terminal), Jupyter Notebook (web-based), or the built-in web shell (no local tools required).
**SSH (port 22)** and **Jupyter Notebook (port 8888)** are only available on containers launched from an **official template** that pre-configures these ports. Custom templates don't expose them by default, use the **web shell** instead, or set up your own port mapping.
### Connect via SSH
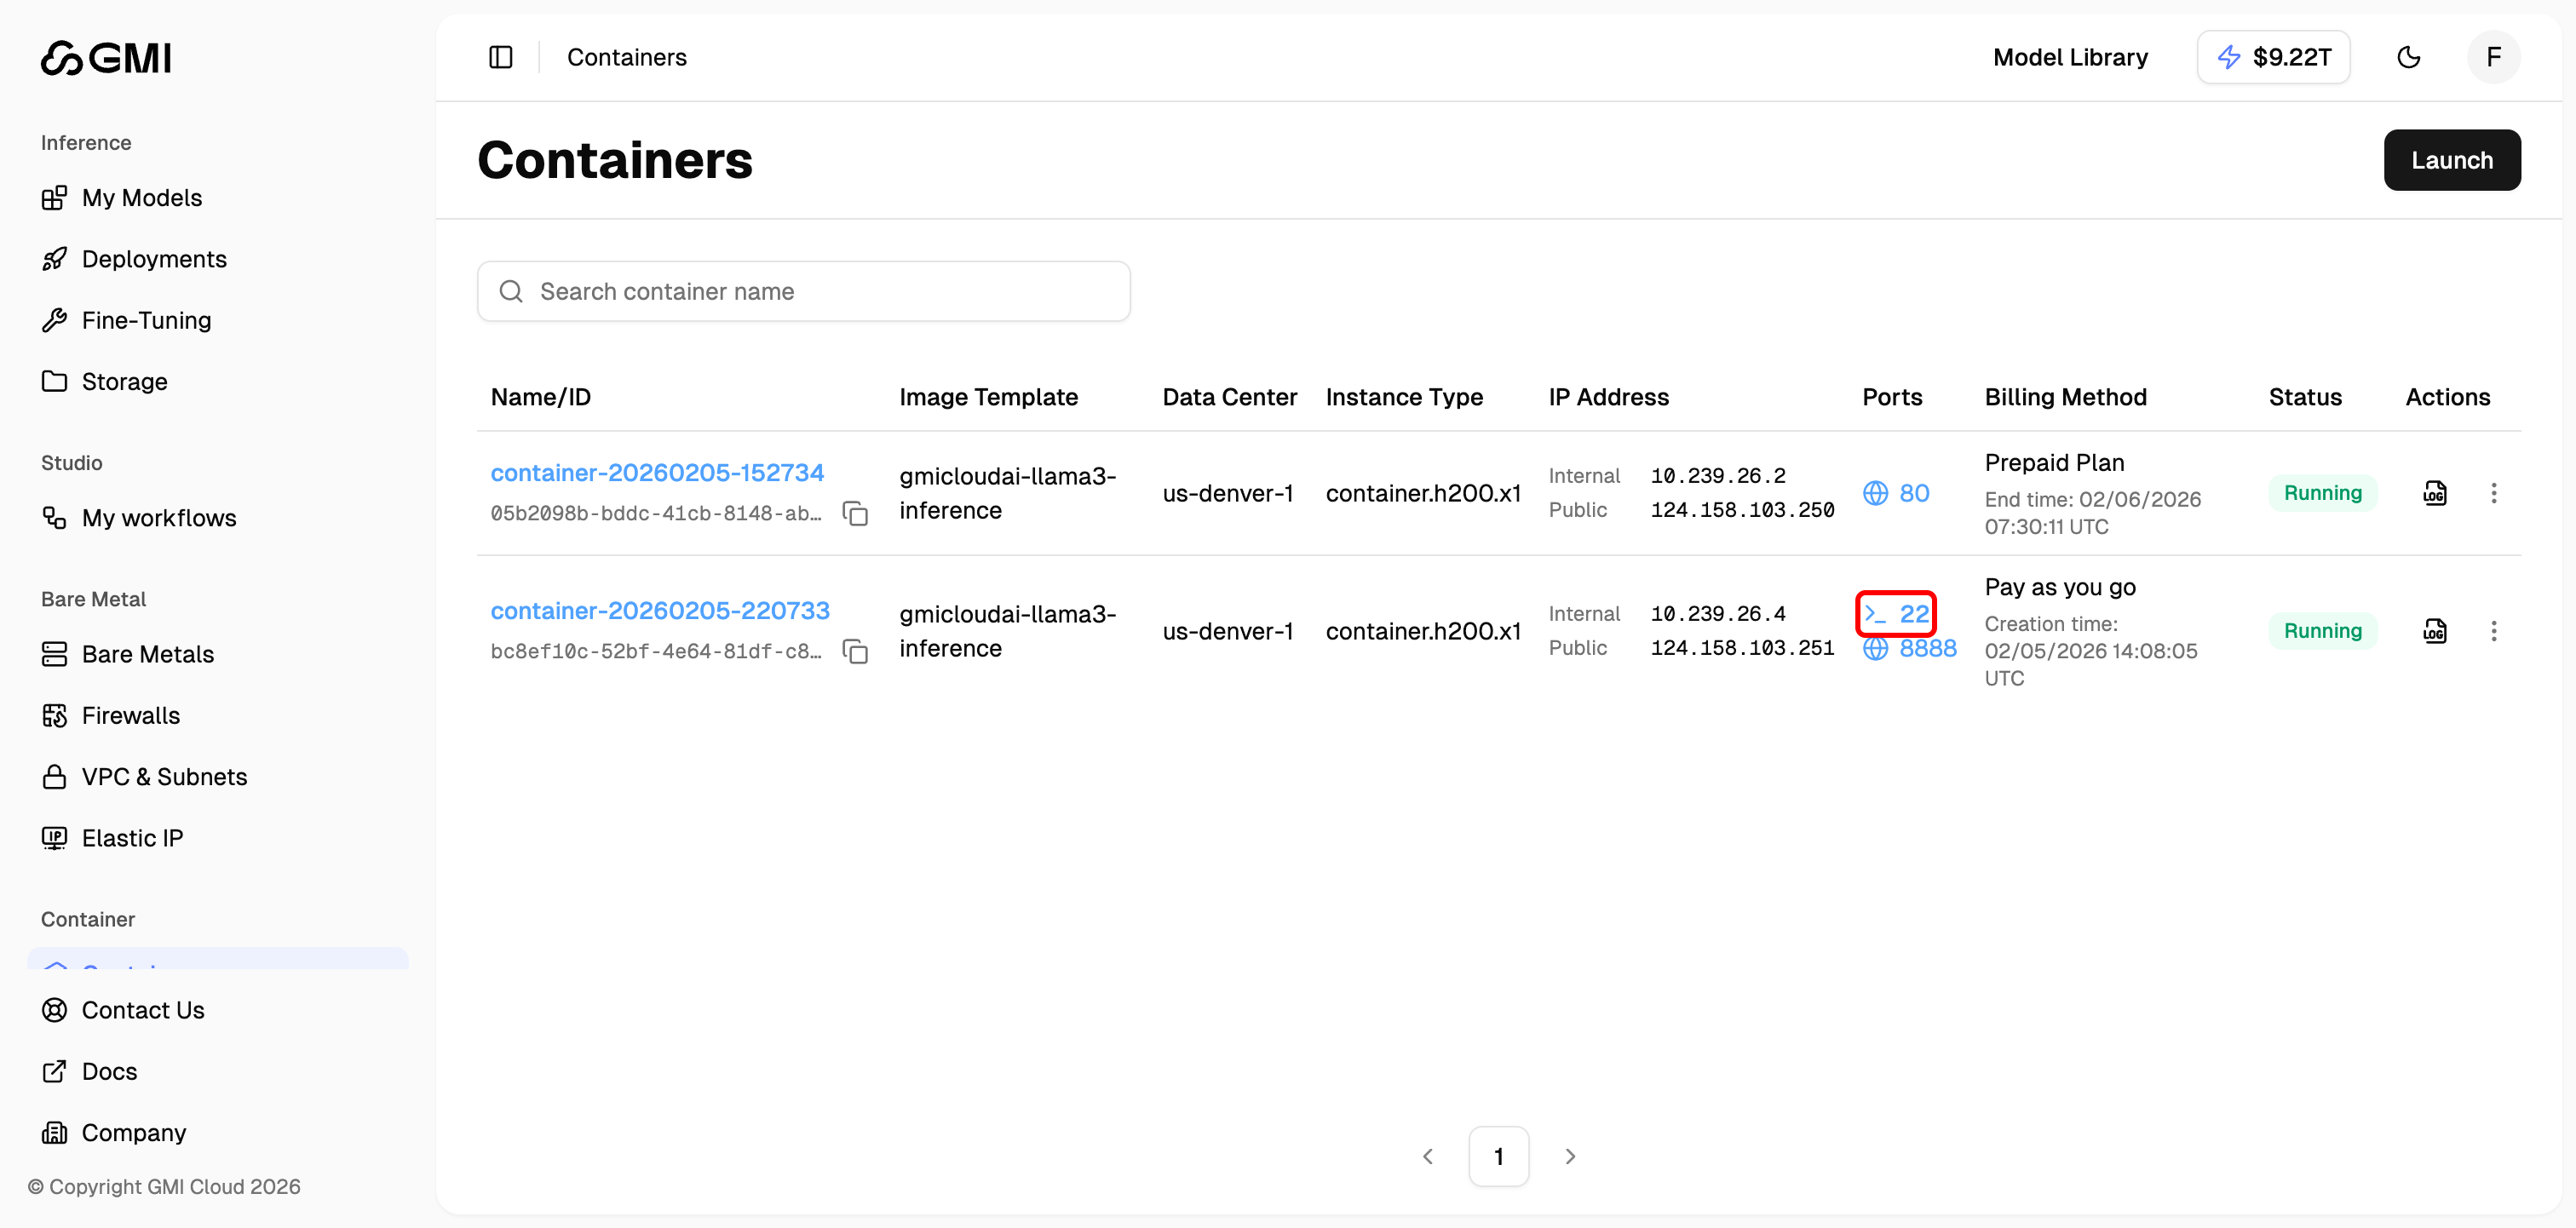
1. Locate a container and click the port "**22**" icon in the "**Ports**" field
## Access Containers
There are three ways to interact with a running container: SSH (from your own terminal), Jupyter Notebook (web-based), or the built-in web shell (no local tools required).
**SSH (port 22)** and **Jupyter Notebook (port 8888)** are only available on containers launched from an **official template** that pre-configures these ports. Custom templates don't expose them by default, use the **web shell** instead, or set up your own port mapping.
### Connect via SSH
1. Locate a container and click the port "**22**" icon in the "**Ports**" field
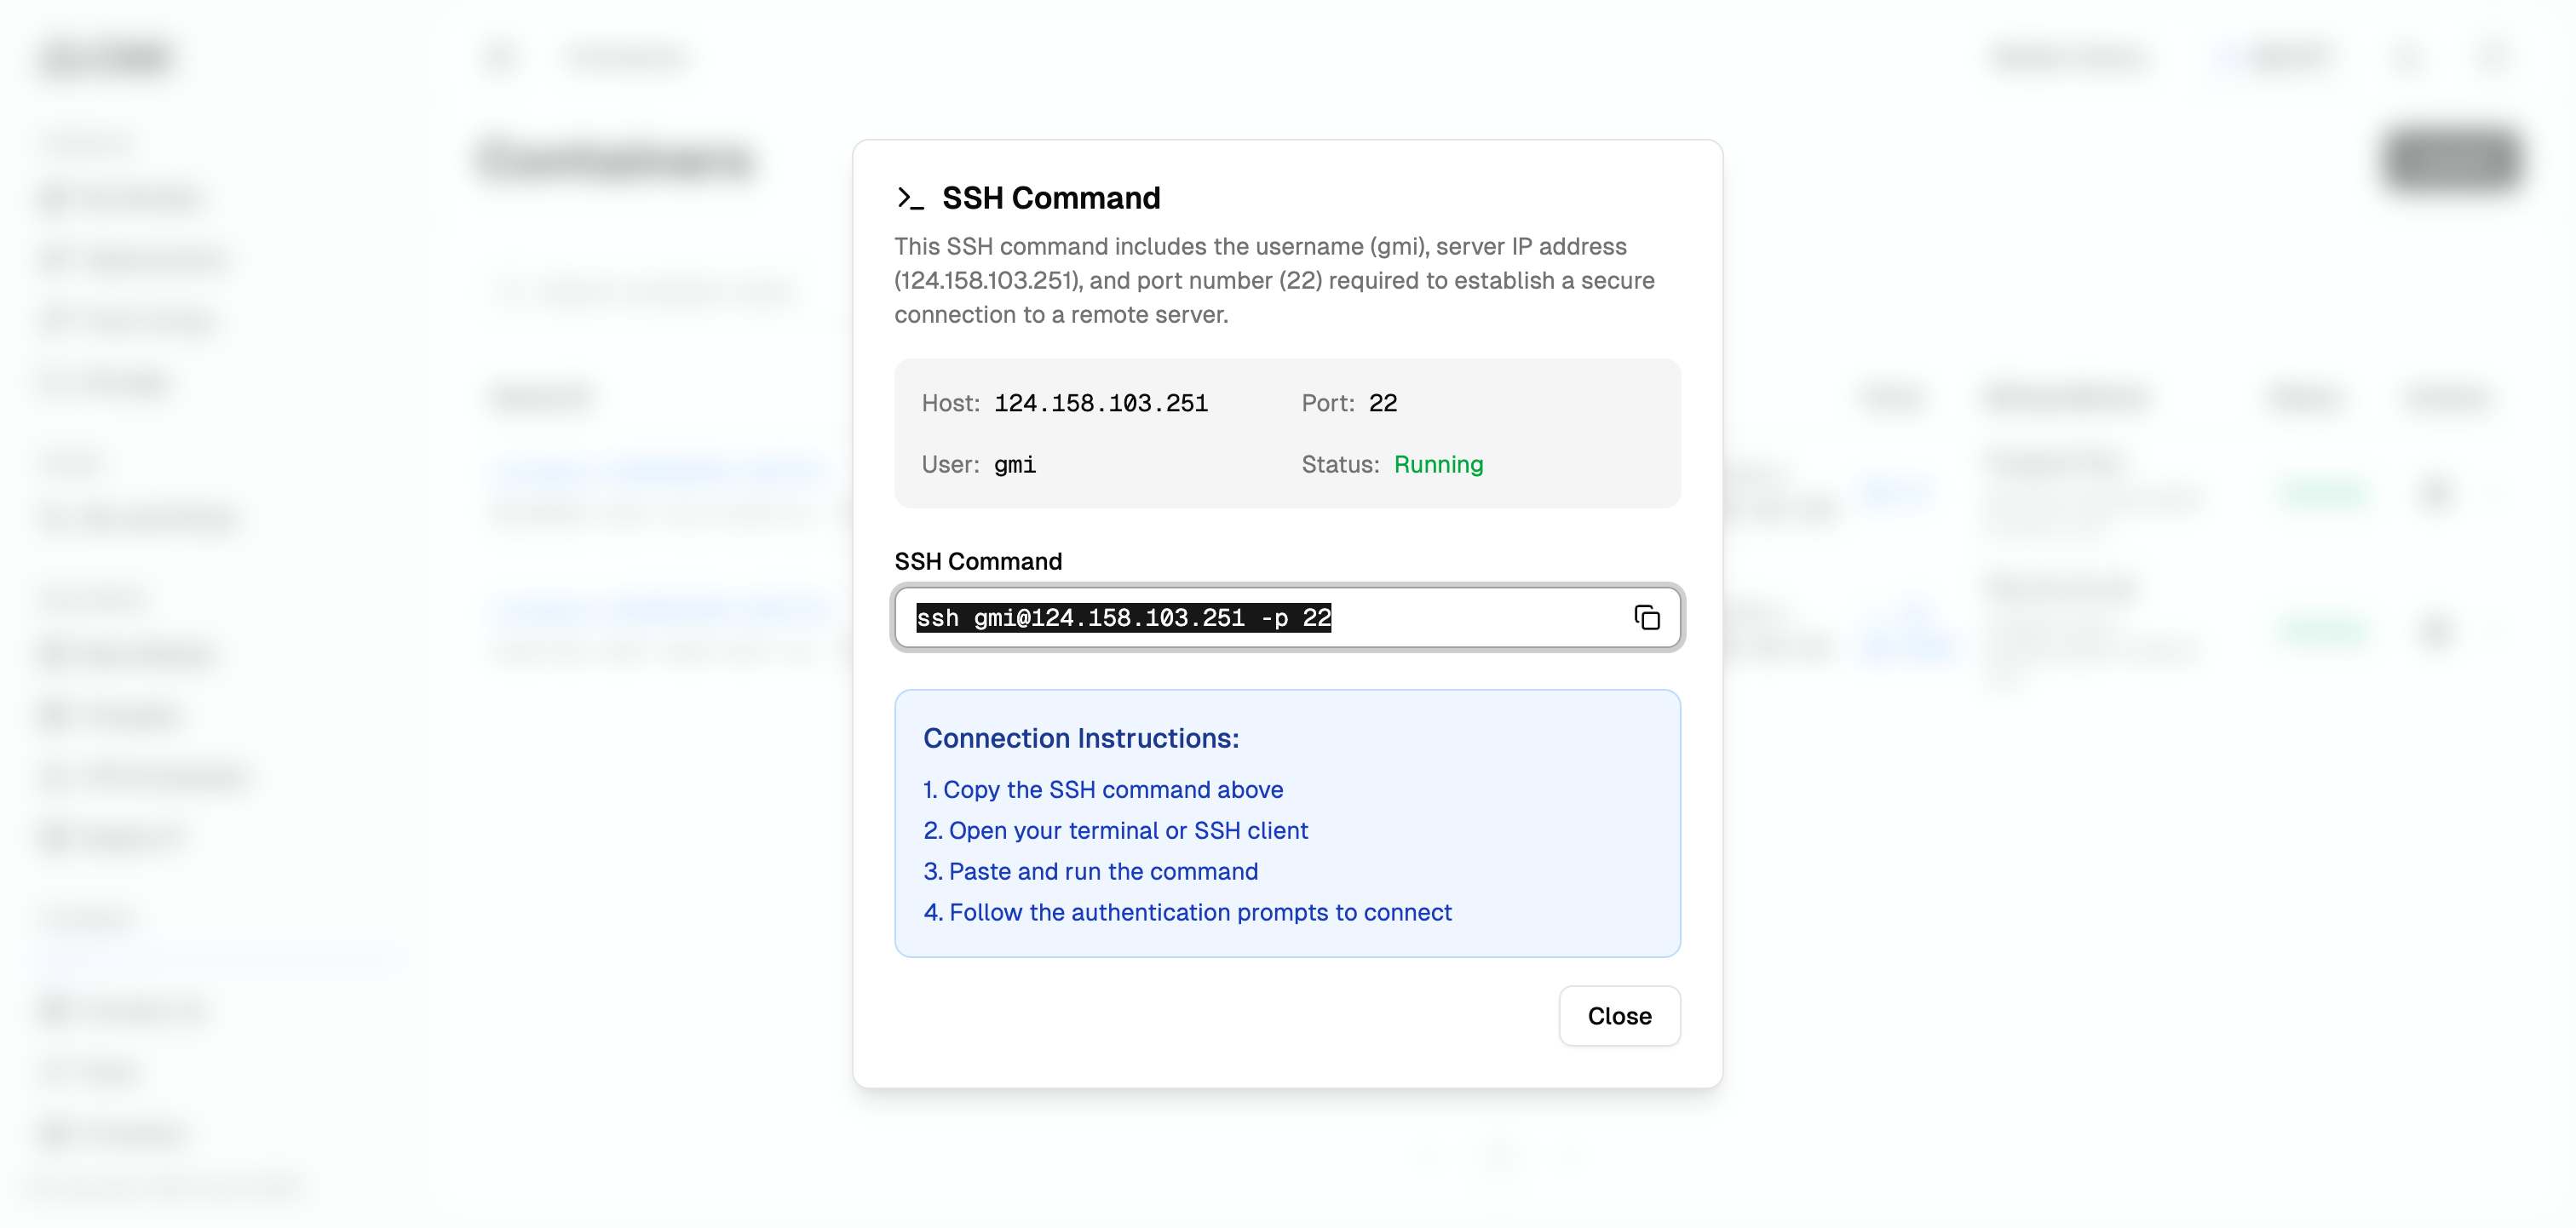
 2. In the pop-up window, copy the SSH command and paste it into your terminal
 ### Connect via Jupyter Notebook
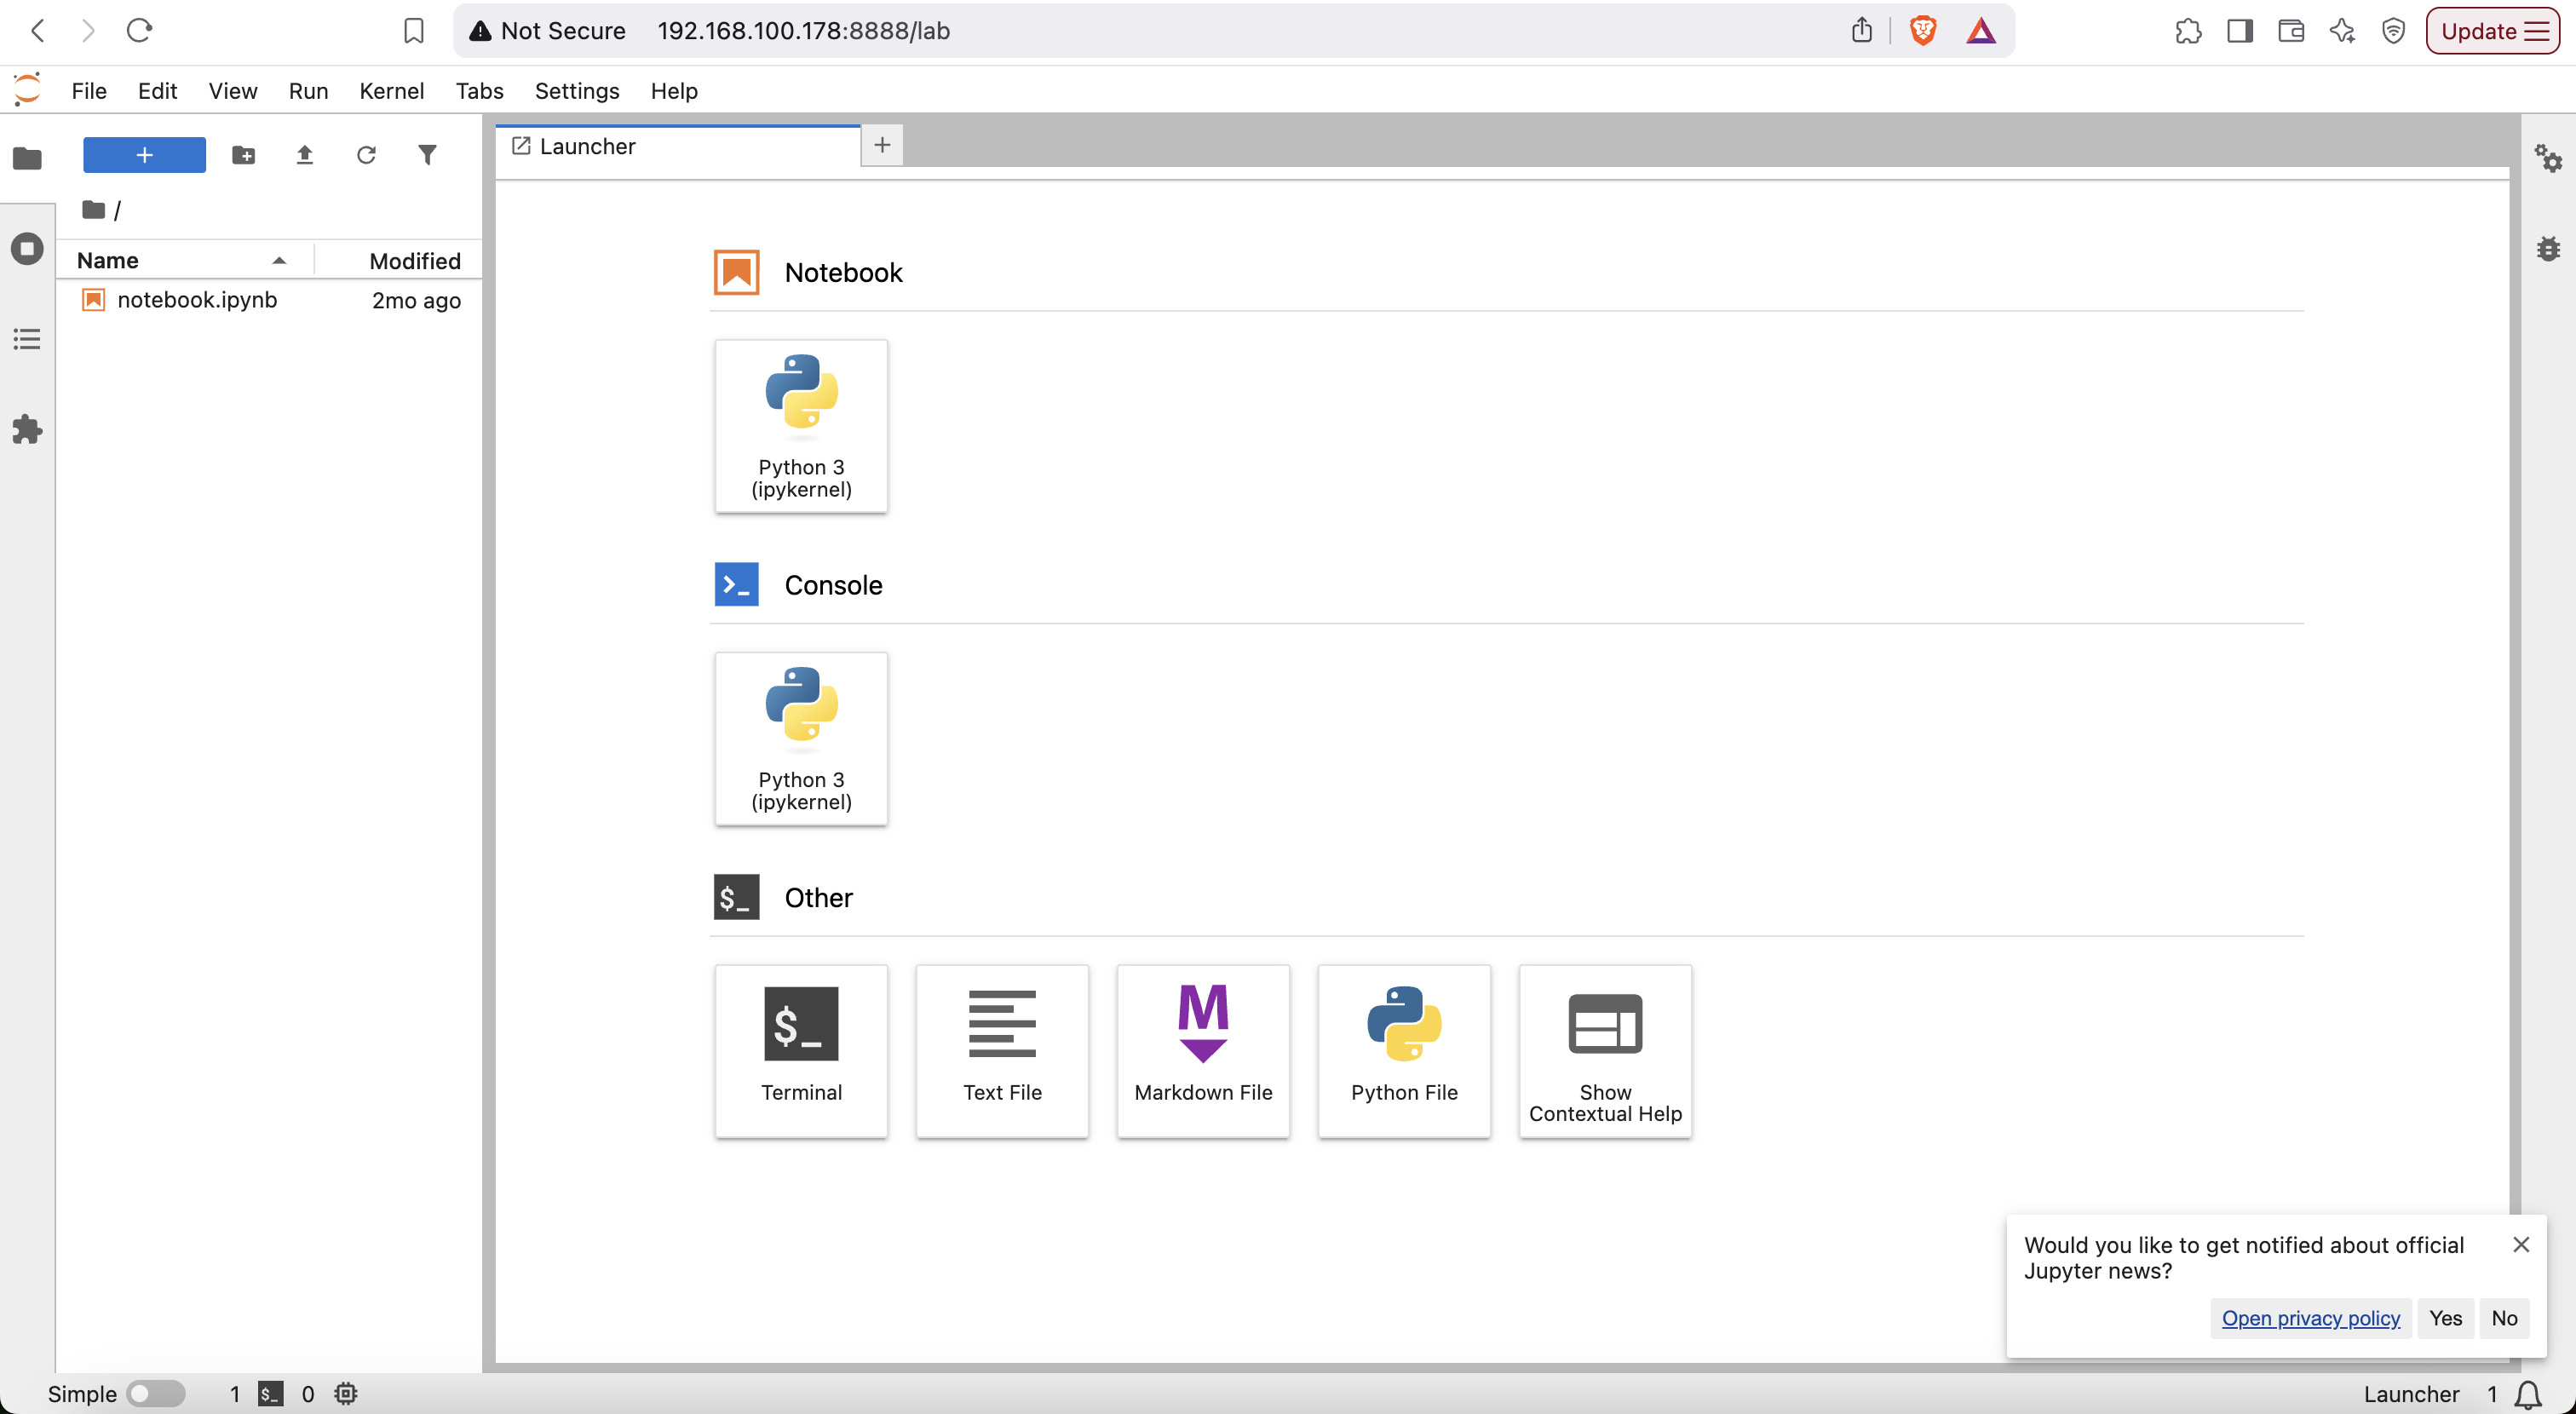
1. Locate a container and click the port "**8888**" icon in the "**Ports**" field
2. A Jupyter Notebook web page will open in another browser tab
### Connect via Jupyter Notebook
1. Locate a container and click the port "**8888**" icon in the "**Ports**" field
2. A Jupyter Notebook web page will open in another browser tab
 ### Open a Web Shell
Access a web-based terminal directly in your browser, no SSH client required.
1. Locate the container you want to access
2. Click the "**More actions**" button (three dots icon)
3. Select "**Open Shell**" from the dropdown menu
### Open a Web Shell
Access a web-based terminal directly in your browser, no SSH client required.
1. Locate the container you want to access
2. Click the "**More actions**" button (three dots icon)
3. Select "**Open Shell**" from the dropdown menu
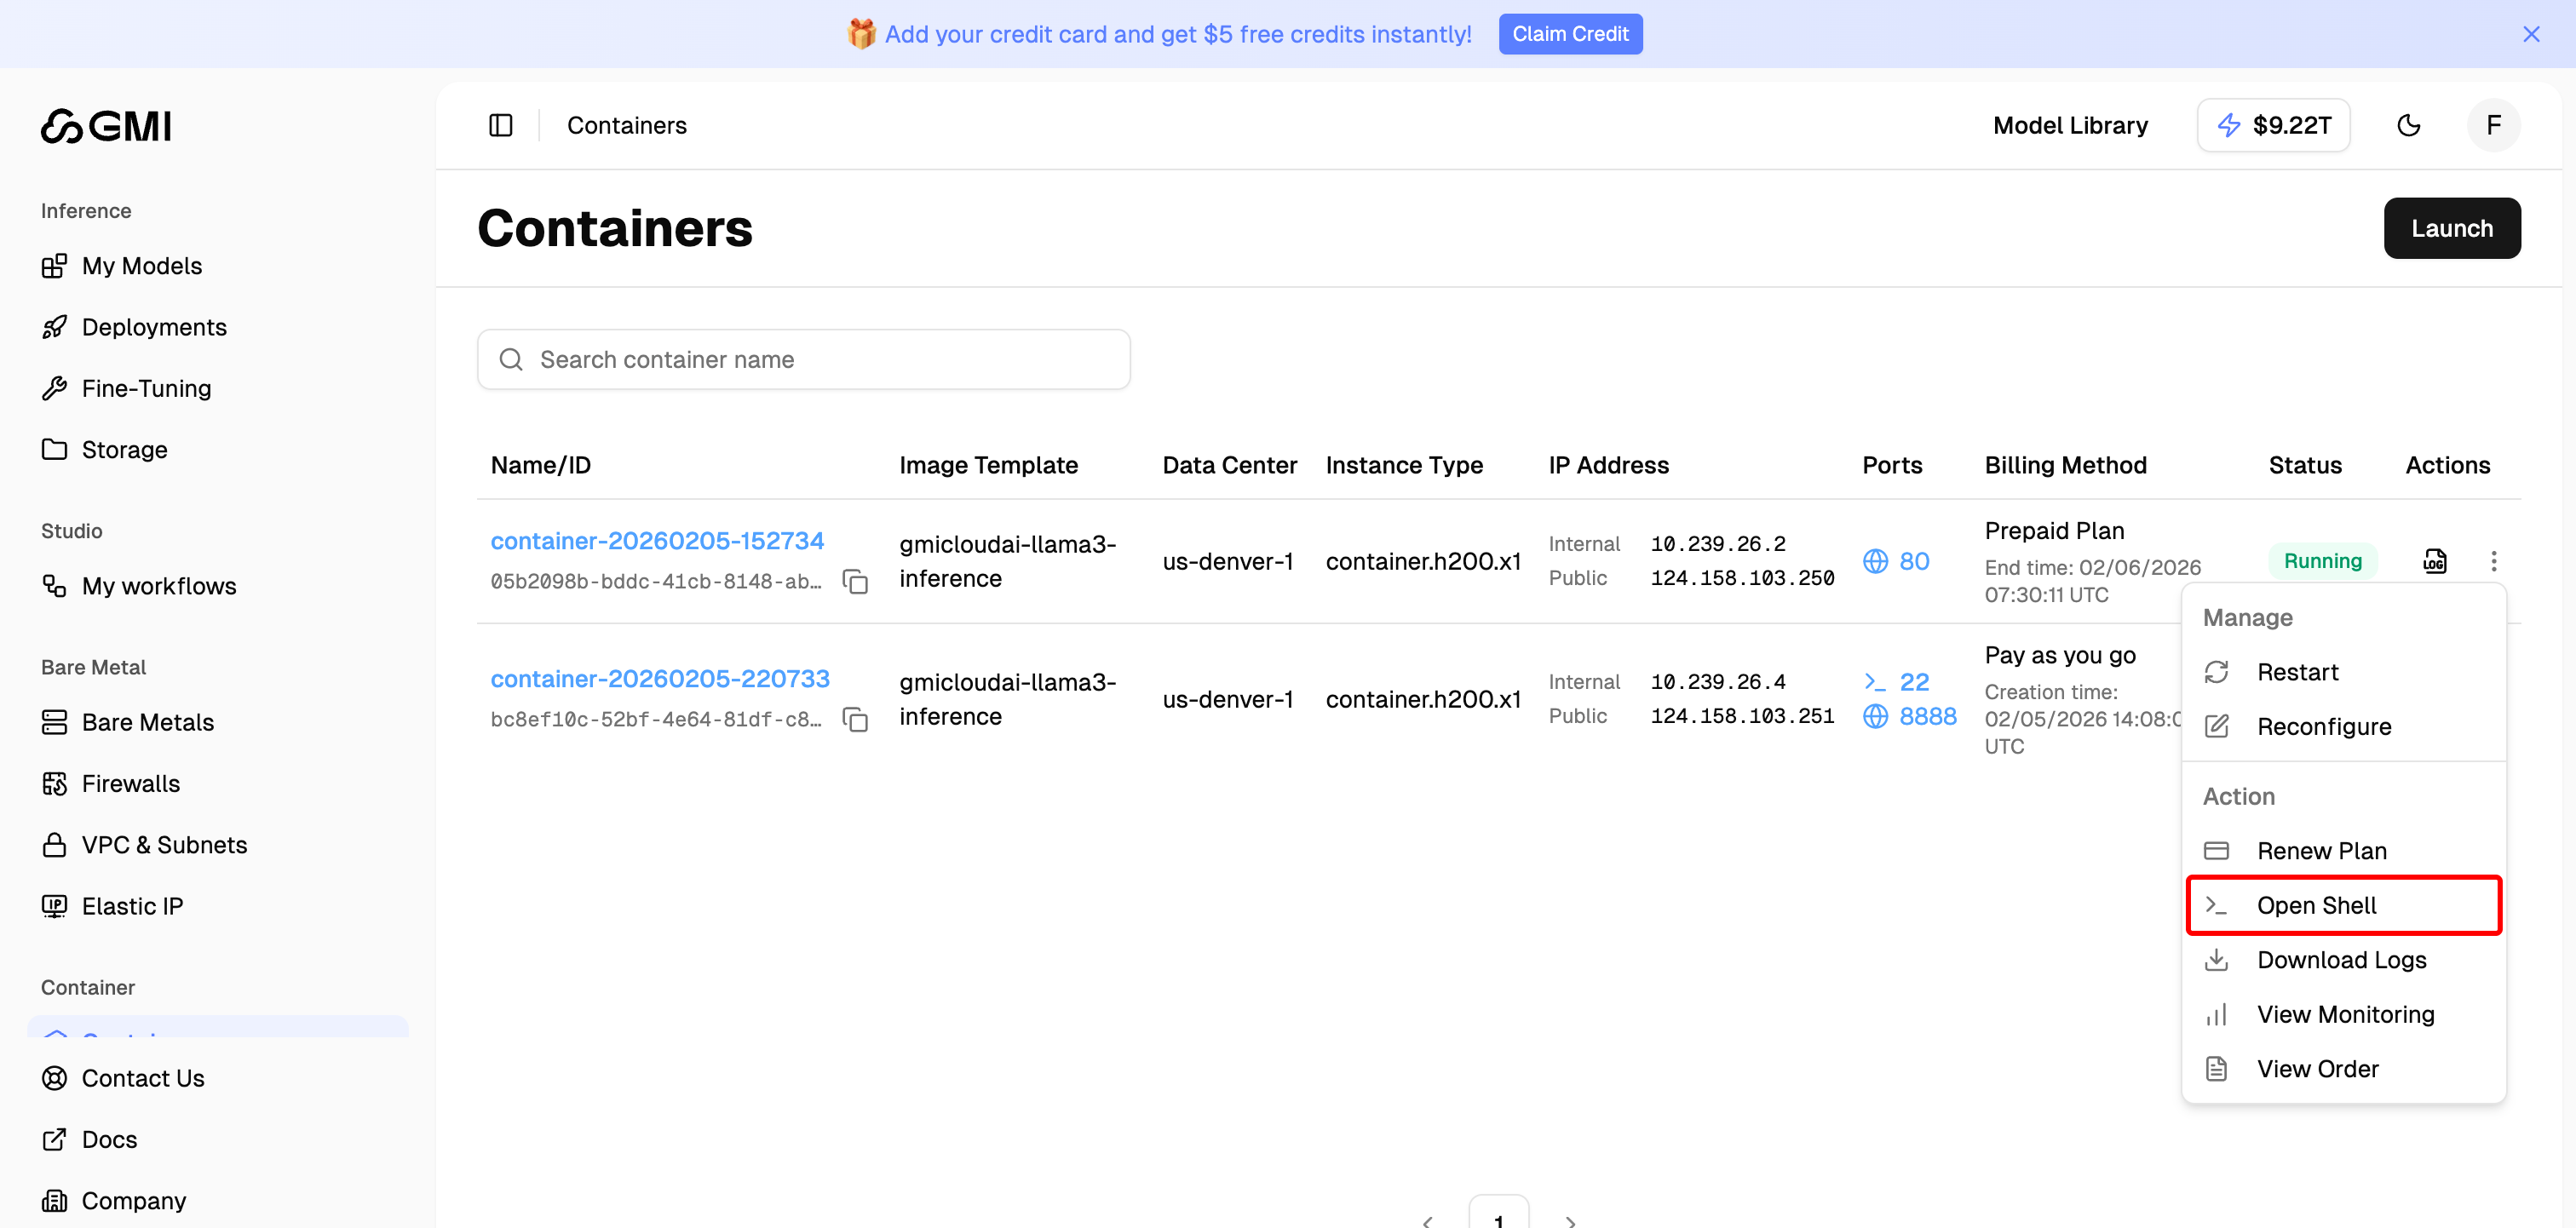 4. A new browser tab will open with a web-based terminal connected to your container
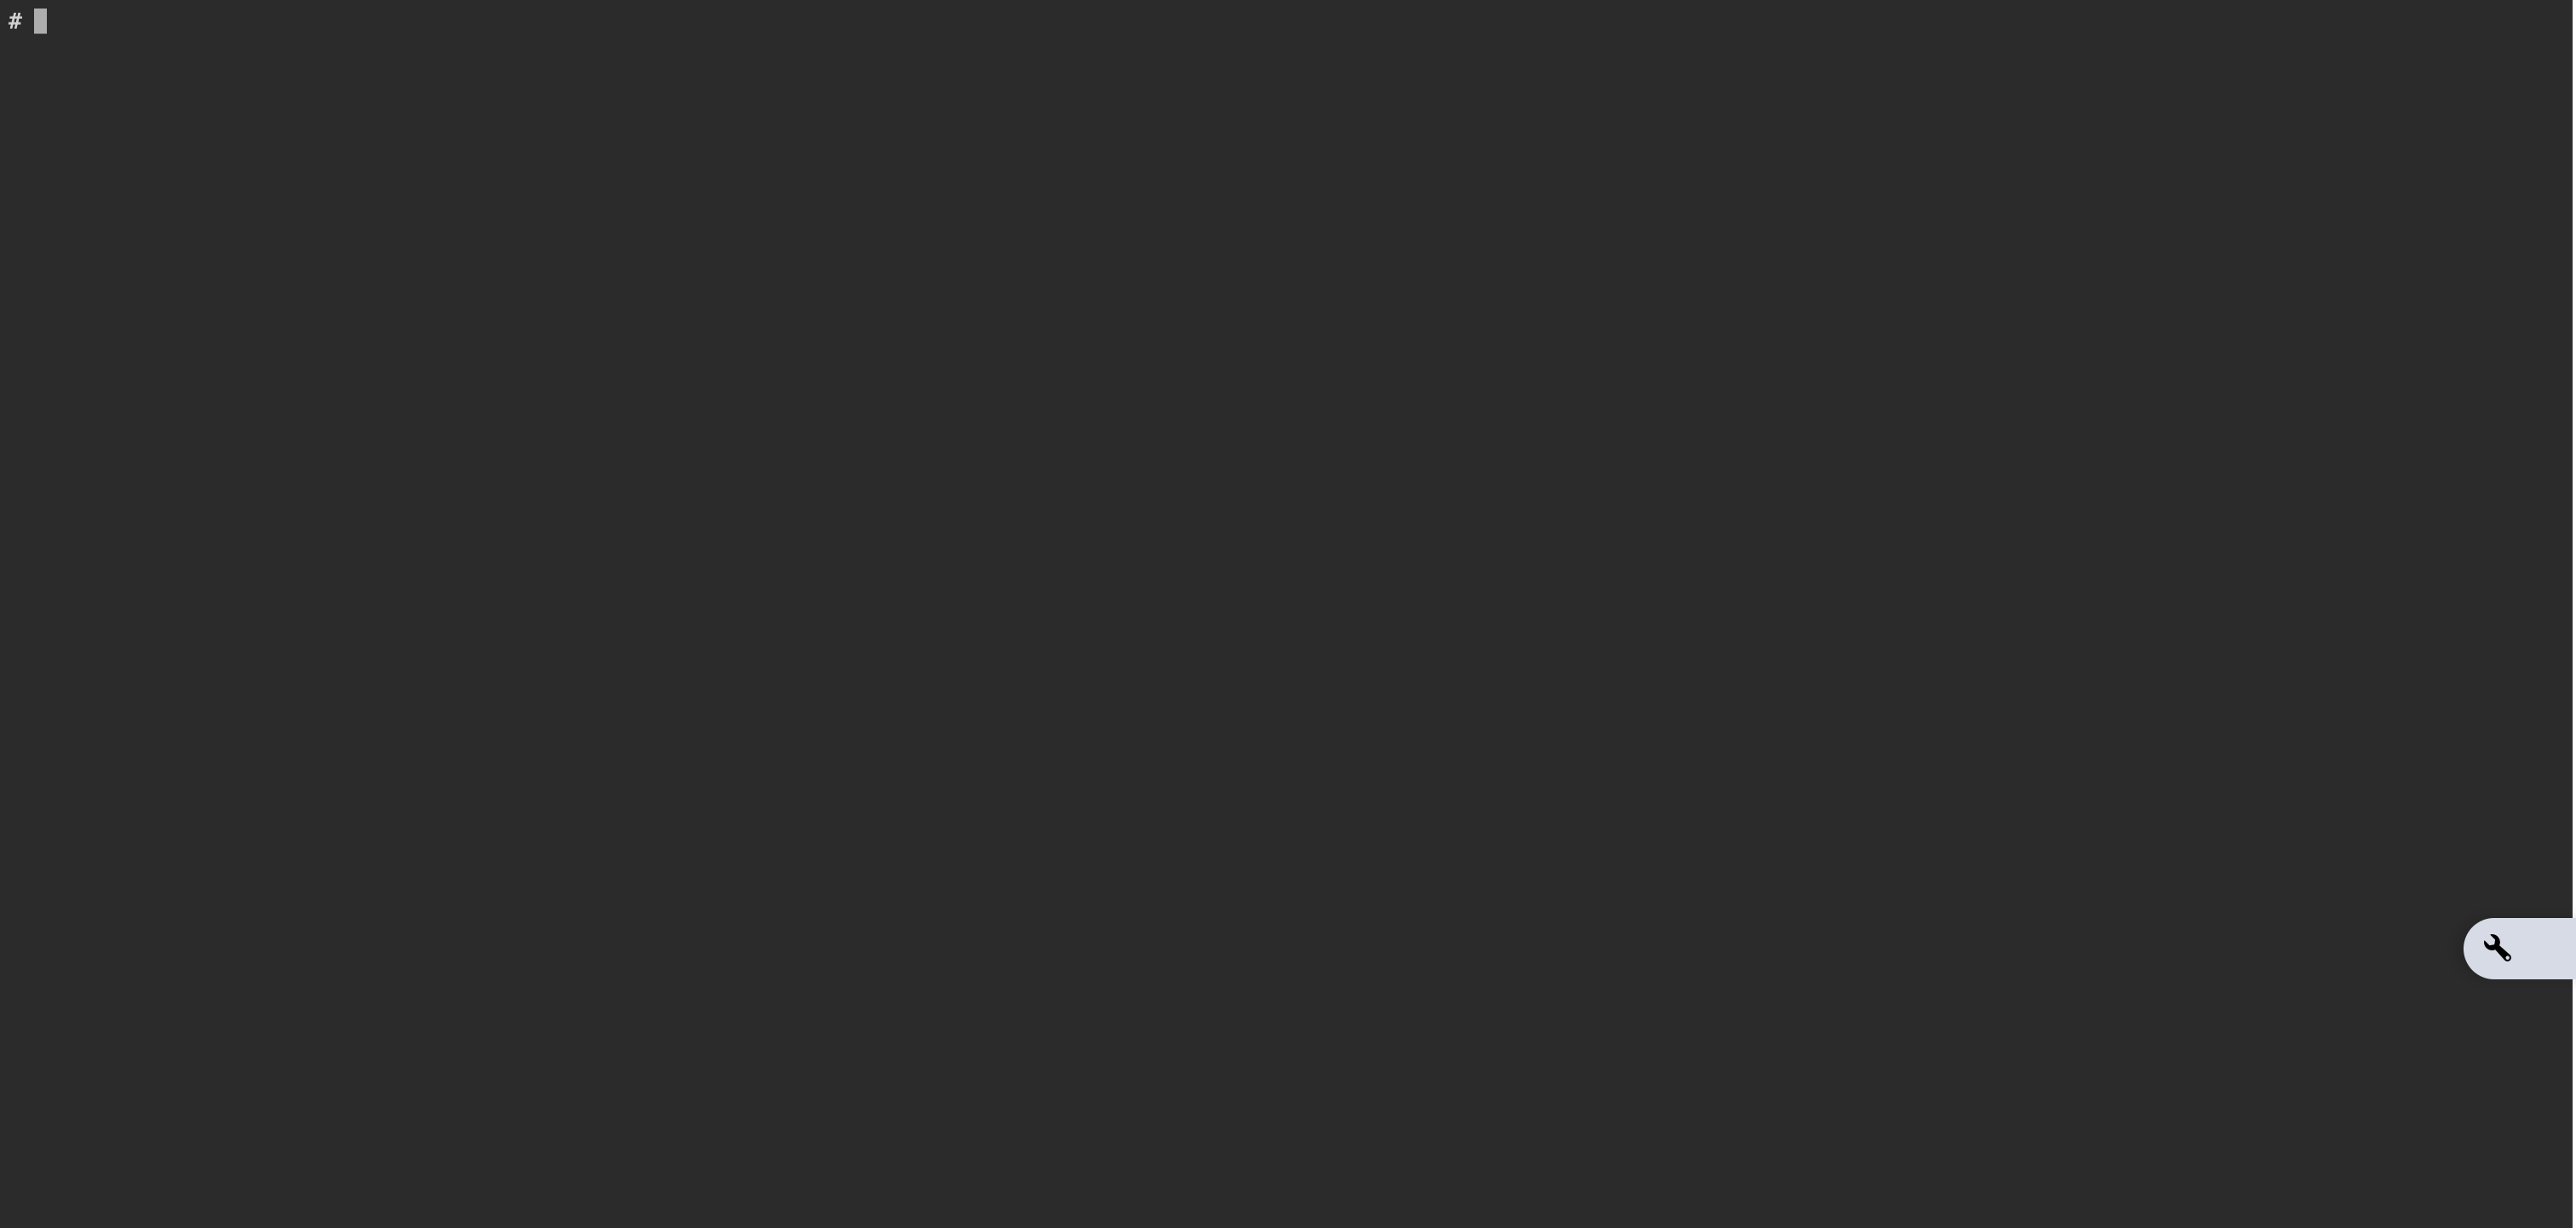 The web shell provides root access to your container. You can run commands, install packages, and manage files directly from your browser without needing an SSH client.
## Container Status Reference
| **Status** | **Description** |
| --------------- | ----------------------------------------------------------------------------- |
| **Creating** | The container is in the process of being created. |
| **Running** | The container is currently running. |
| **Terminating** | The container is shutting down, typically appearing briefly during a restart. |
| **Error** | An error has occurred in the container. Check the logs for more details. |
## Lifecycle Actions
These actions change the state of a container. Open the "**More actions**" menu (three dots) on a container row to reach them.
### Reconfigure
1. Locate the container you want to reconfigure and click "**Reconfigure**" from the dropdown menu in the "Action" field
The web shell provides root access to your container. You can run commands, install packages, and manage files directly from your browser without needing an SSH client.
## Container Status Reference
| **Status** | **Description** |
| --------------- | ----------------------------------------------------------------------------- |
| **Creating** | The container is in the process of being created. |
| **Running** | The container is currently running. |
| **Terminating** | The container is shutting down, typically appearing briefly during a restart. |
| **Error** | An error has occurred in the container. Check the logs for more details. |
## Lifecycle Actions
These actions change the state of a container. Open the "**More actions**" menu (three dots) on a container row to reach them.
### Reconfigure
1. Locate the container you want to reconfigure and click "**Reconfigure**" from the dropdown menu in the "Action" field
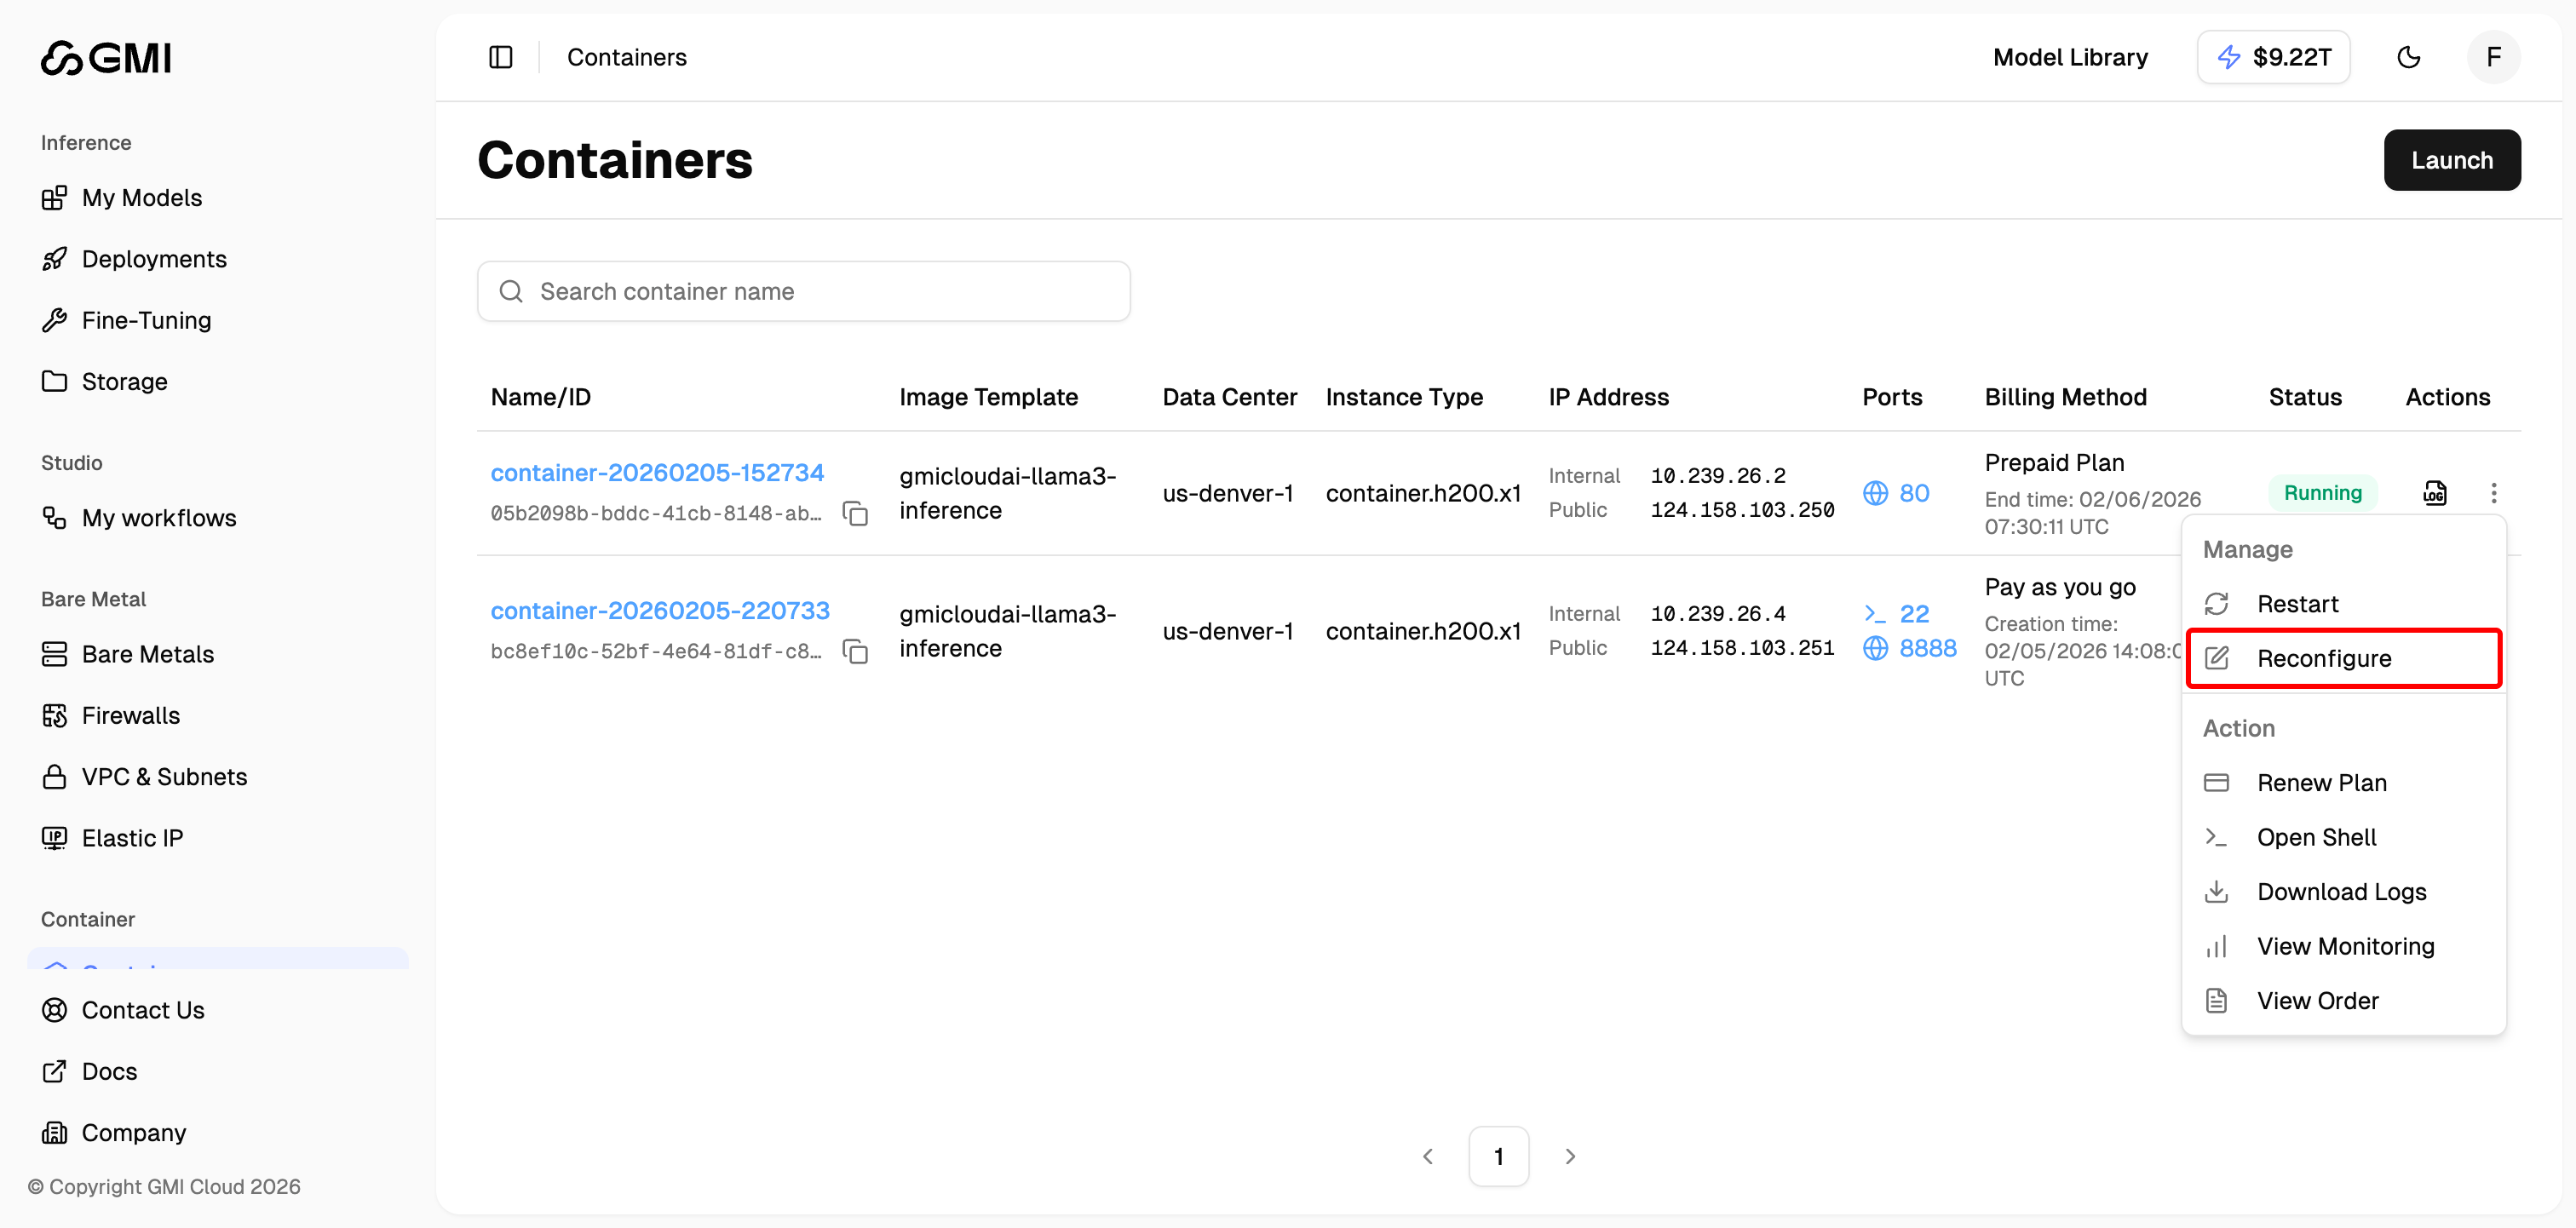 2. Edit the settings of the original container as you wish, one by one
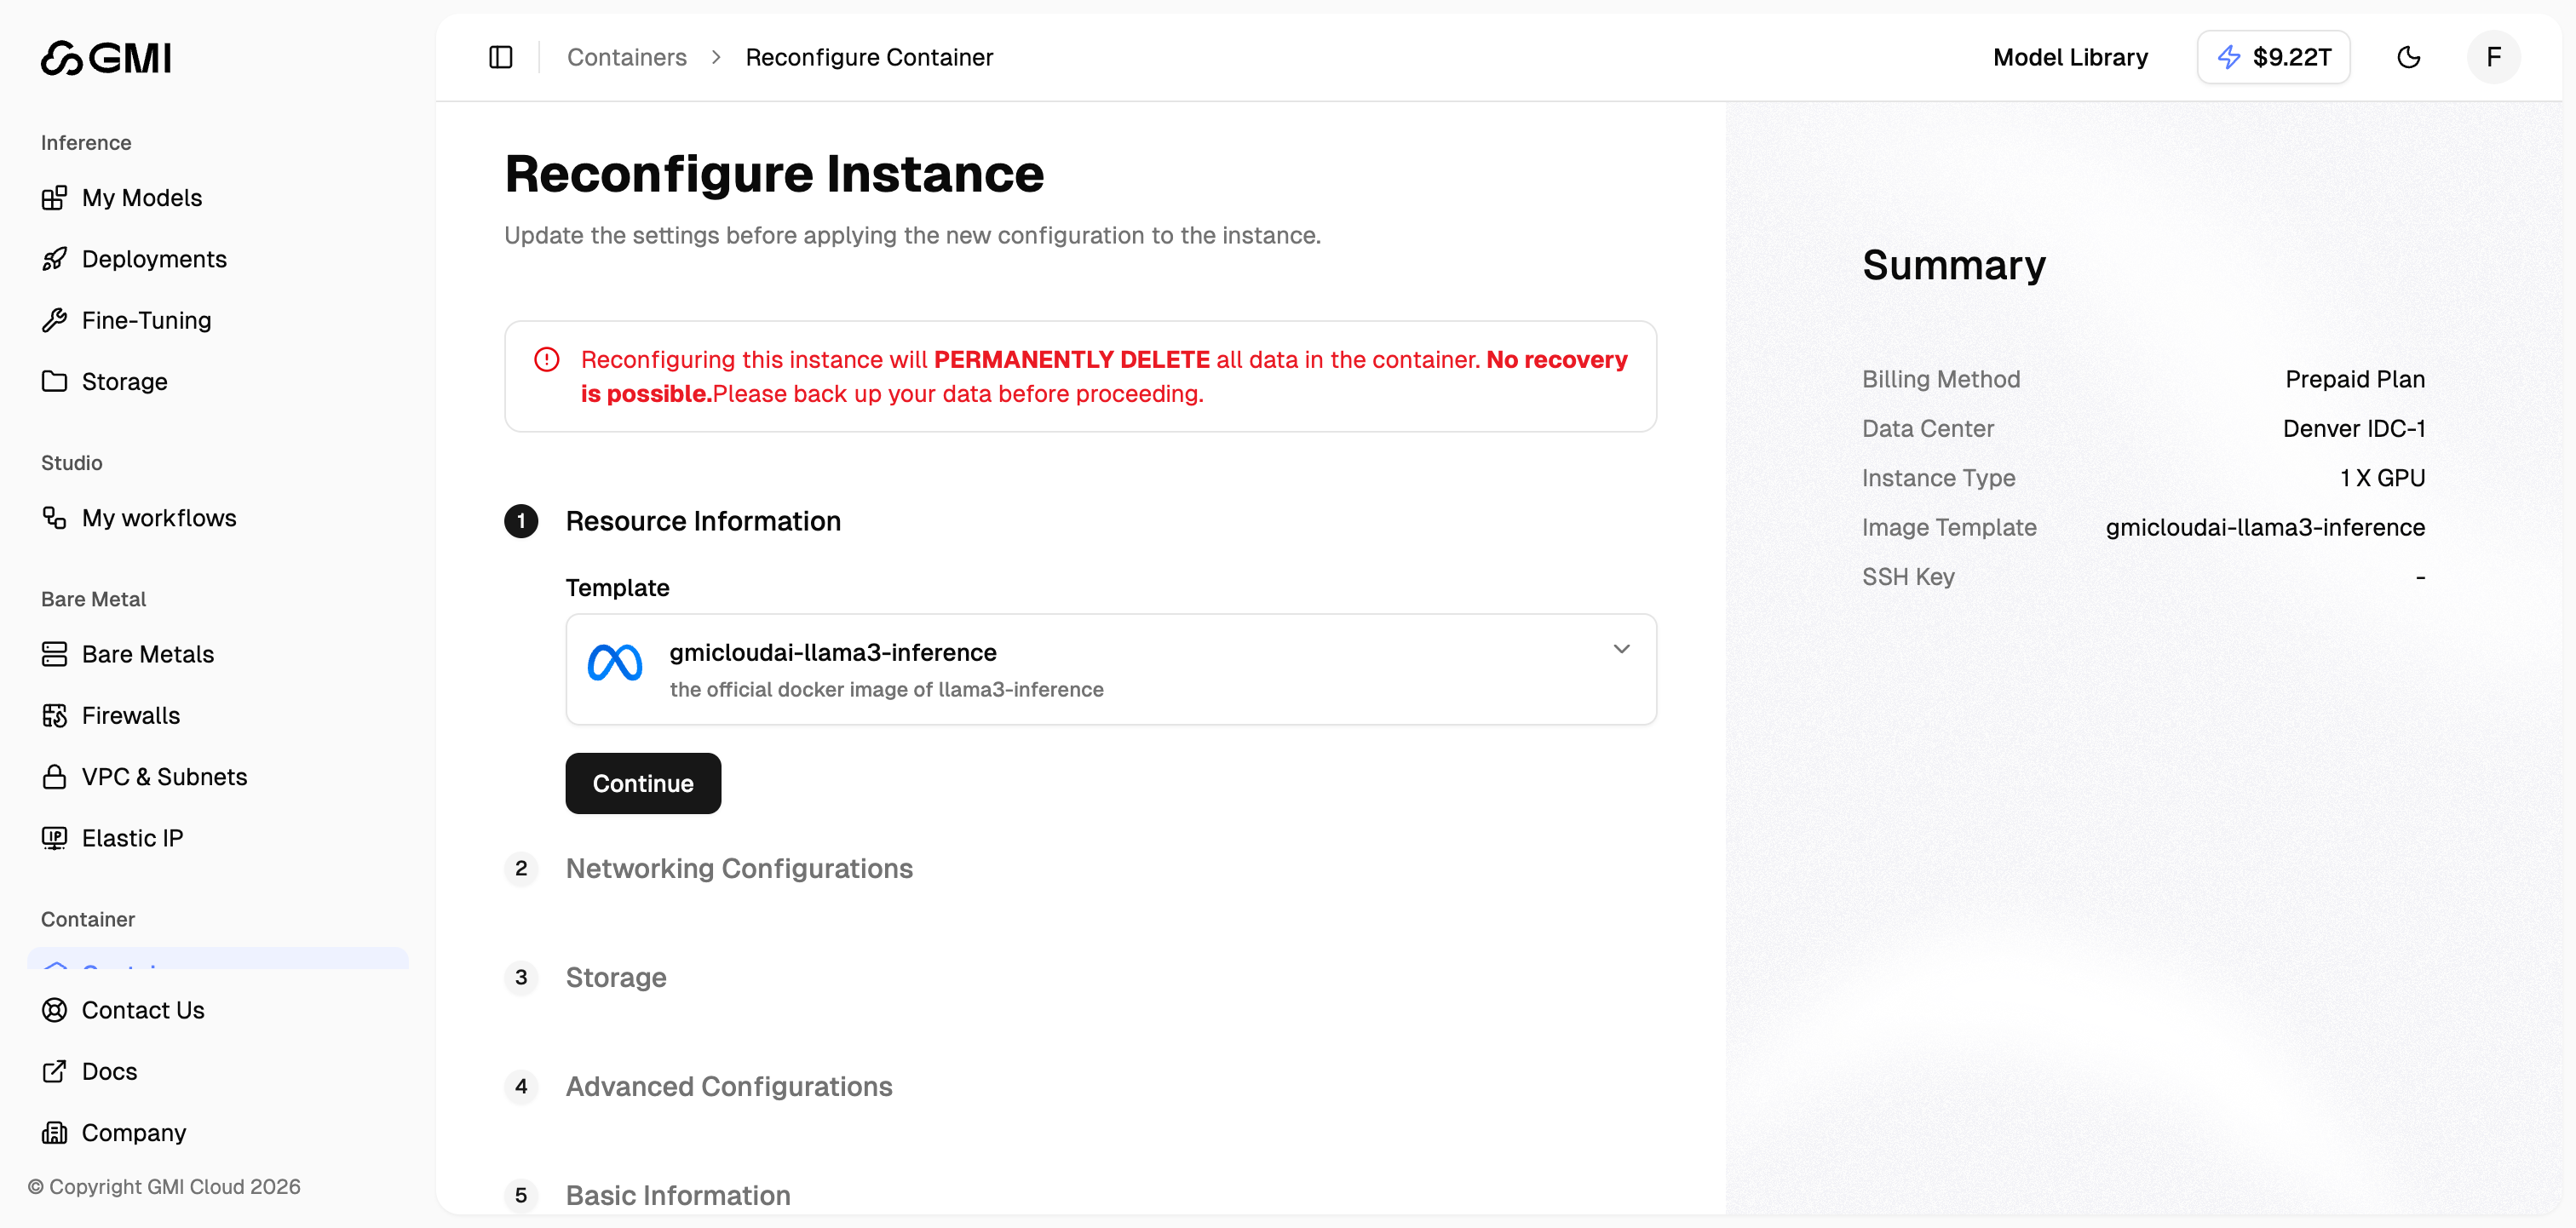 3. Type "**RECONFIGURE**" in the pop-up window to confirm the new settings and start the instance with the new settings
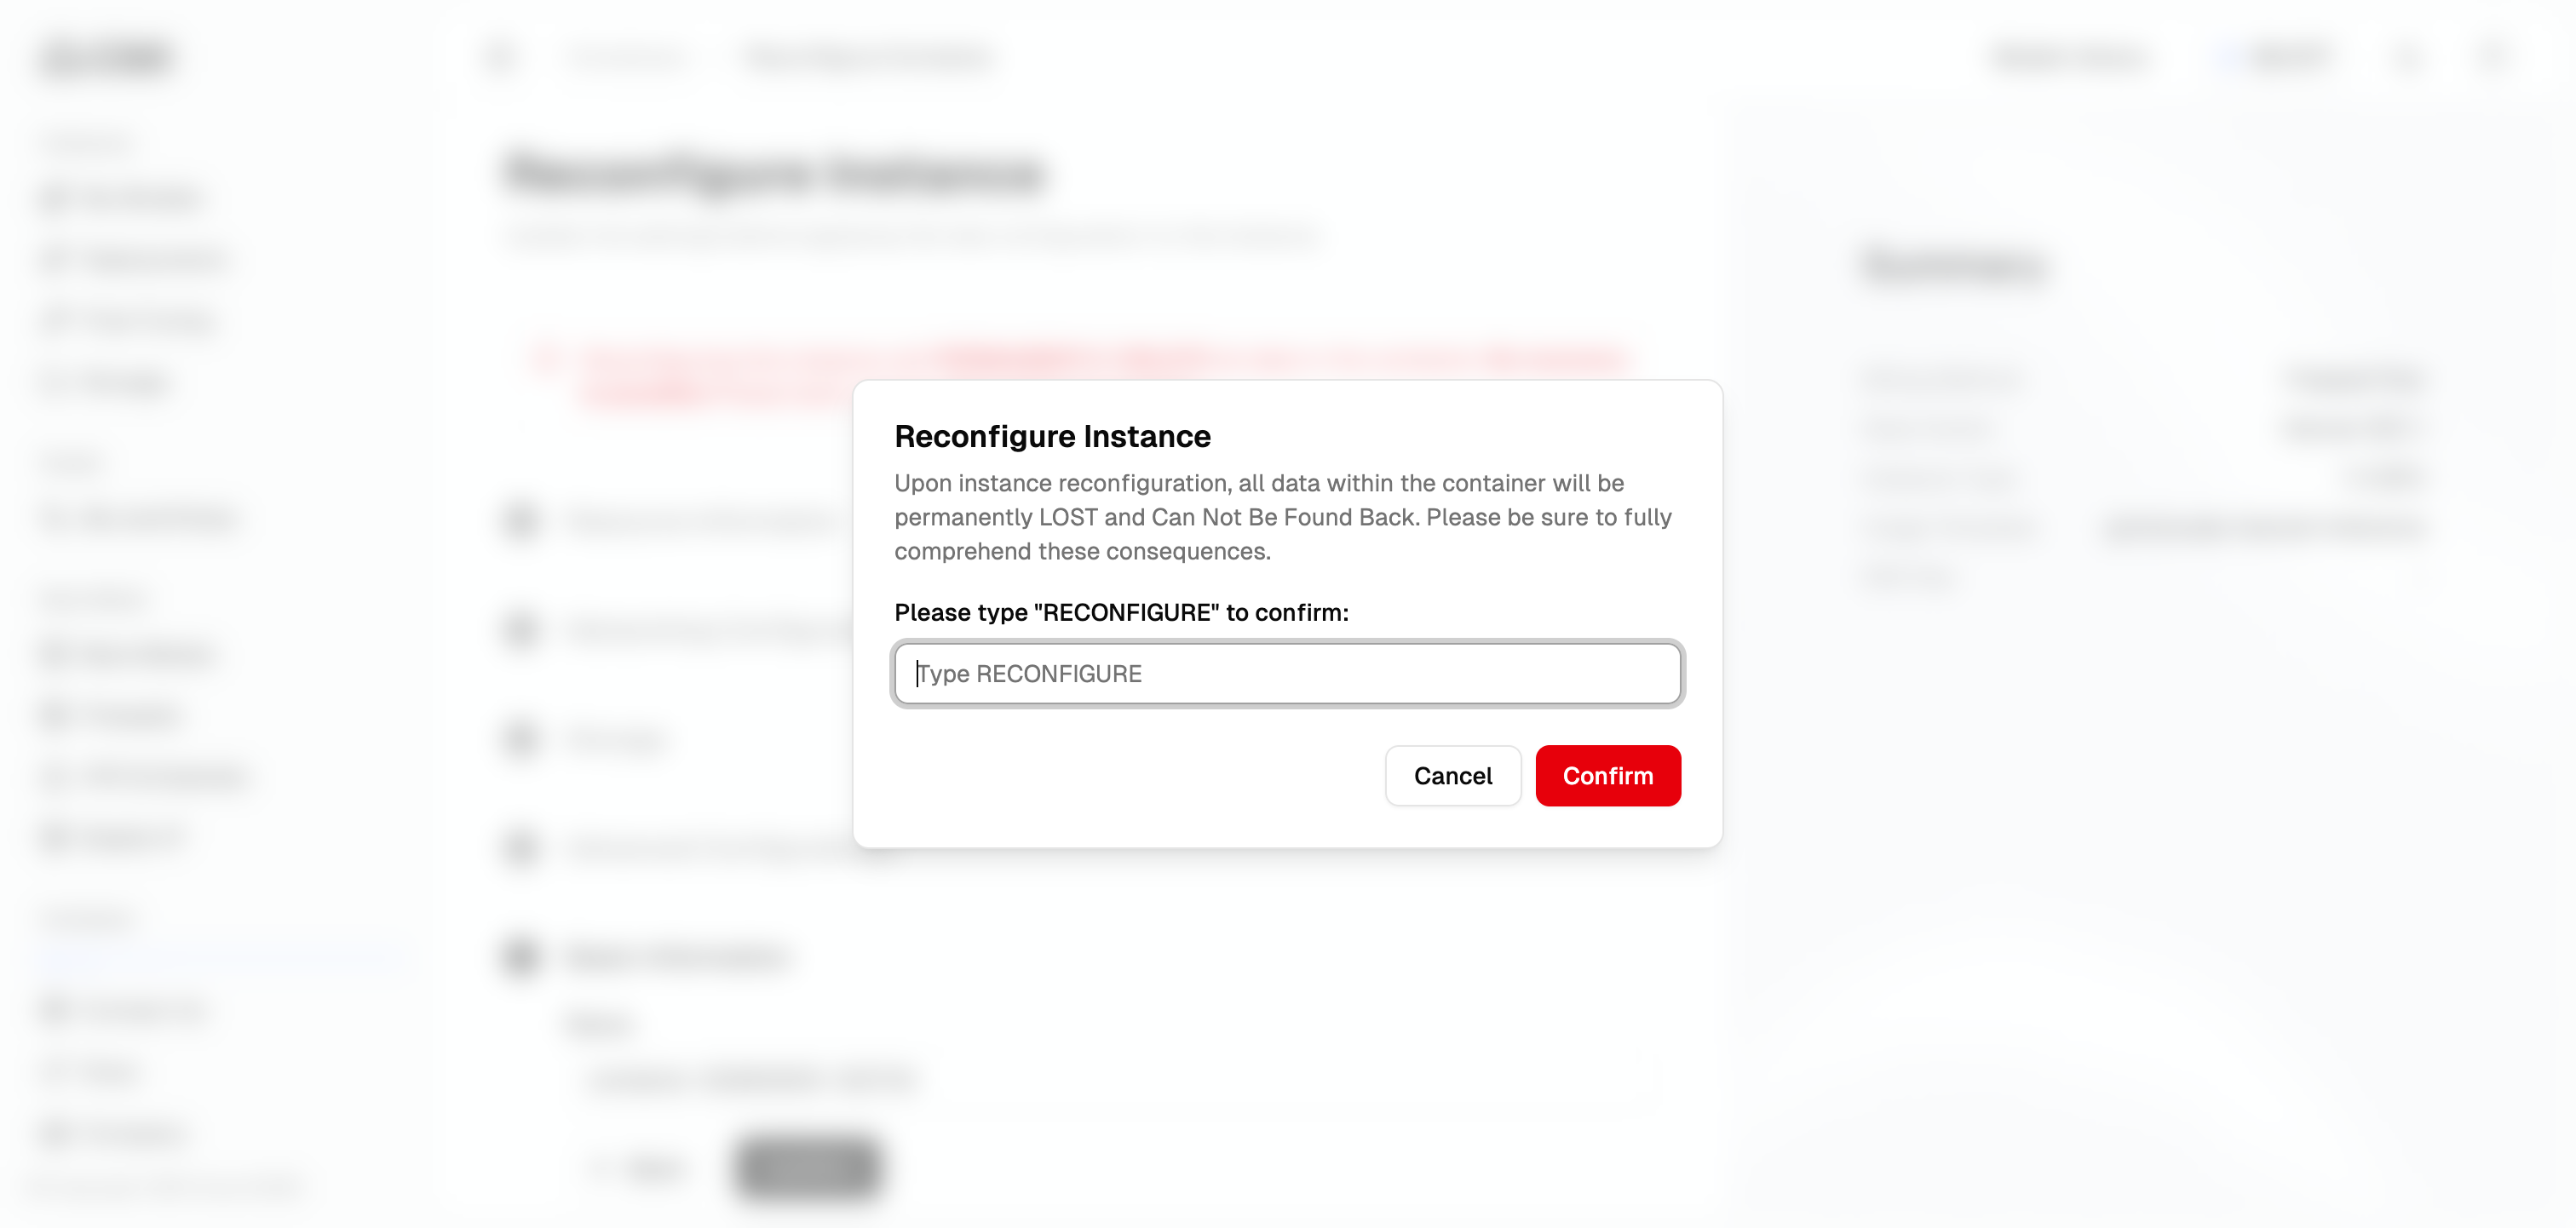 Upon instance reconfiguration, all data within the container will be permanently LOST and cannot be recovered. Please be sure to fully comprehend these consequences and back up your data before proceeding.
### Restart
1. Locate the container you want to restart
2. Click the "**More actions**" button (three dots icon)
3. Select "**Restart**" from the dropdown menu
Upon instance reconfiguration, all data within the container will be permanently LOST and cannot be recovered. Please be sure to fully comprehend these consequences and back up your data before proceeding.
### Restart
1. Locate the container you want to restart
2. Click the "**More actions**" button (three dots icon)
3. Select "**Restart**" from the dropdown menu
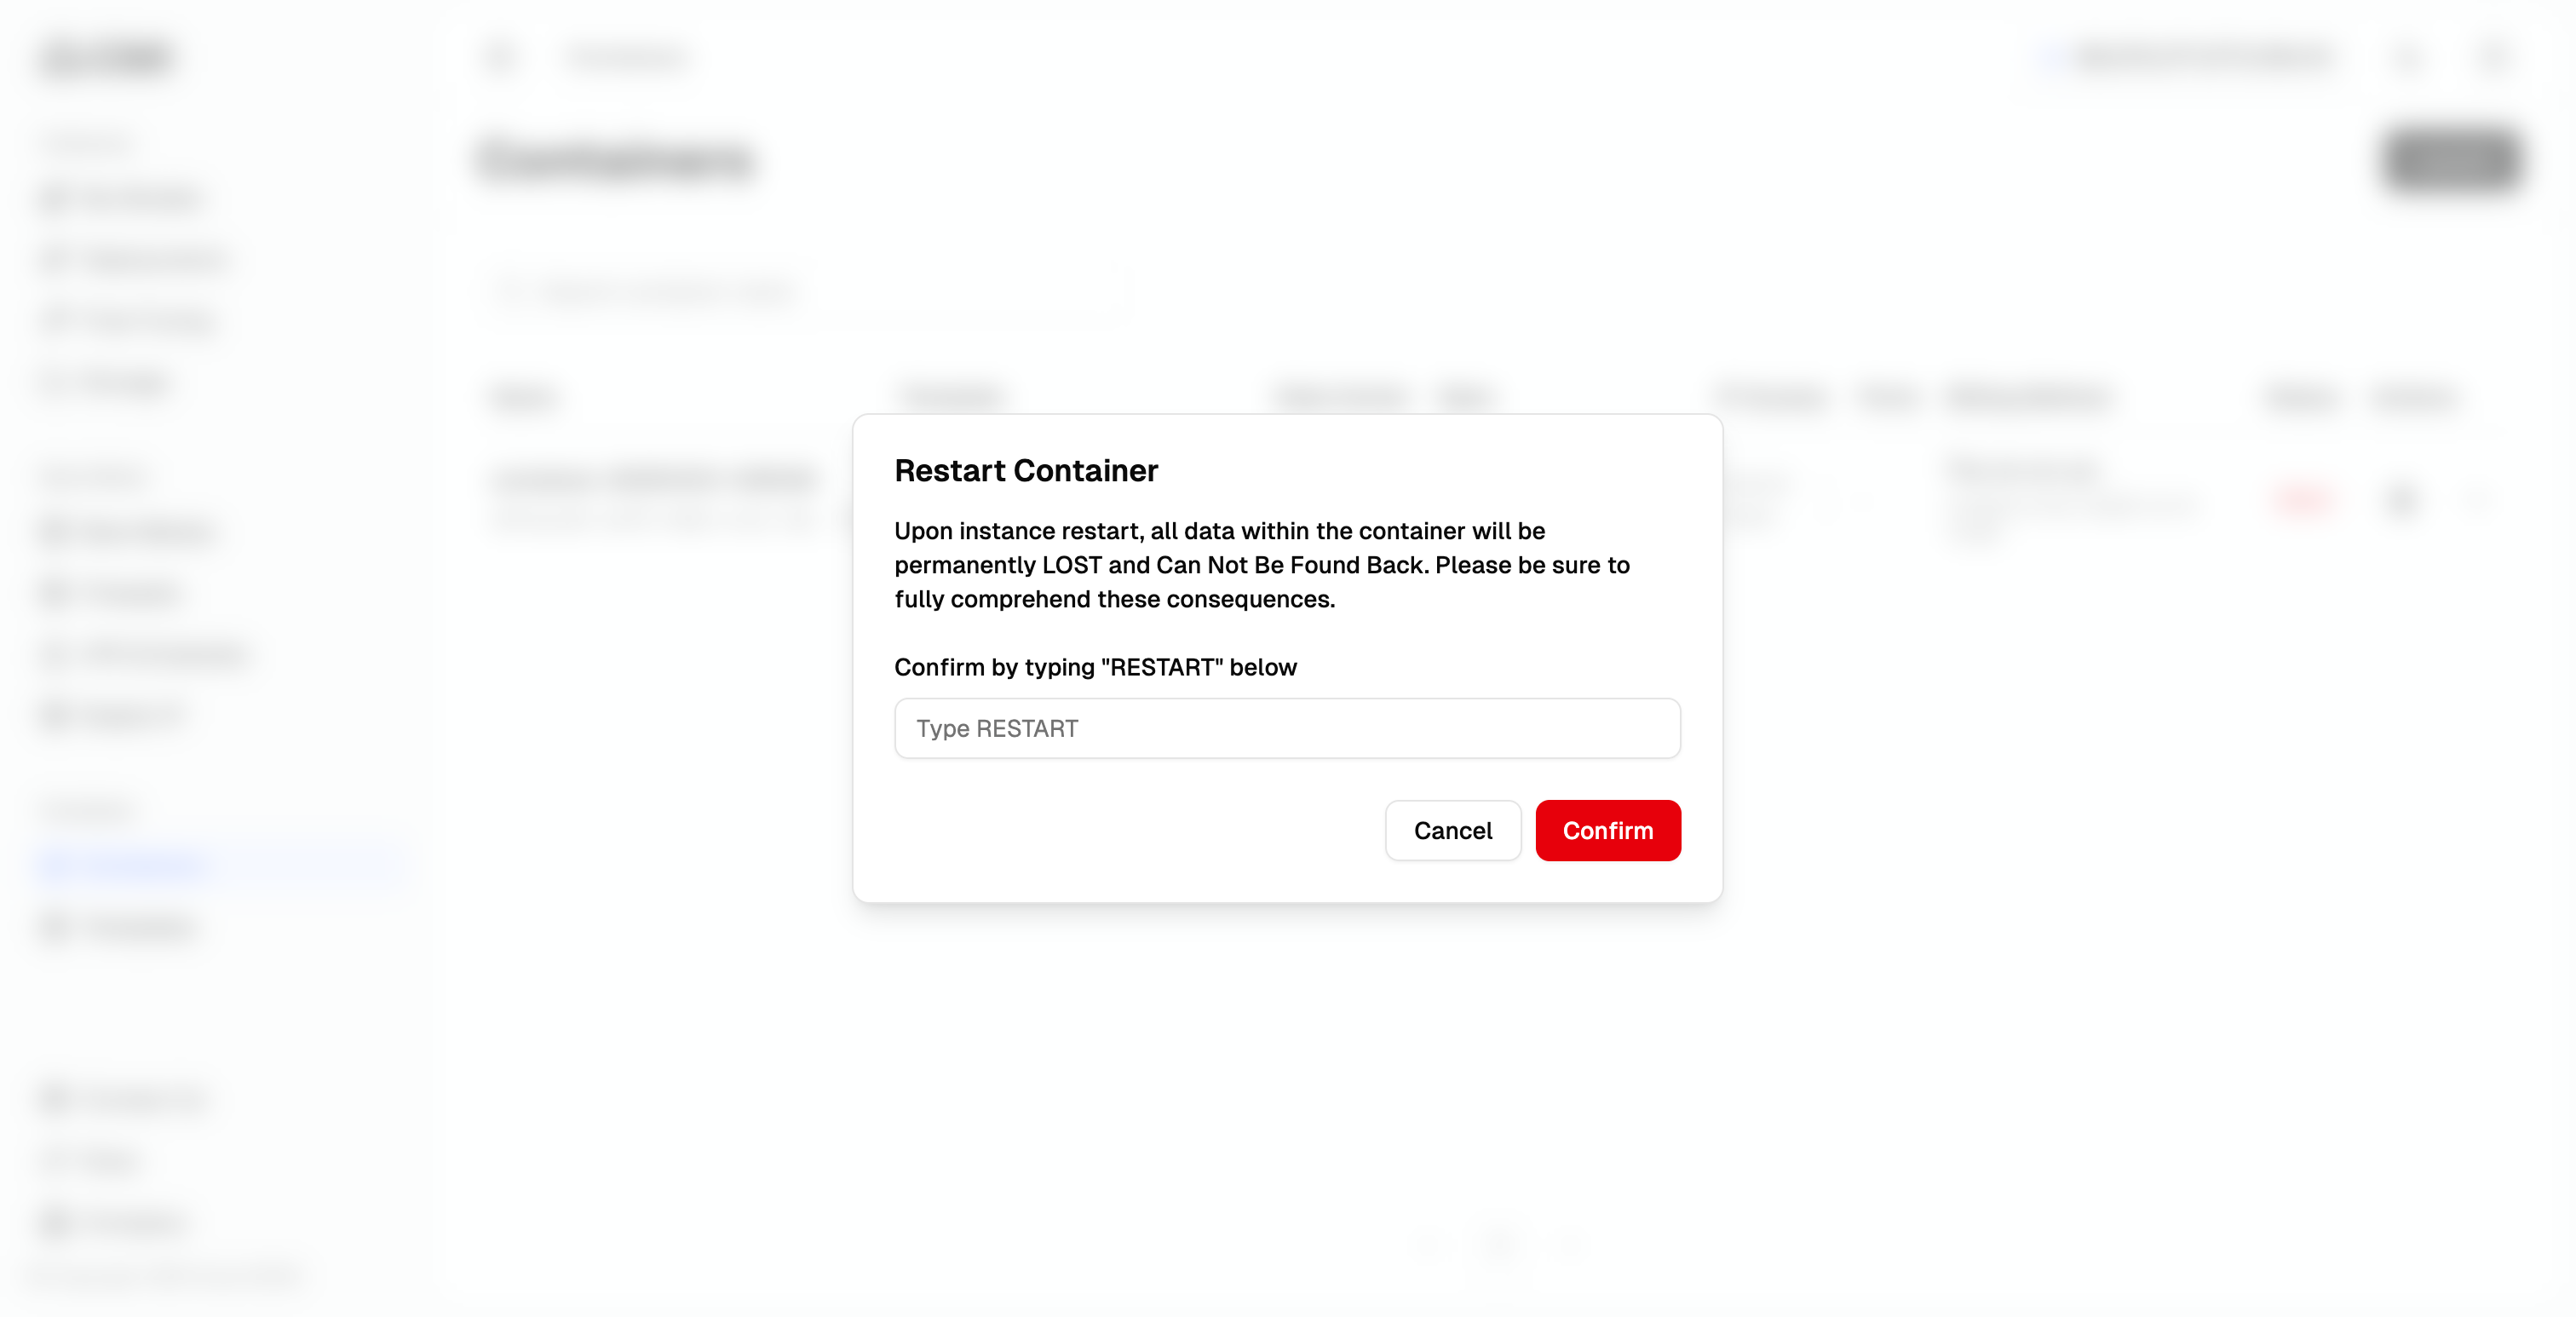
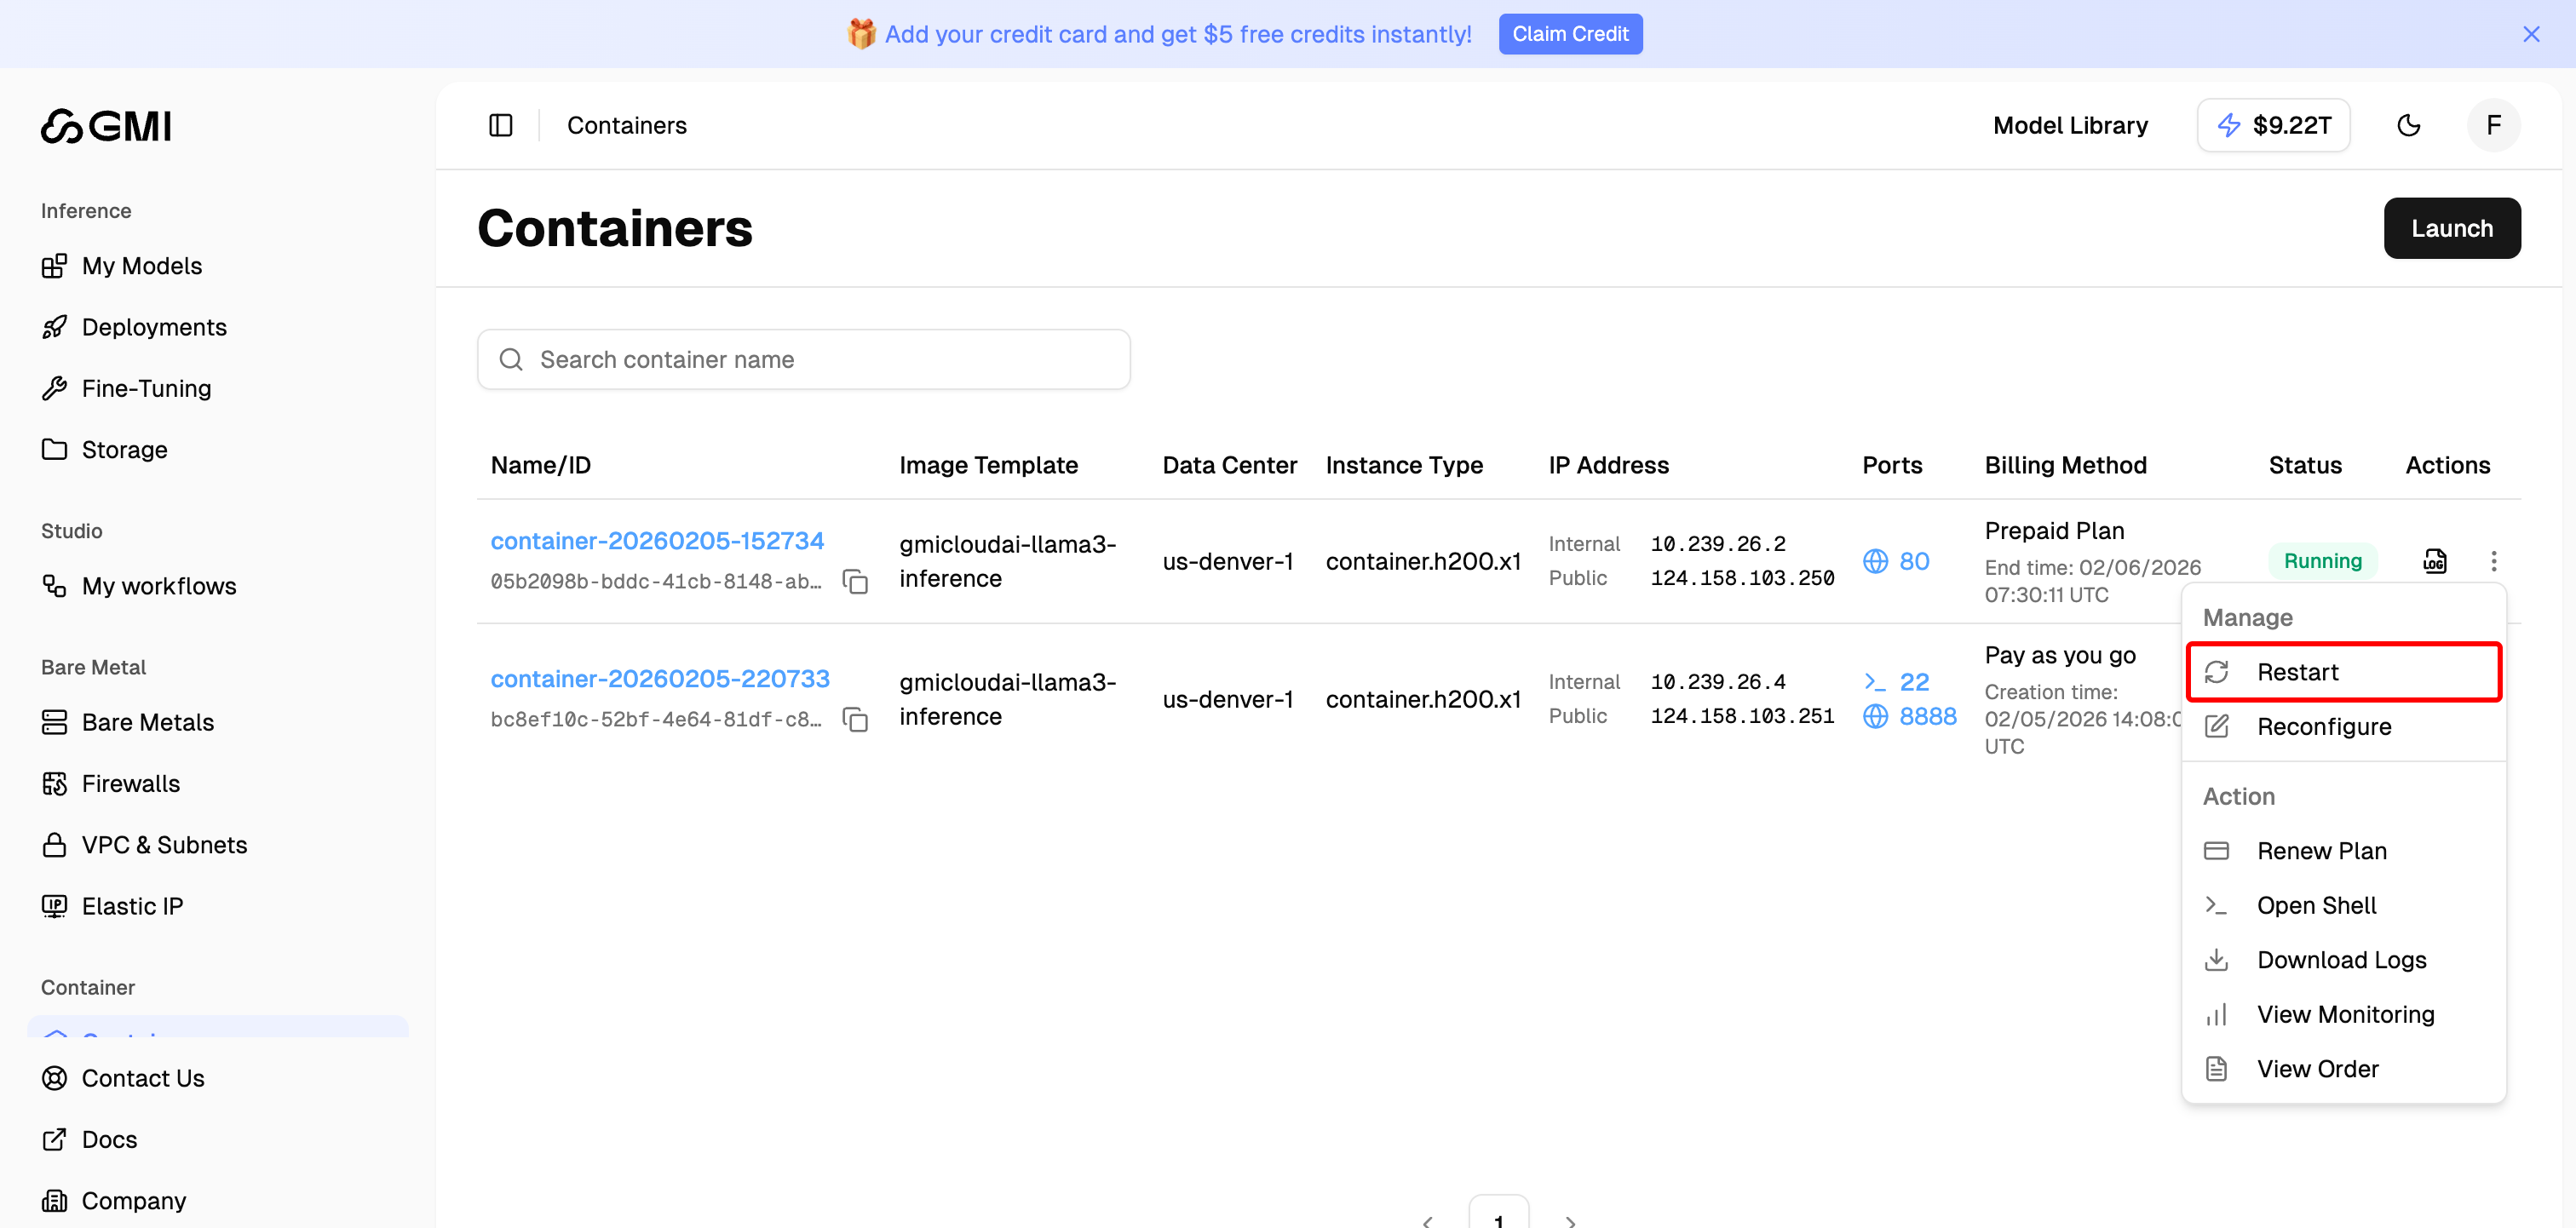 4. Enter the confirmation text as shown in the dialog
5. Click "**Confirm**" to proceed
4. Enter the confirmation text as shown in the dialog
5. Click "**Confirm**" to proceed
 ### Renew
The Renew feature extends the rental period of a **Prepaid Plan** container to keep your resources running uninterrupted.
The Renew option is only available for containers with **Prepaid Plan** billing method. Pay-as-you-go containers do not have an expiration date and therefore do not need renewal.
1. Locate the container you want to renew
2. Click the "**More actions**" button (three dots icon)
3. Select "**Renew Plan**" from the dropdown menu
### Renew
The Renew feature extends the rental period of a **Prepaid Plan** container to keep your resources running uninterrupted.
The Renew option is only available for containers with **Prepaid Plan** billing method. Pay-as-you-go containers do not have an expiration date and therefore do not need renewal.
1. Locate the container you want to renew
2. Click the "**More actions**" button (three dots icon)
3. Select "**Renew Plan**" from the dropdown menu
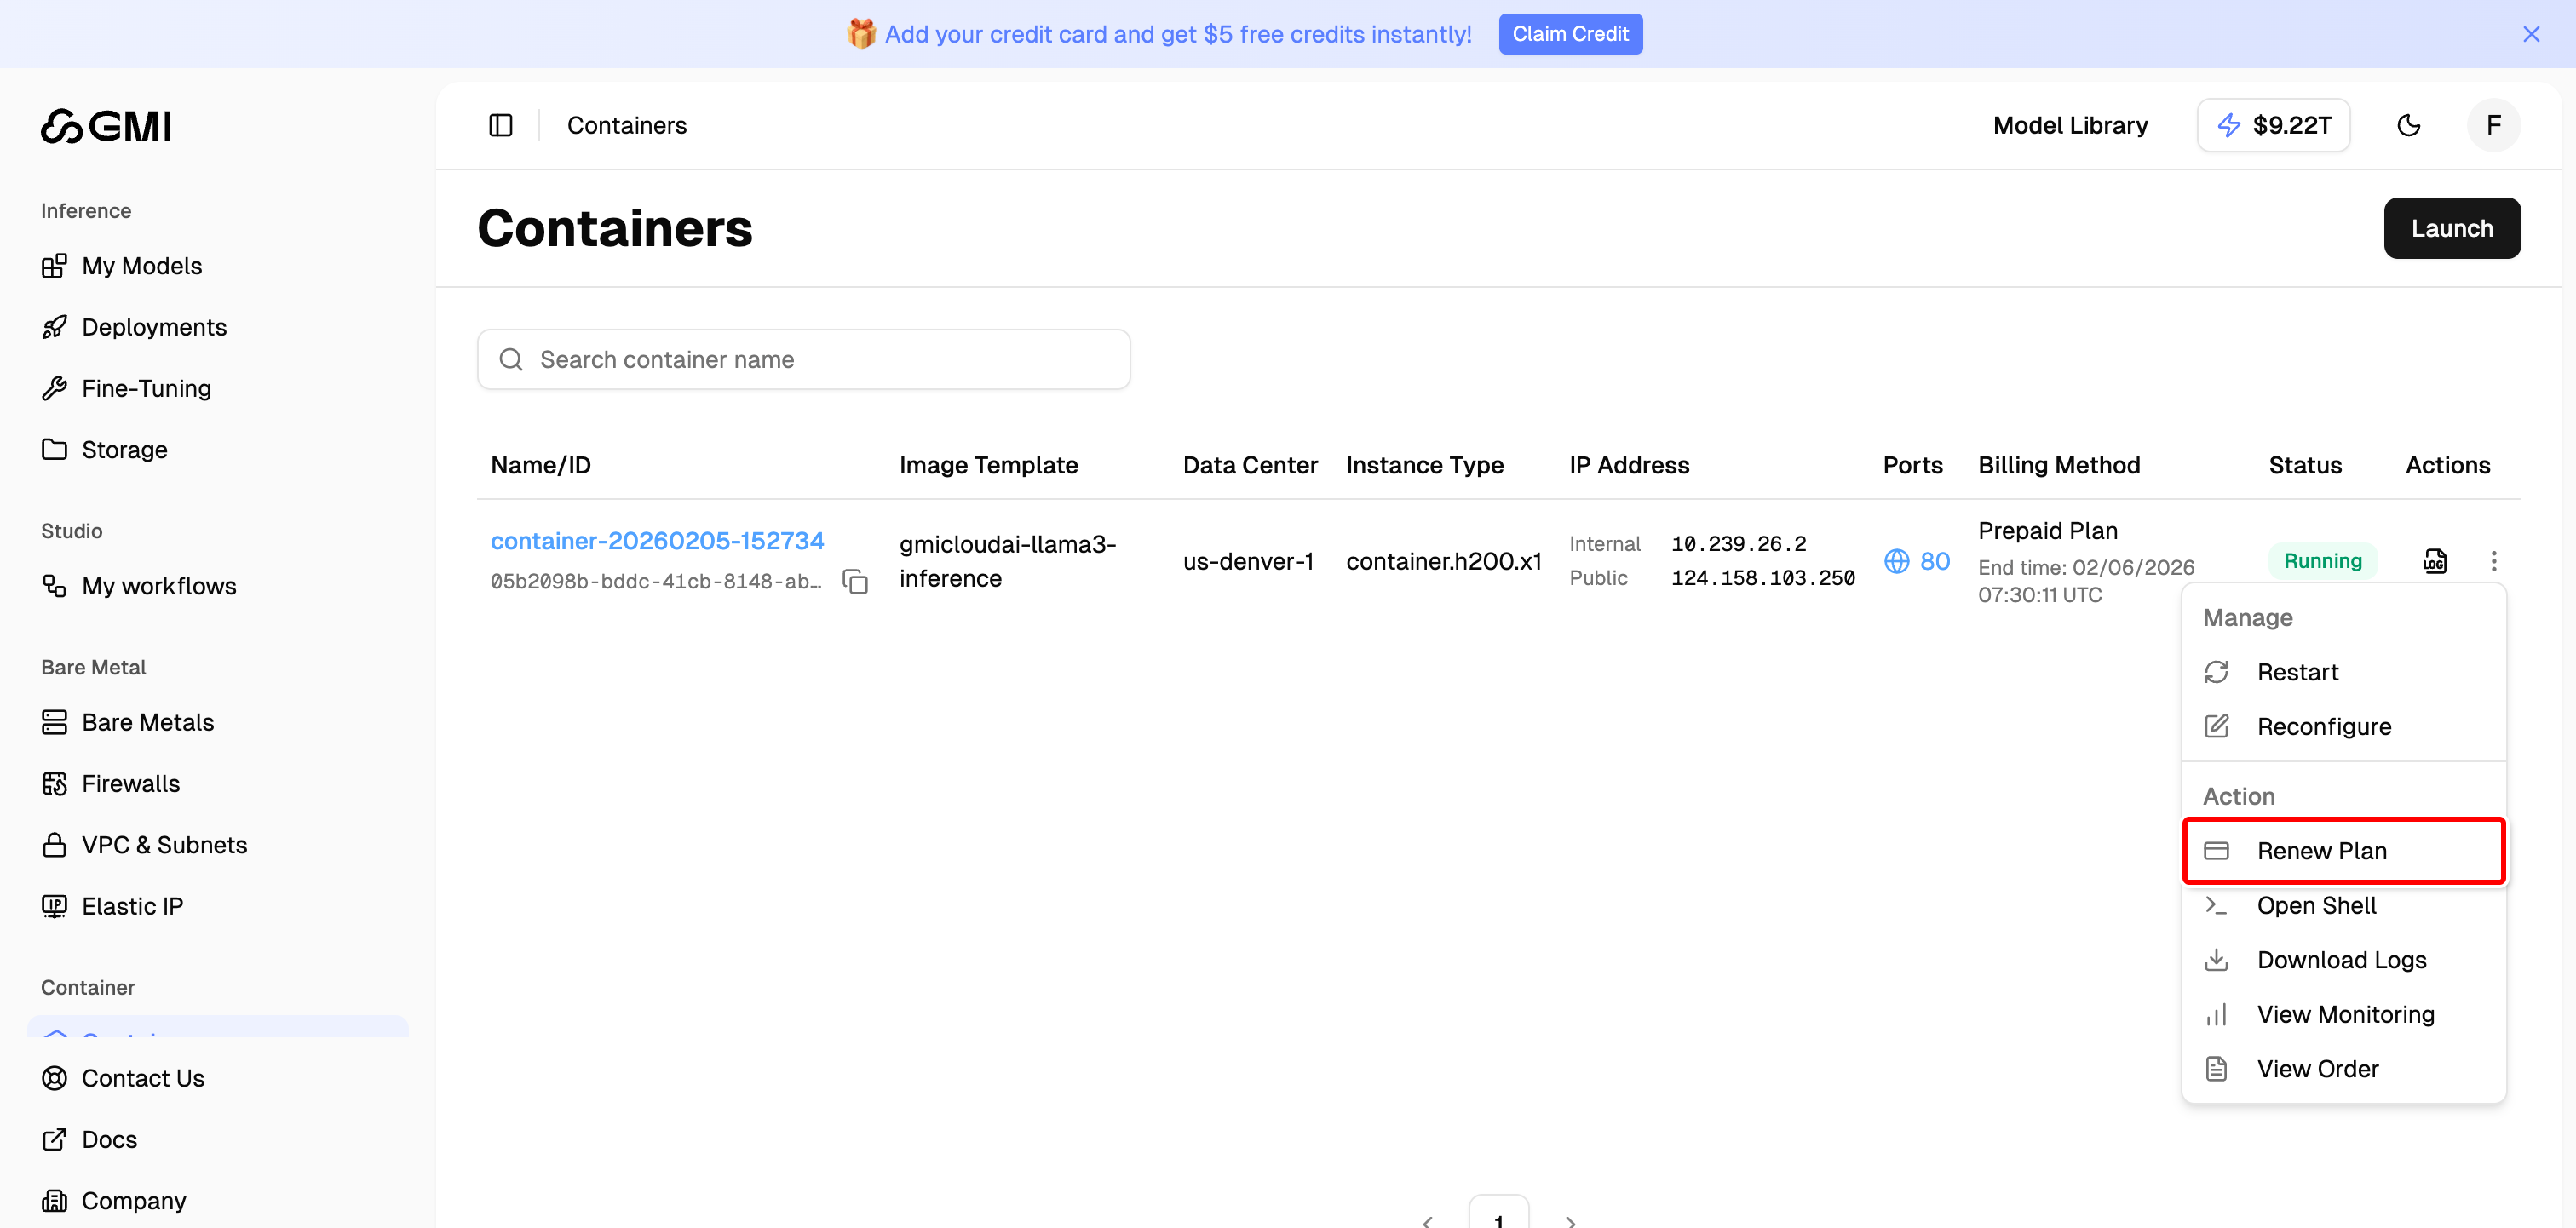 4. On the Renew Container page, you will see:
* **Instance Information**: Container name, billing method, current end time, and new end time
* **Extension Duration**: Select how long you want to extend the container
4. On the Renew Container page, you will see:
* **Instance Information**: Container name, billing method, current end time, and new end time
* **Extension Duration**: Select how long you want to extend the container
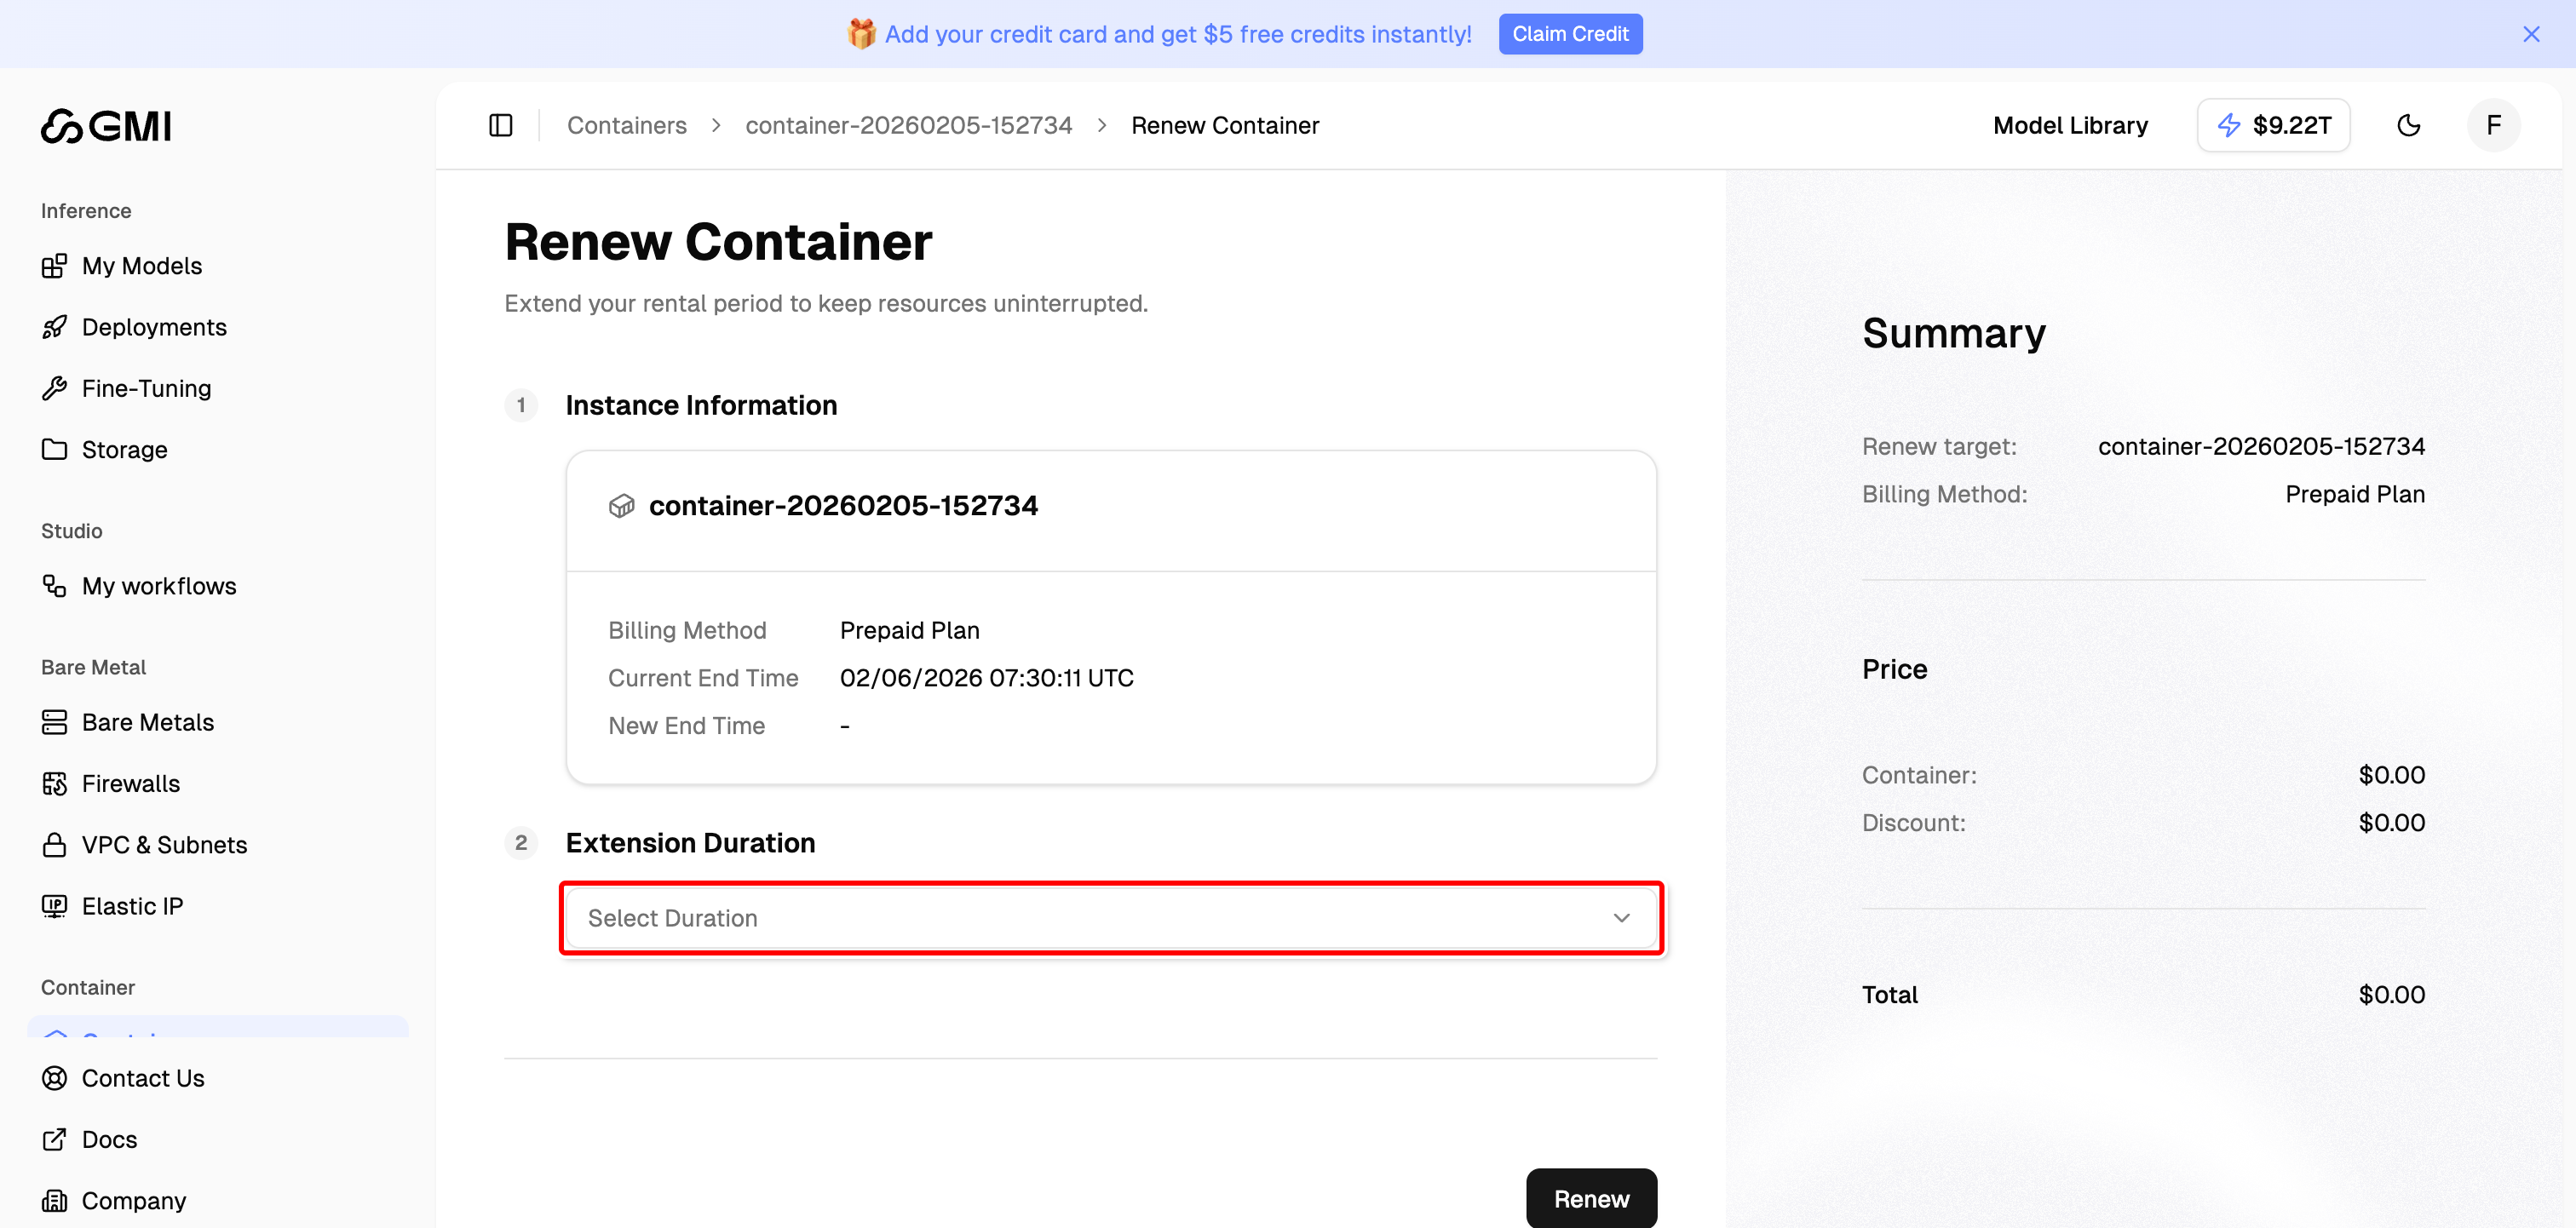 5. Click the "**Select Duration**" dropdown to choose your extension period. Available options include:
* Short-term: 1 day, 3 days, 1 week, 2 weeks, 3 weeks
* Monthly: 1 month through 11 months
* Long-term: 1 year, 3 years
5. Click the "**Select Duration**" dropdown to choose your extension period. Available options include:
* Short-term: 1 day, 3 days, 1 week, 2 weeks, 3 weeks
* Monthly: 1 month through 11 months
* Long-term: 1 year, 3 years
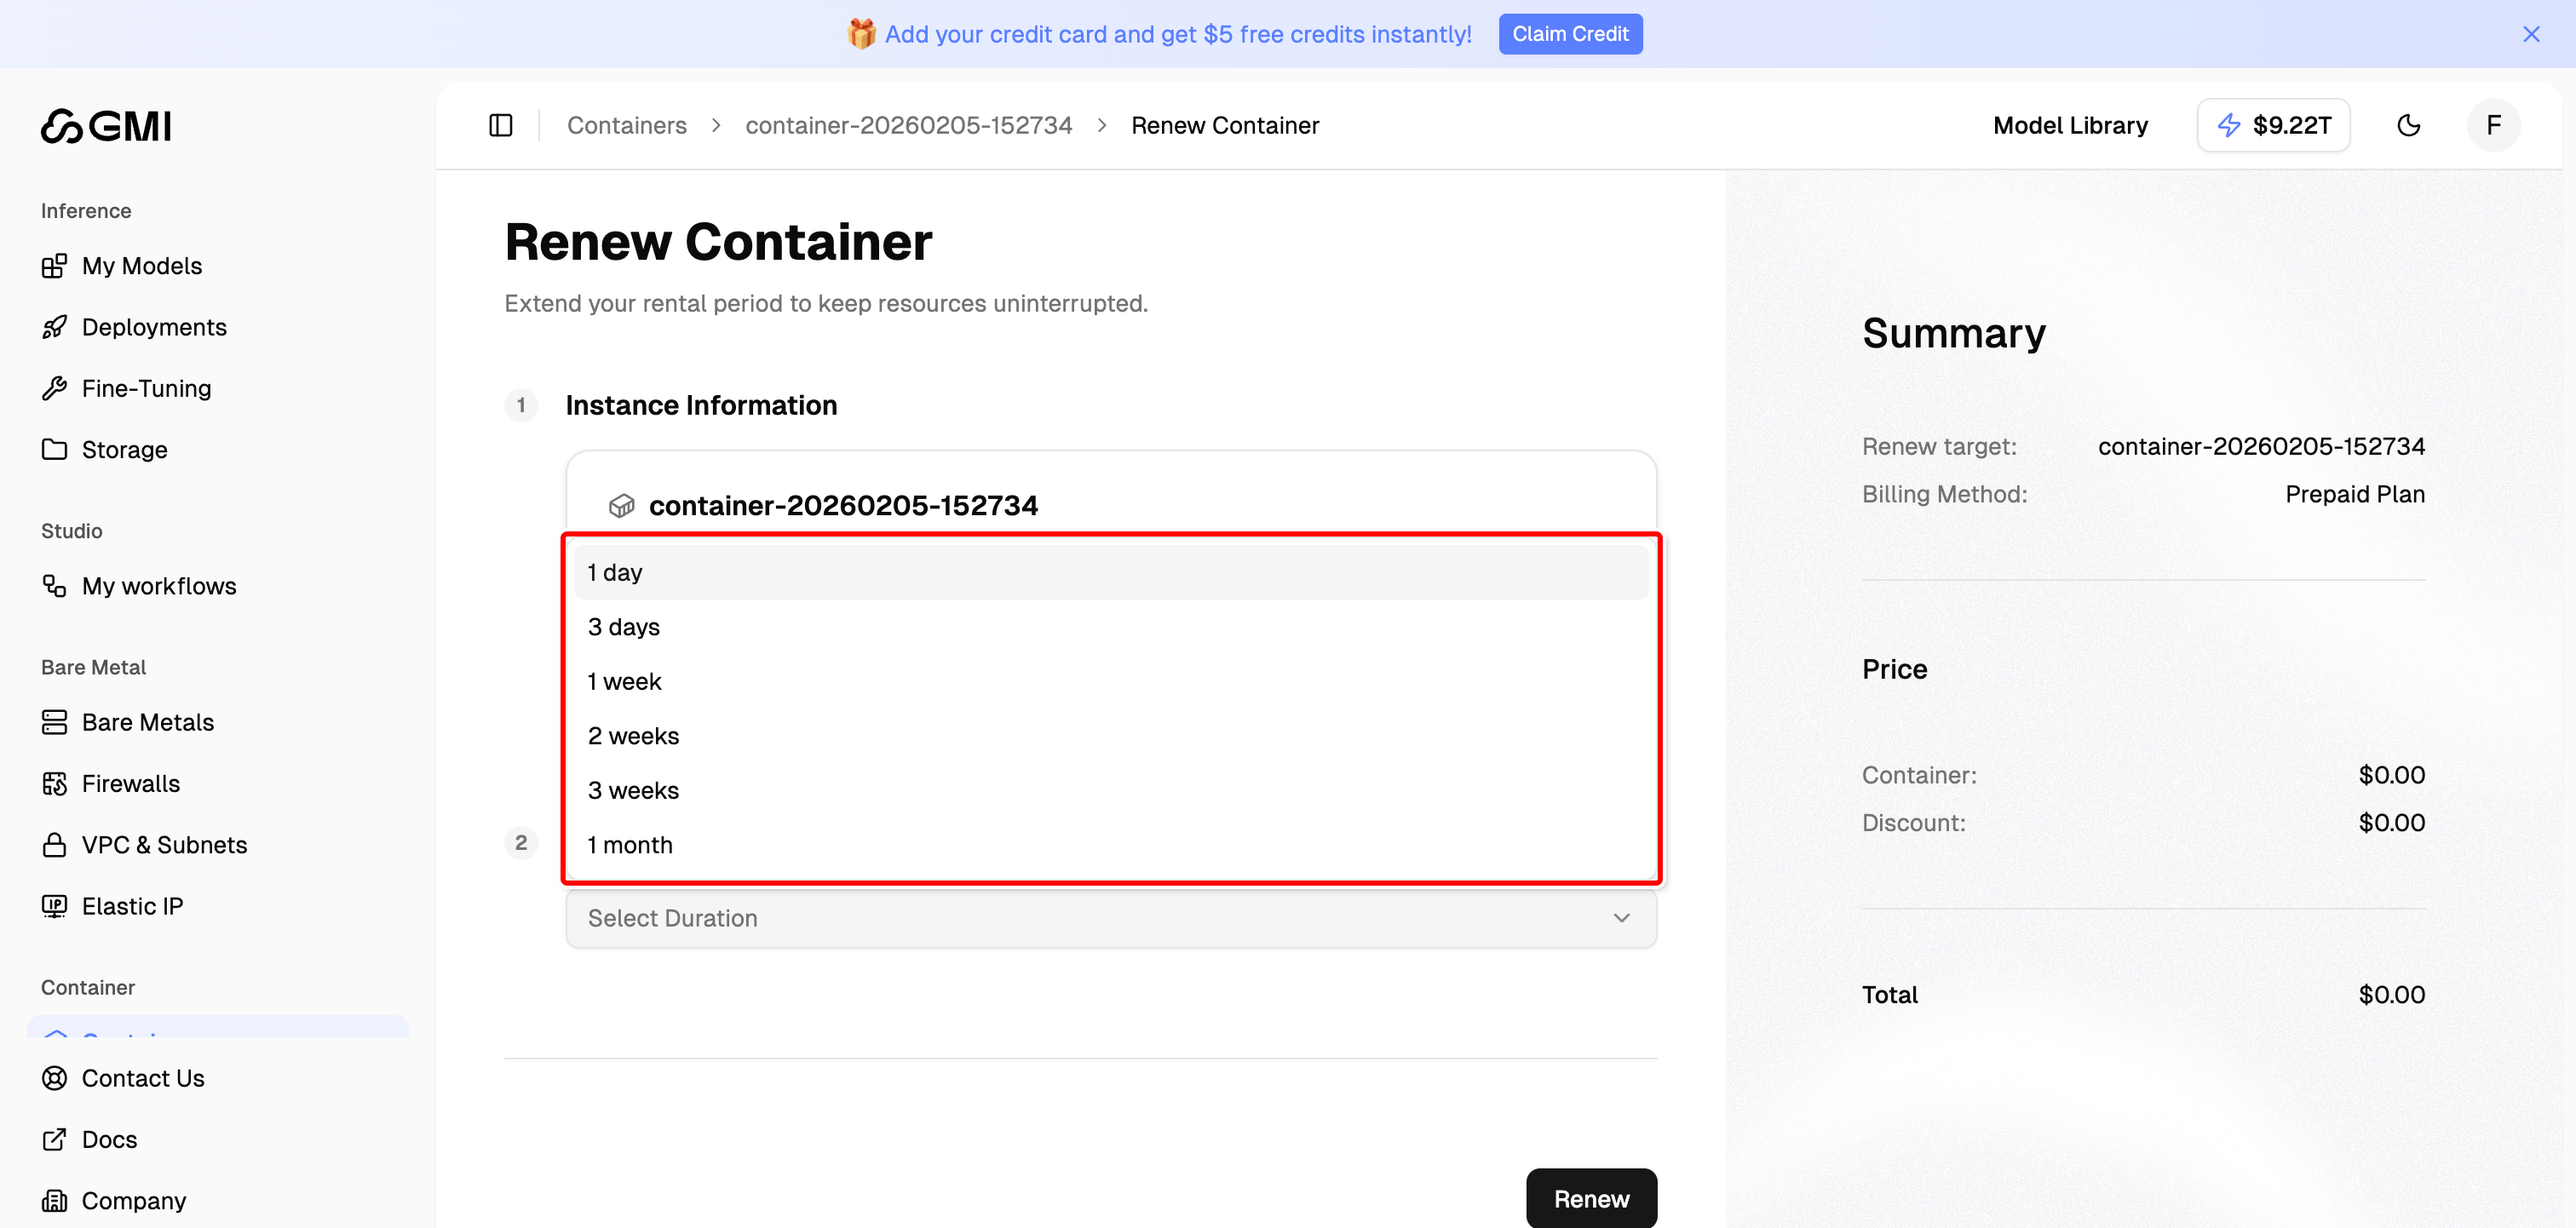 6. After selecting a duration, review the updated **New End Time** and the **Price** summary
7. Click "**Renew**" to proceed to payment
6. After selecting a duration, review the updated **New End Time** and the **Price** summary
7. Click "**Renew**" to proceed to payment
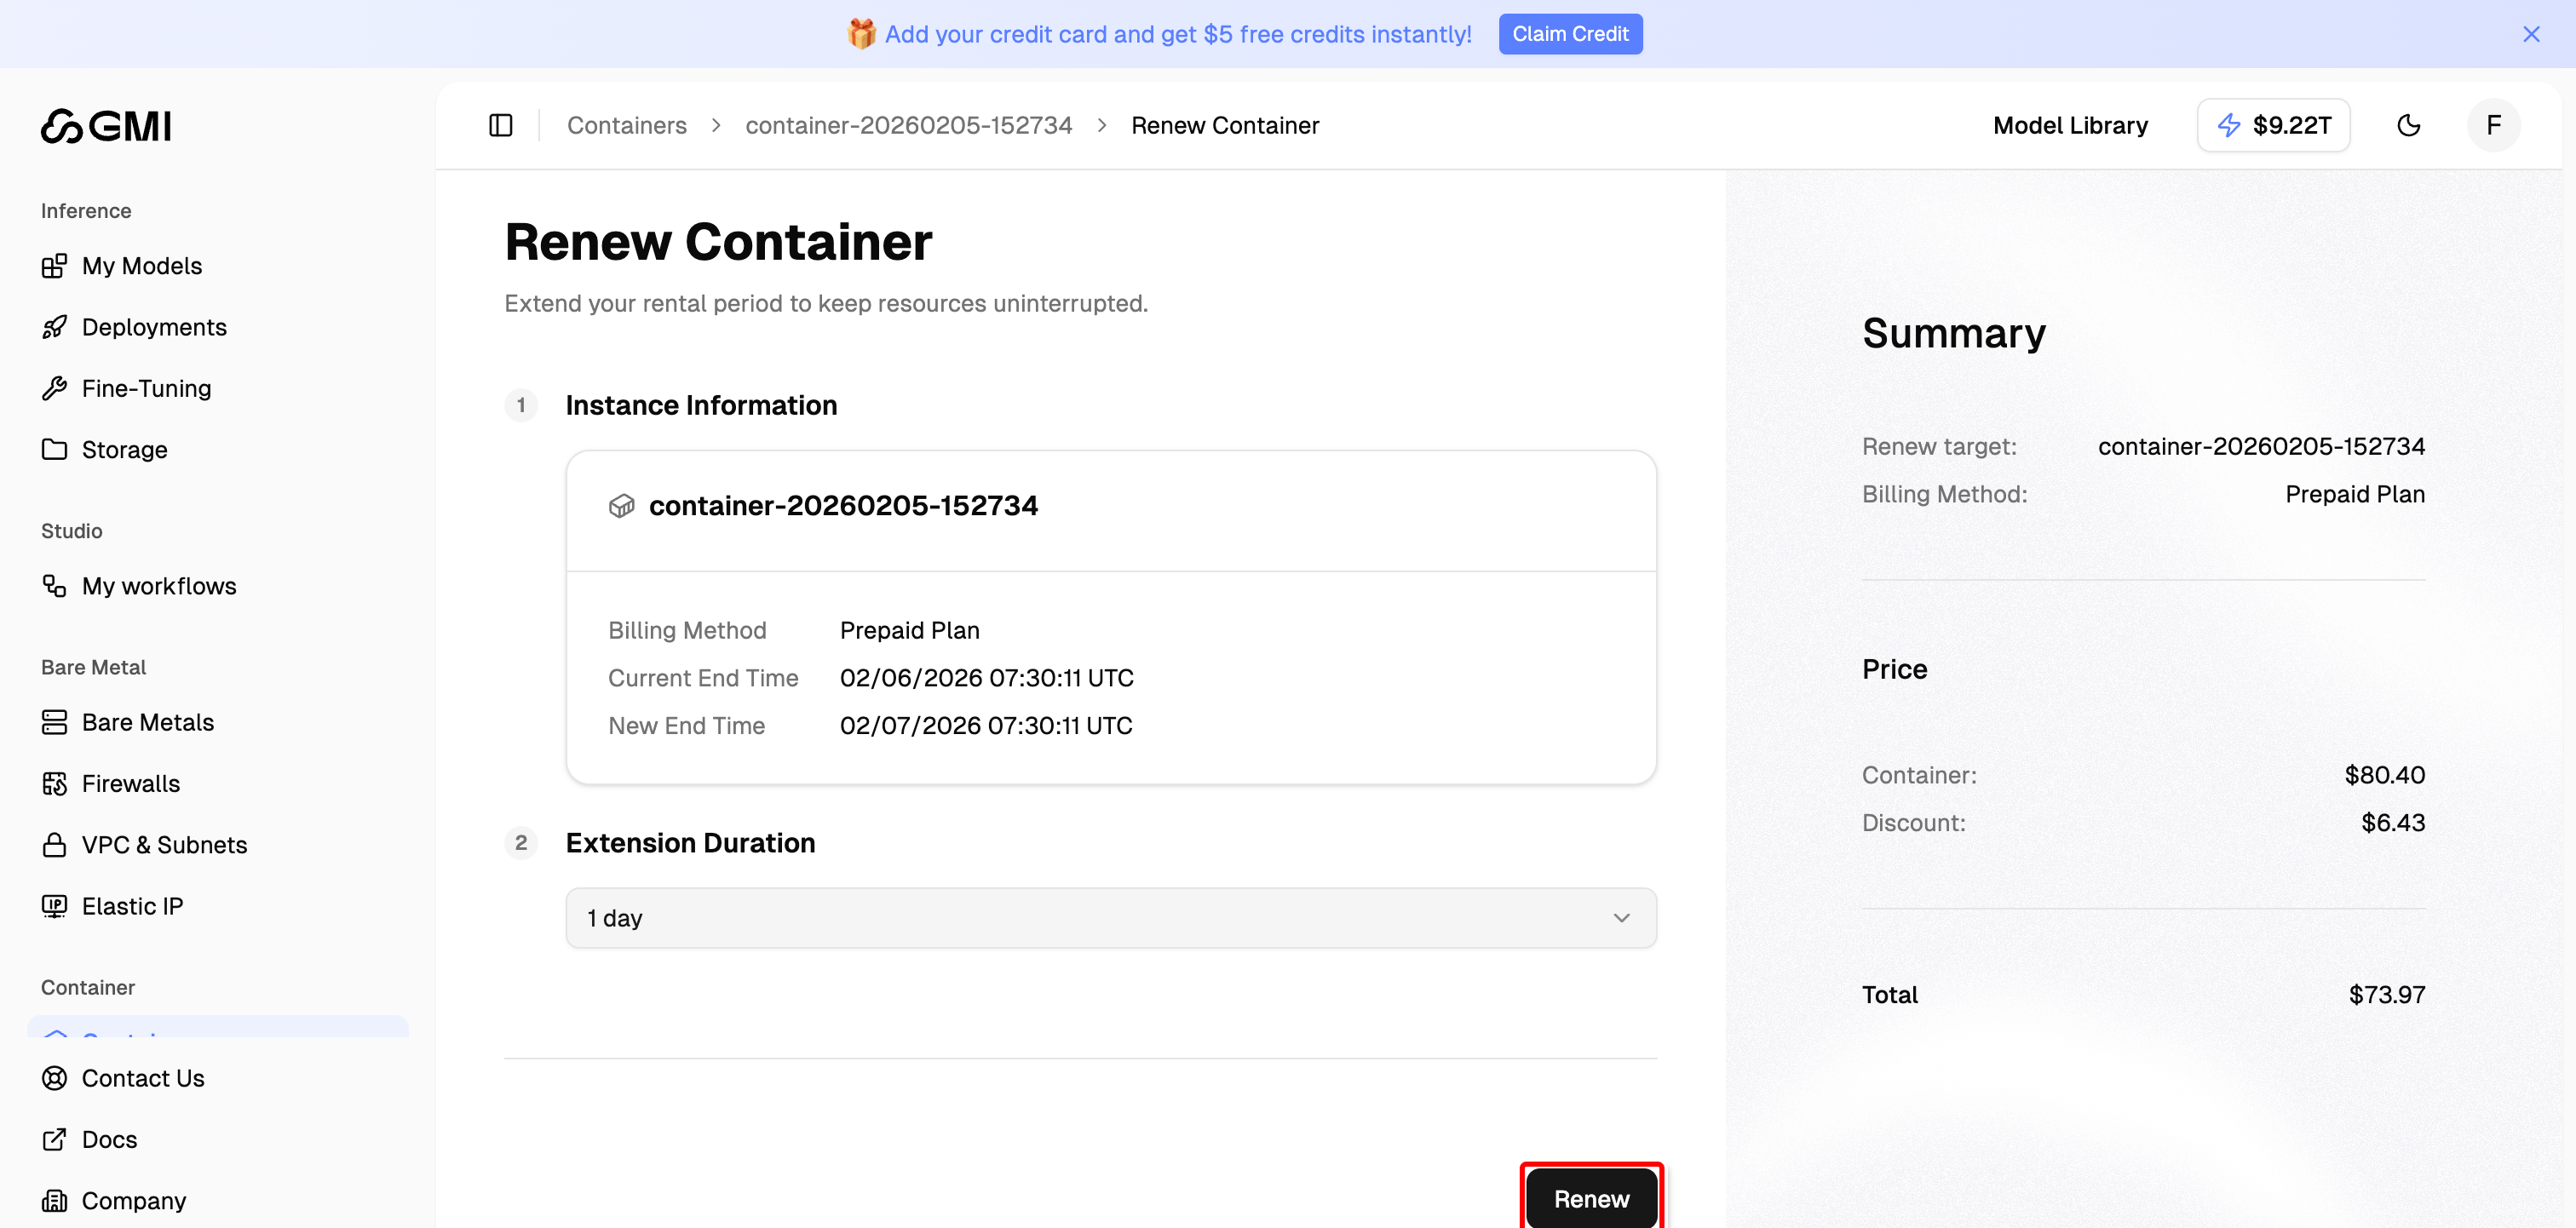 8. Complete the payment process to finalize the renewal
Renew your container before the expiration date to avoid any service interruption. You can renew at any time while the container is running.
### Terminate
The Terminate option is only available for containers with **Pay as you go** billing method. Prepaid Plan containers cannot be terminated before their rental period ends.
1. Locate the container you want to terminate
2. Click the "**More actions**" button (three dots icon)
3. Select "**Terminate**" from the dropdown menu
8. Complete the payment process to finalize the renewal
Renew your container before the expiration date to avoid any service interruption. You can renew at any time while the container is running.
### Terminate
The Terminate option is only available for containers with **Pay as you go** billing method. Prepaid Plan containers cannot be terminated before their rental period ends.
1. Locate the container you want to terminate
2. Click the "**More actions**" button (three dots icon)
3. Select "**Terminate**" from the dropdown menu
 4. Review the dialog, if the container has an Elastic IP attached, note that **the EIP will NOT be automatically released**. You must manually release it from the Elastic IP console afterwards if you no longer need it
5. Type **`TERMINATE`** in the confirmation field
6. Click "**Confirm**" to proceed
4. Review the dialog, if the container has an Elastic IP attached, note that **the EIP will NOT be automatically released**. You must manually release it from the Elastic IP console afterwards if you no longer need it
5. Type **`TERMINATE`** in the confirmation field
6. Click "**Confirm**" to proceed
 ## Networking
Modify a running container's networking attachments from its **Detail** page (click the container name in the list to open it). These changes apply immediately without restarting the container.
**Order matters.** A firewall is scoped to the container's public IP, so the EIP must be attached first before you can associate a firewall. Follow this order:
* **Attaching**: associate the **EIP first**, then the **firewall**
* **Detaching**: disassociate the **firewall first**, then the **EIP**
### Associate EIP
Attach an Elastic IP to give the container a public IP address. **Do this before associating a firewall.** On its own, an EIP does not allow any traffic through, a firewall must be attached afterwards to permit inbound connections.
1. Open the container's detail page
2. In the **Networking Configurations** section, click "**Associate EIP**"
## Networking
Modify a running container's networking attachments from its **Detail** page (click the container name in the list to open it). These changes apply immediately without restarting the container.
**Order matters.** A firewall is scoped to the container's public IP, so the EIP must be attached first before you can associate a firewall. Follow this order:
* **Attaching**: associate the **EIP first**, then the **firewall**
* **Detaching**: disassociate the **firewall first**, then the **EIP**
### Associate EIP
Attach an Elastic IP to give the container a public IP address. **Do this before associating a firewall.** On its own, an EIP does not allow any traffic through, a firewall must be attached afterwards to permit inbound connections.
1. Open the container's detail page
2. In the **Networking Configurations** section, click "**Associate EIP**"
 3. In the dialog, select an Elastic IP from the **Elastic IP Address** dropdown (only Disassociated EIPs in the same data center as the container are listed)
 4. Click "**Confirm**" to attach the EIP
If no EIPs appear in the dropdown, allocate one from the **Elastic IP** page first, see [Allocate an Elastic IP](/cluster-engine/resources/elastic-ip#allocate-an-elastic-ip).
### Associate Firewall
Attach a firewall to a container that has an EIP but no firewall associated. **Only do this after an EIP is associated.**
1. Open the container's detail page
2. Scroll to the **Firewalls** section and click "**Associate Firewall**"
4. Click "**Confirm**" to attach the EIP
If no EIPs appear in the dropdown, allocate one from the **Elastic IP** page first, see [Allocate an Elastic IP](/cluster-engine/resources/elastic-ip#allocate-an-elastic-ip).
### Associate Firewall
Attach a firewall to a container that has an EIP but no firewall associated. **Only do this after an EIP is associated.**
1. Open the container's detail page
2. Scroll to the **Firewalls** section and click "**Associate Firewall**"
 3. In the dialog, select a firewall from the **Firewall** dropdown (only firewalls in the same data center as the container are listed)
 4. Click "**Confirm**" to attach the firewall
To change an existing firewall, disassociate the current one first (see below), then associate a new one. Alternatively, manage associations from the **Firewalls** page, see [Associate a Firewall with Instances](/cluster-engine/resources/firewalls#associate-a-firewall-with-instances).
### Disassociate Firewall
Remove the firewall currently attached to the container. **Do this before disassociating the EIP.** Once the firewall is removed, **no inbound traffic is allowed through the EIP** until you associate another firewall with the appropriate rules.
1. Open the container's detail page
2. Scroll to the **Firewalls** section and click "**Disassociate Firewall**"
4. Click "**Confirm**" to attach the firewall
To change an existing firewall, disassociate the current one first (see below), then associate a new one. Alternatively, manage associations from the **Firewalls** page, see [Associate a Firewall with Instances](/cluster-engine/resources/firewalls#associate-a-firewall-with-instances).
### Disassociate Firewall
Remove the firewall currently attached to the container. **Do this before disassociating the EIP.** Once the firewall is removed, **no inbound traffic is allowed through the EIP** until you associate another firewall with the appropriate rules.
1. Open the container's detail page
2. Scroll to the **Firewalls** section and click "**Disassociate Firewall**"
 3. In the confirmation dialog, type **`DISASSOCIATE`** to confirm
 4. Click "**Confirm**" to detach the firewall
Without a firewall, the container will not accept any inbound connections even if it has an EIP. To resume inbound traffic, associate another firewall, see [Associate a Firewall with Instances](/cluster-engine/resources/firewalls#associate-a-firewall-with-instances).
### Disassociate EIP
Detach the Elastic IP from the container. **Disassociate the firewall first** before removing the EIP. The EIP returns to your account as **Disassociated**, you can associate it with another instance later or release it entirely (see [Elastic IP](/cluster-engine/resources/elastic-ip)).
1. Open the container's detail page
2. In the **Networking Configurations** section, click "**Disassociate EIP**"
4. Click "**Confirm**" to detach the firewall
Without a firewall, the container will not accept any inbound connections even if it has an EIP. To resume inbound traffic, associate another firewall, see [Associate a Firewall with Instances](/cluster-engine/resources/firewalls#associate-a-firewall-with-instances).
### Disassociate EIP
Detach the Elastic IP from the container. **Disassociate the firewall first** before removing the EIP. The EIP returns to your account as **Disassociated**, you can associate it with another instance later or release it entirely (see [Elastic IP](/cluster-engine/resources/elastic-ip)).
1. Open the container's detail page
2. In the **Networking Configurations** section, click "**Disassociate EIP**"
 3. In the confirmation dialog, type **`DISASSOCIATE`** to confirm
 4. Click "**Confirm**" to detach the EIP
Once the EIP is disassociated, the container will lose its public IP connectivity. Any external services or clients relying on the IP will fail until you associate a new EIP.
## Operations & Monitoring
Day-to-day observability, these actions read container state without changing it.
### View Logs
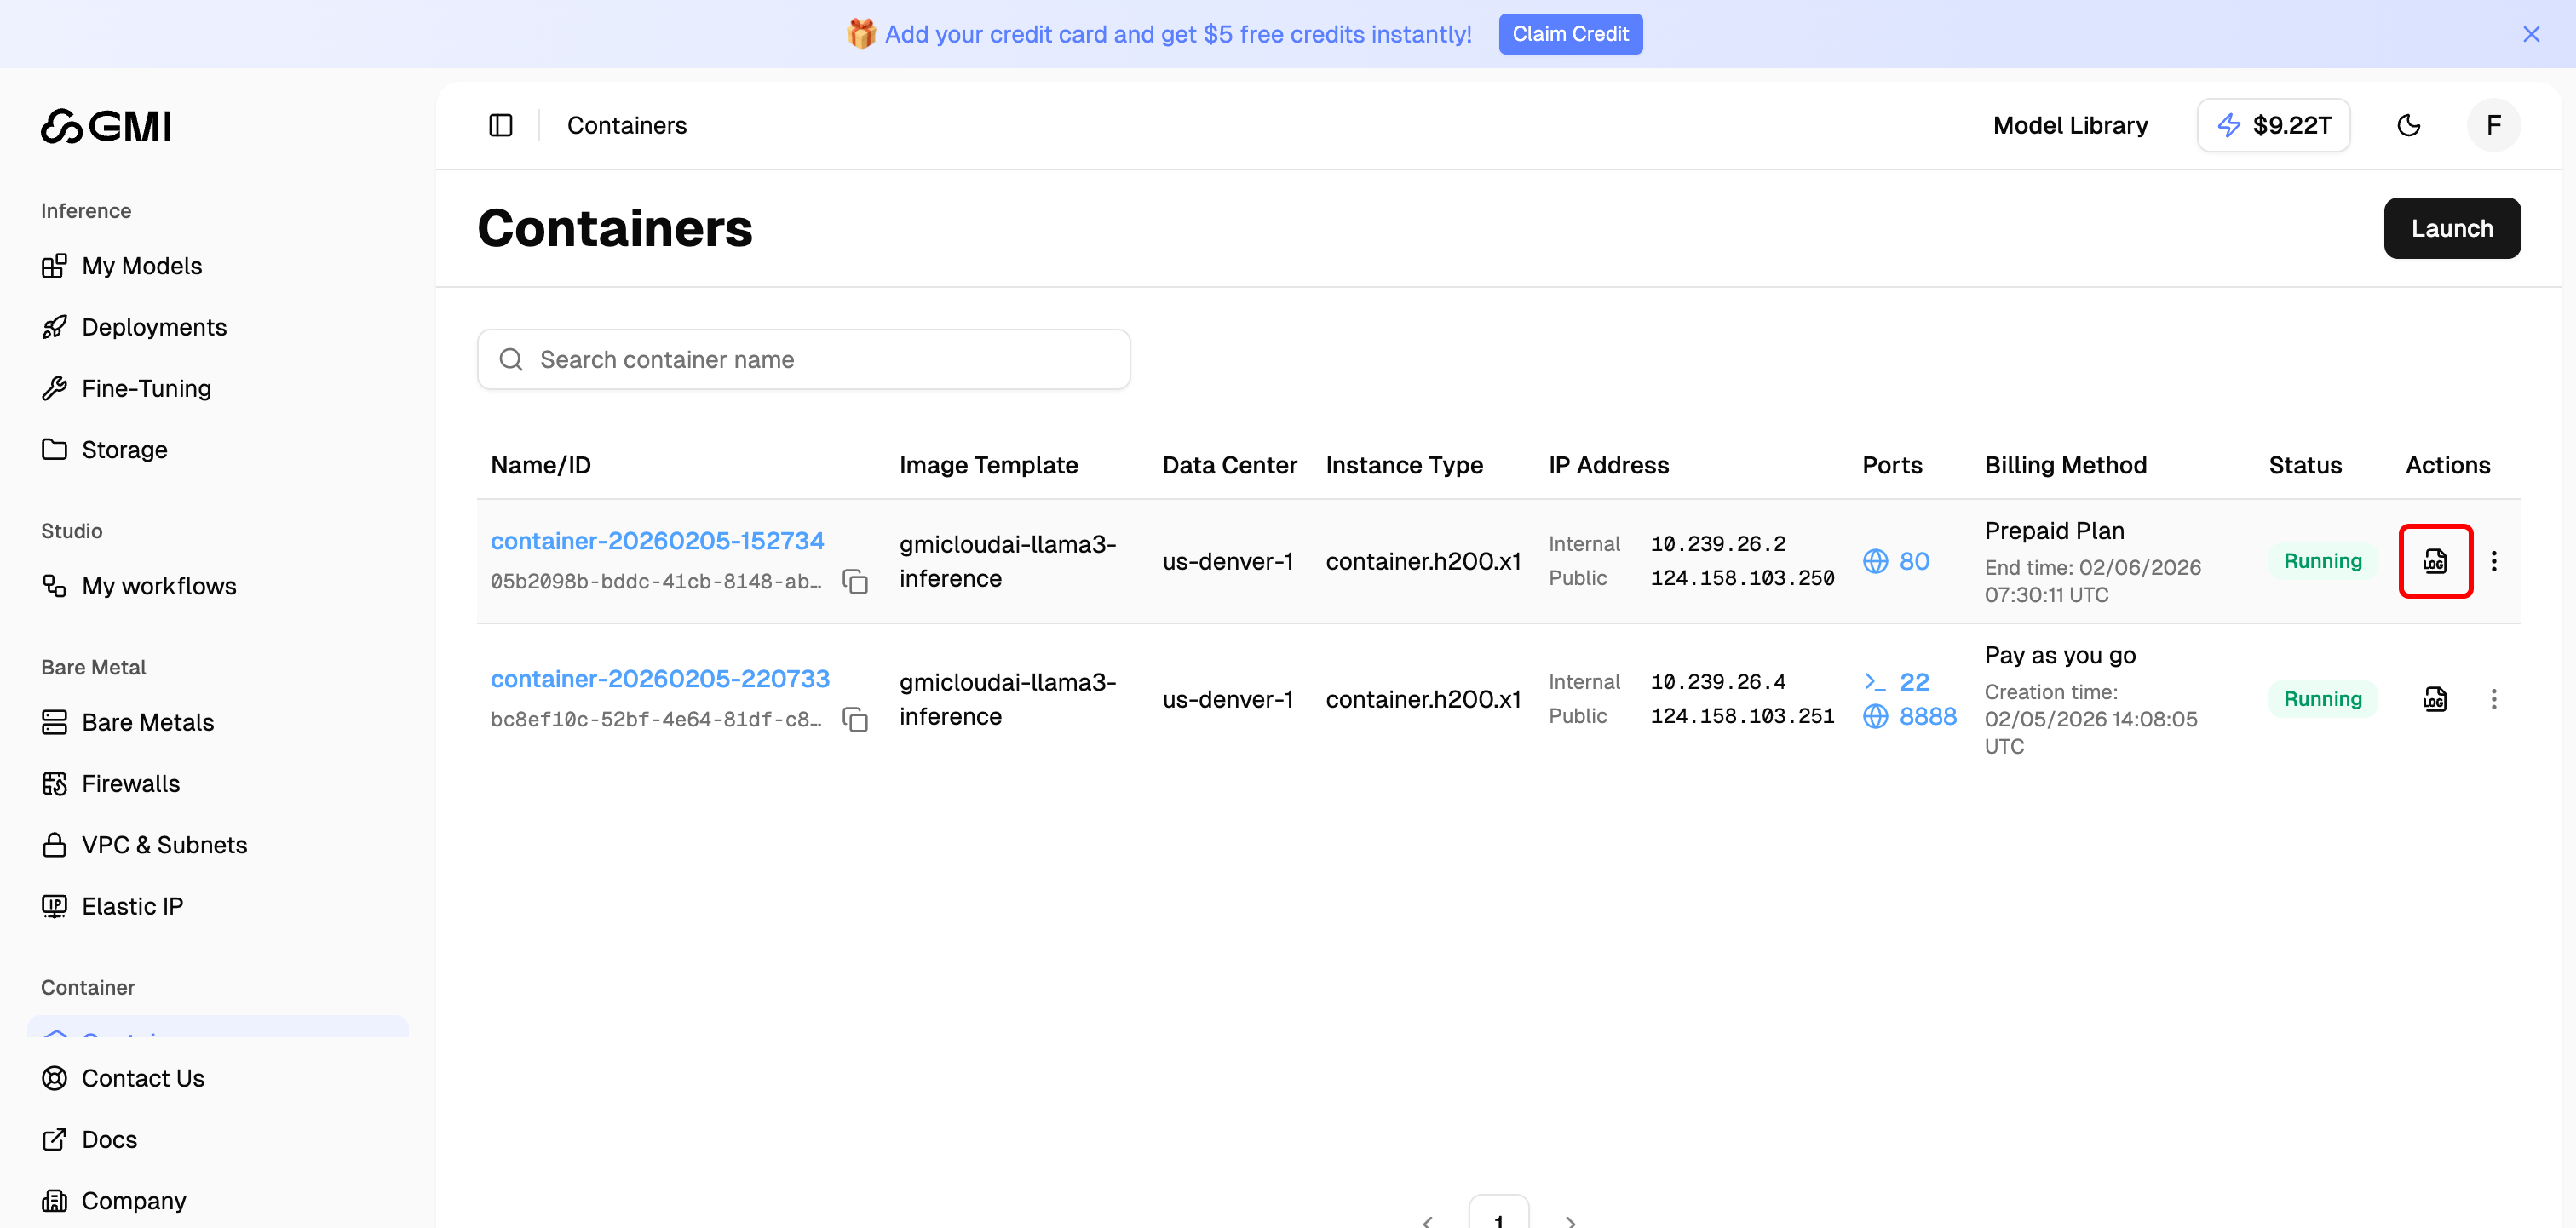
1. Locate the container whose logs you want to view
2. Click the "**View Log**" icon to access the logs
4. Click "**Confirm**" to detach the EIP
Once the EIP is disassociated, the container will lose its public IP connectivity. Any external services or clients relying on the IP will fail until you associate a new EIP.
## Operations & Monitoring
Day-to-day observability, these actions read container state without changing it.
### View Logs
1. Locate the container whose logs you want to view
2. Click the "**View Log**" icon to access the logs
 ### Download Logs
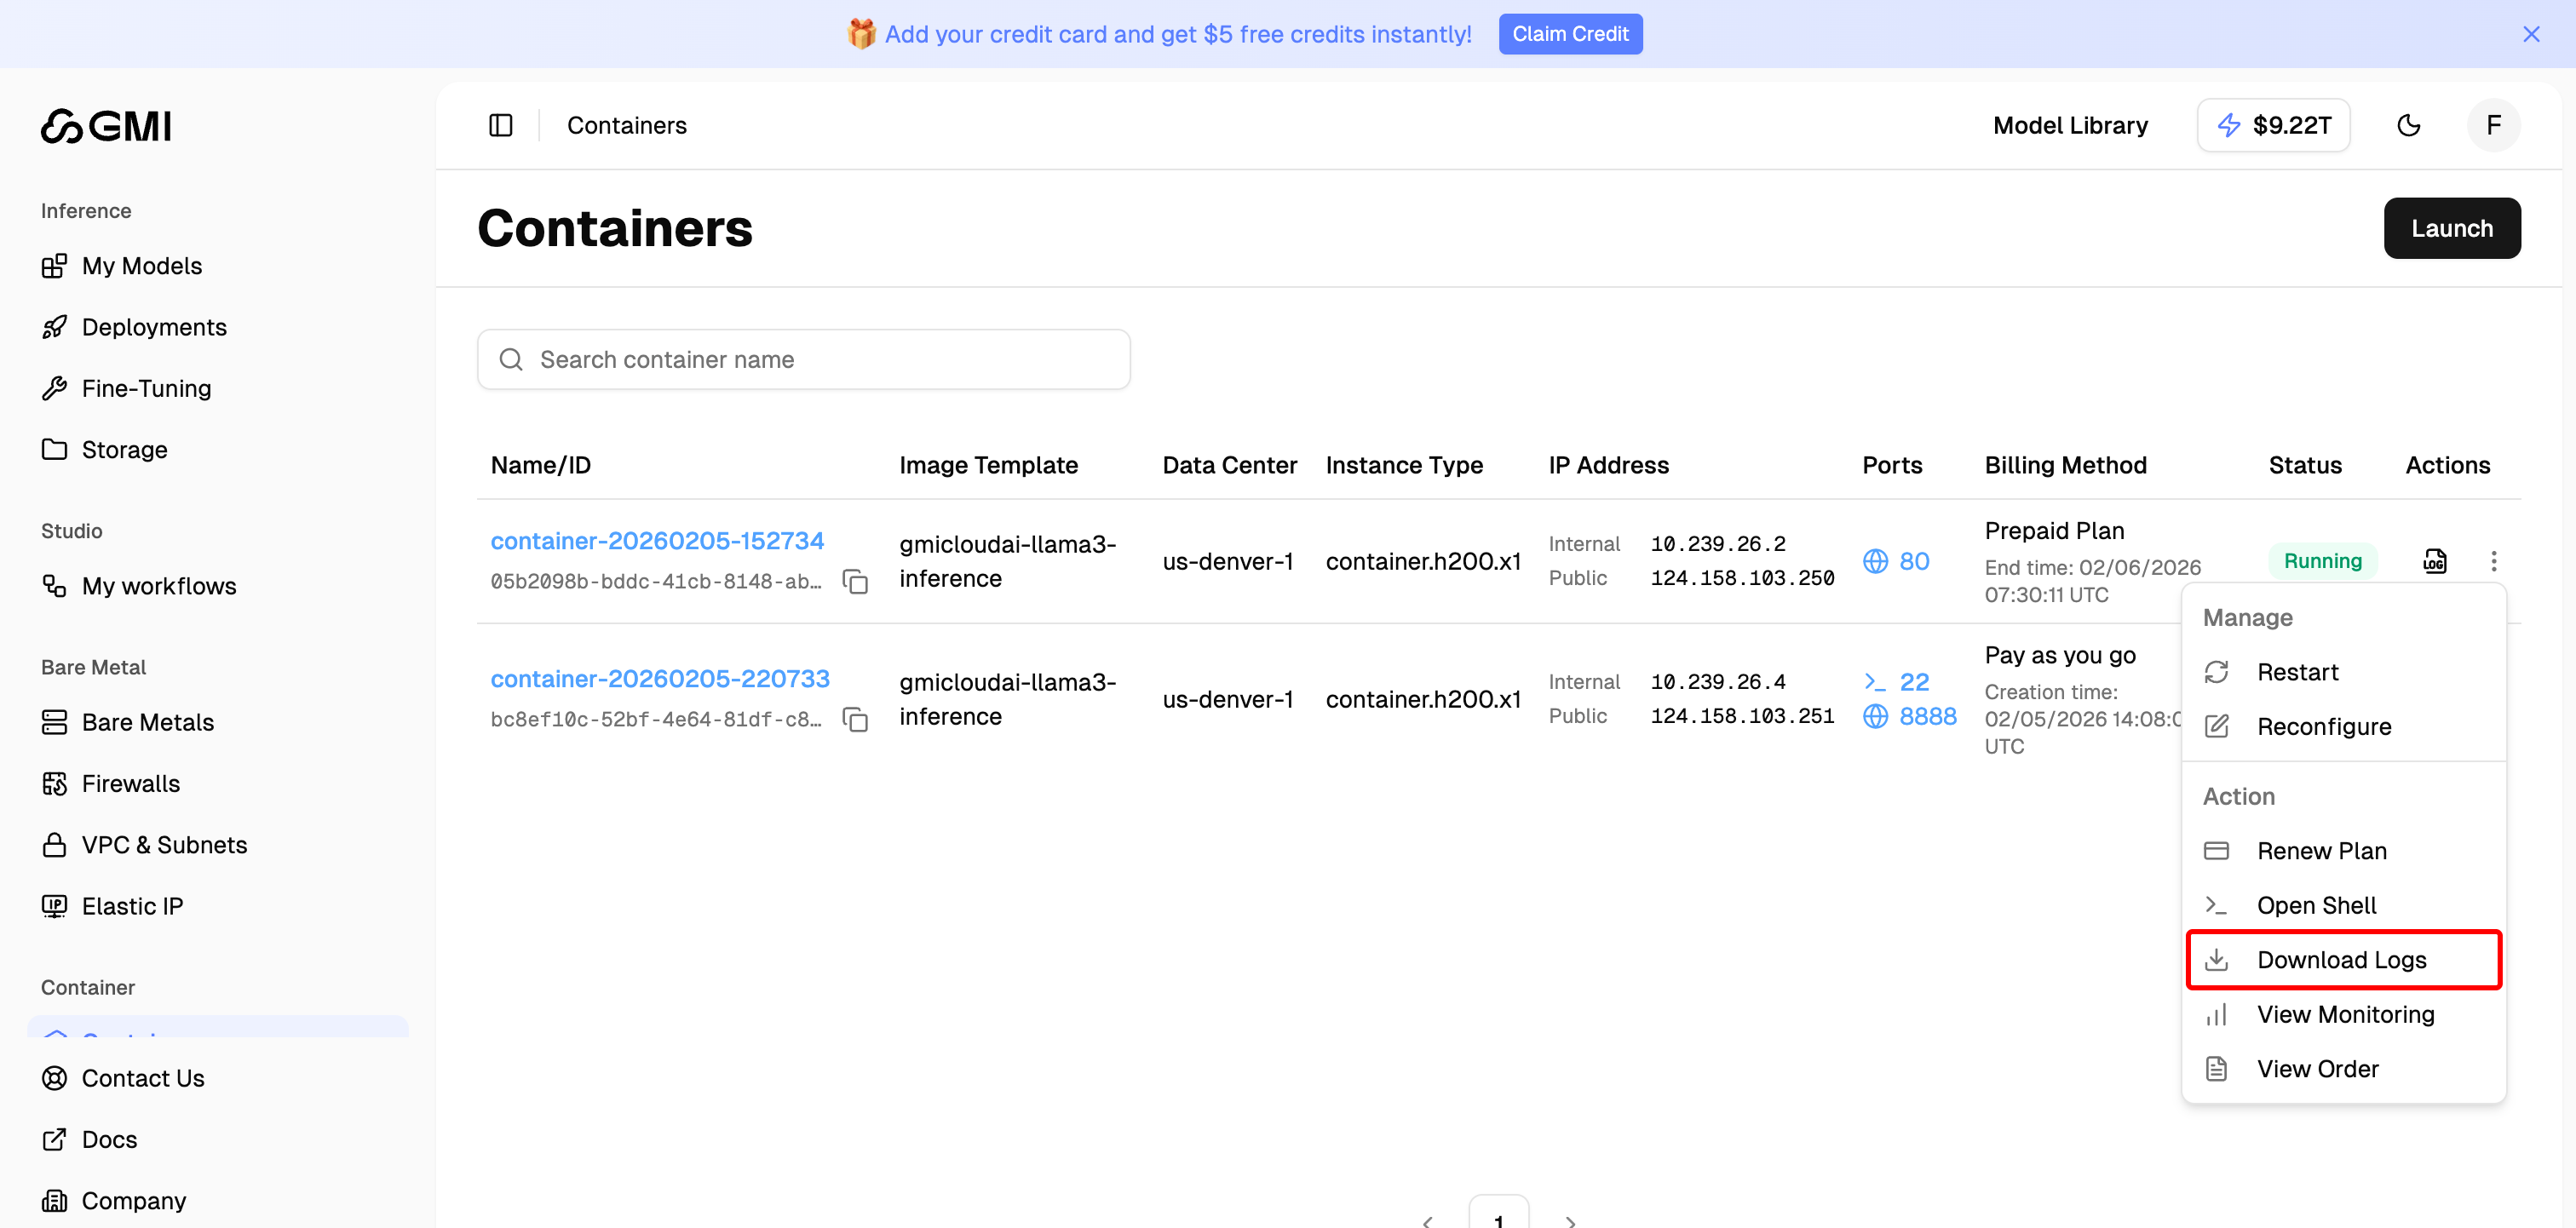
1. Locate the container whose logs you want to download
2. Click the "**More actions**" button (three dots icon)
3. Select "**Download Logs**" from the dropdown menu to download the logs
### Download Logs
1. Locate the container whose logs you want to download
2. Click the "**More actions**" button (three dots icon)
3. Select "**Download Logs**" from the dropdown menu to download the logs
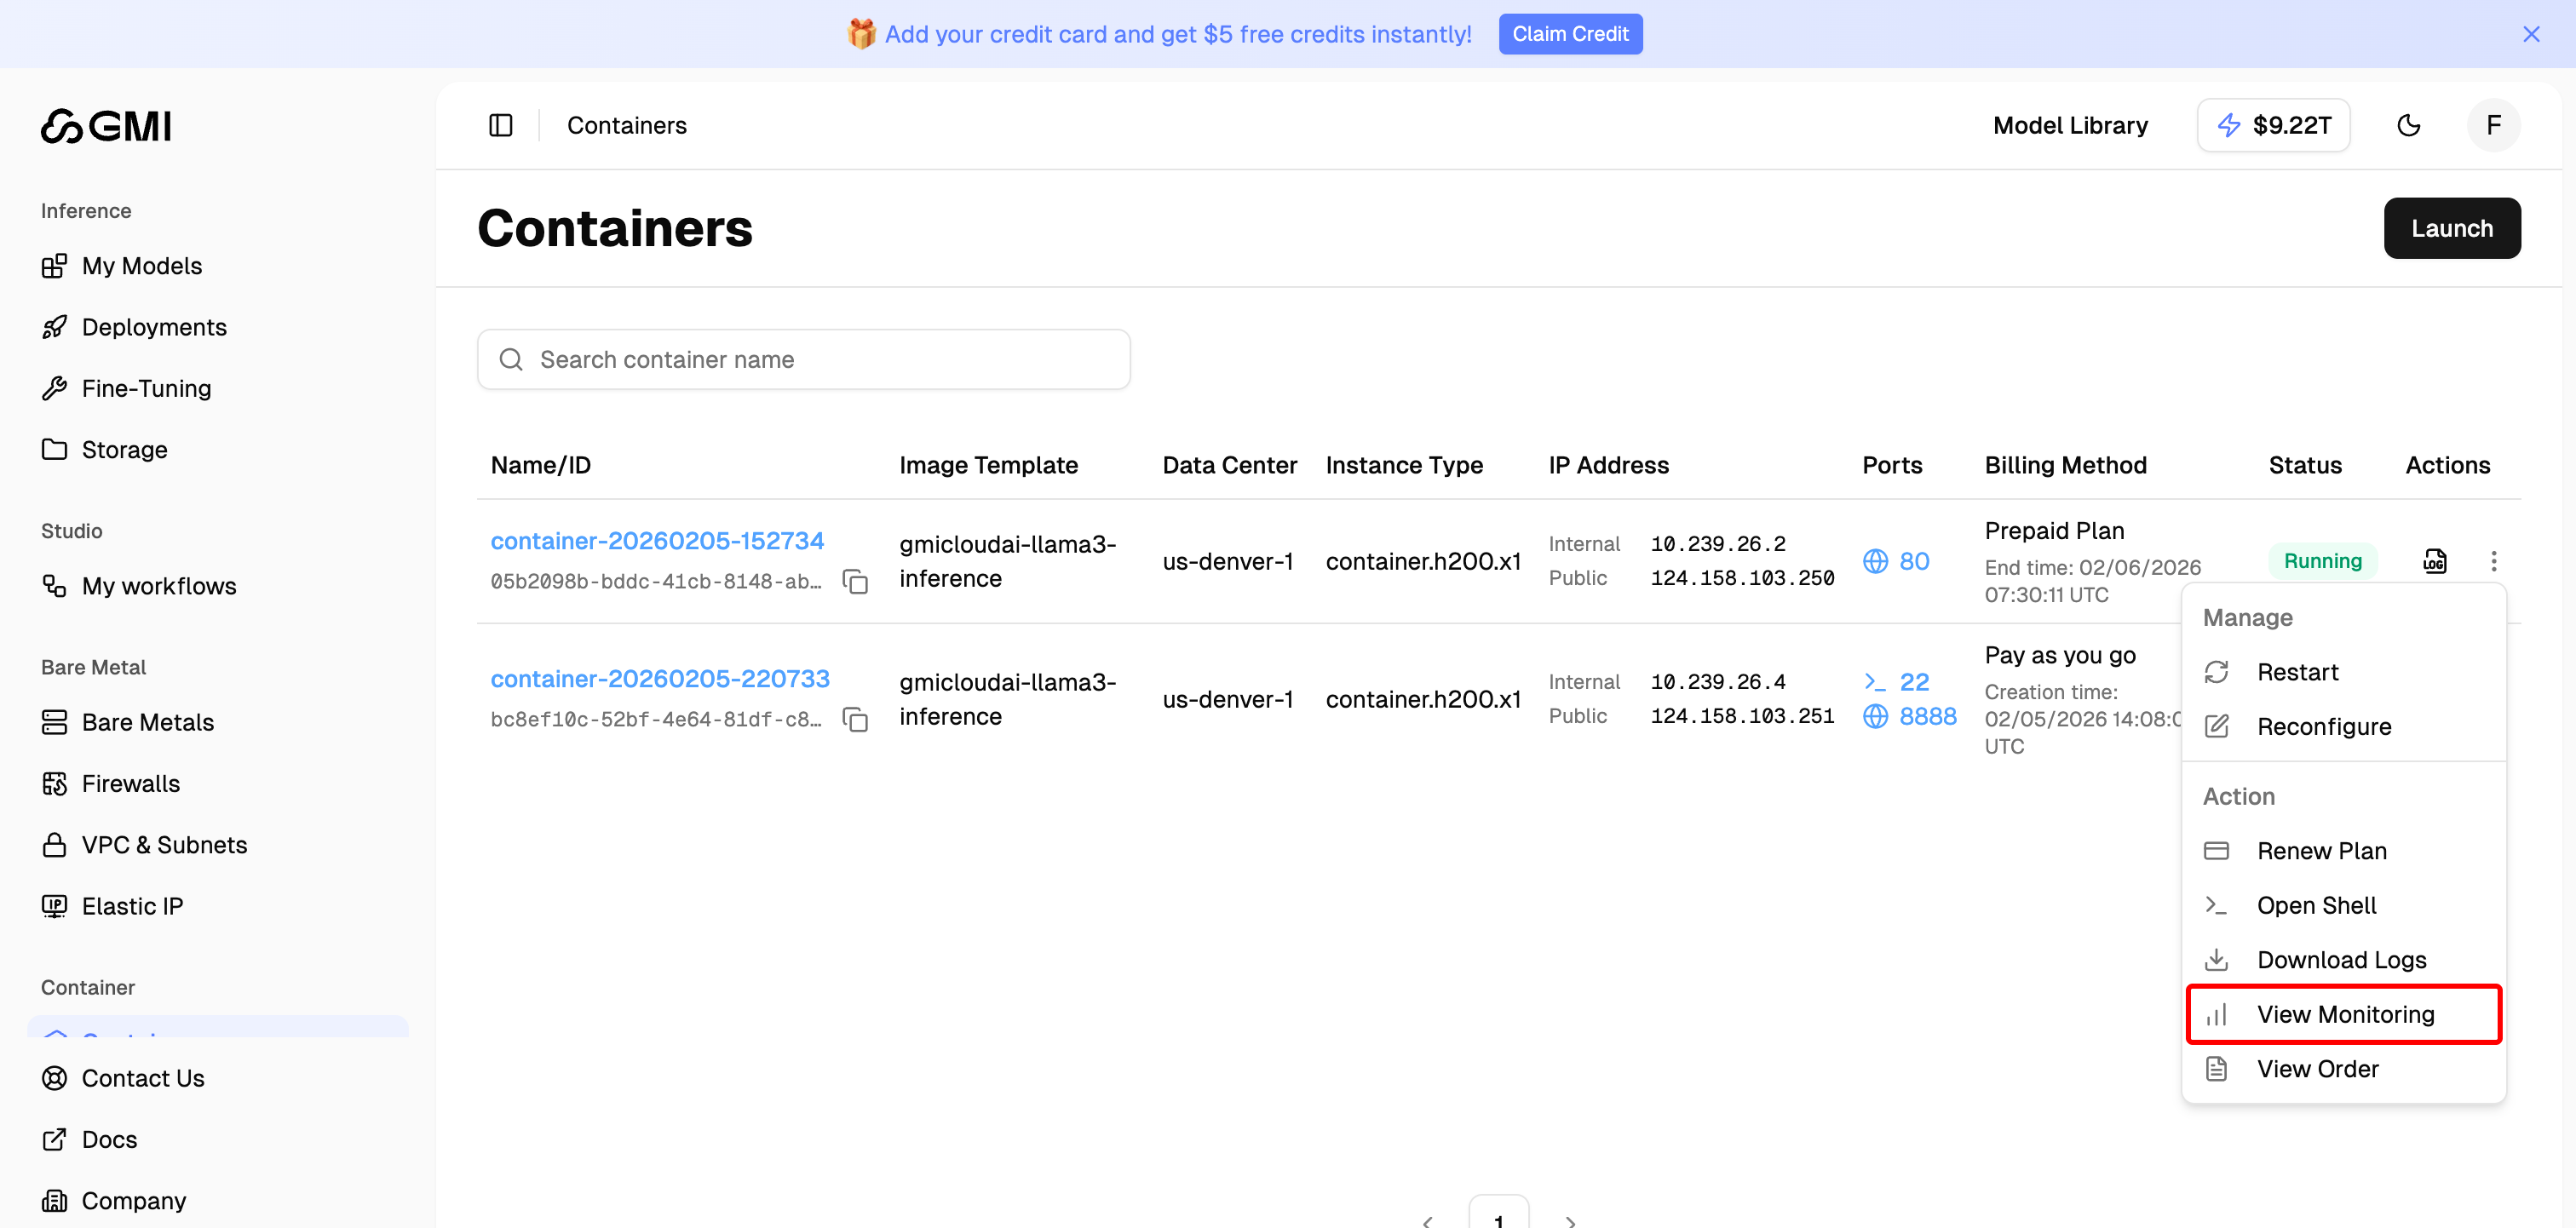
 ### View Monitoring
Monitor your container's resource usage including GPU, CPU, and memory metrics.
1. Locate the container you want to monitor
2. Click the "**More actions**" button (three dots icon)
3. Select "**View Monitoring**" from the dropdown menu
### View Monitoring
Monitor your container's resource usage including GPU, CPU, and memory metrics.
1. Locate the container you want to monitor
2. Click the "**More actions**" button (three dots icon)
3. Select "**View Monitoring**" from the dropdown menu
 4. The monitoring dashboard displays:
* **GPU Usage**: Real-time GPU utilization percentage
* **GPU Memory Usage**: GPU memory consumption
* **CPU Usage**: CPU utilization percentage
* **Memory Usage**: RAM consumption
4. The monitoring dashboard displays:
* **GPU Usage**: Real-time GPU utilization percentage
* **GPU Memory Usage**: GPU memory consumption
* **CPU Usage**: CPU utilization percentage
* **Memory Usage**: RAM consumption
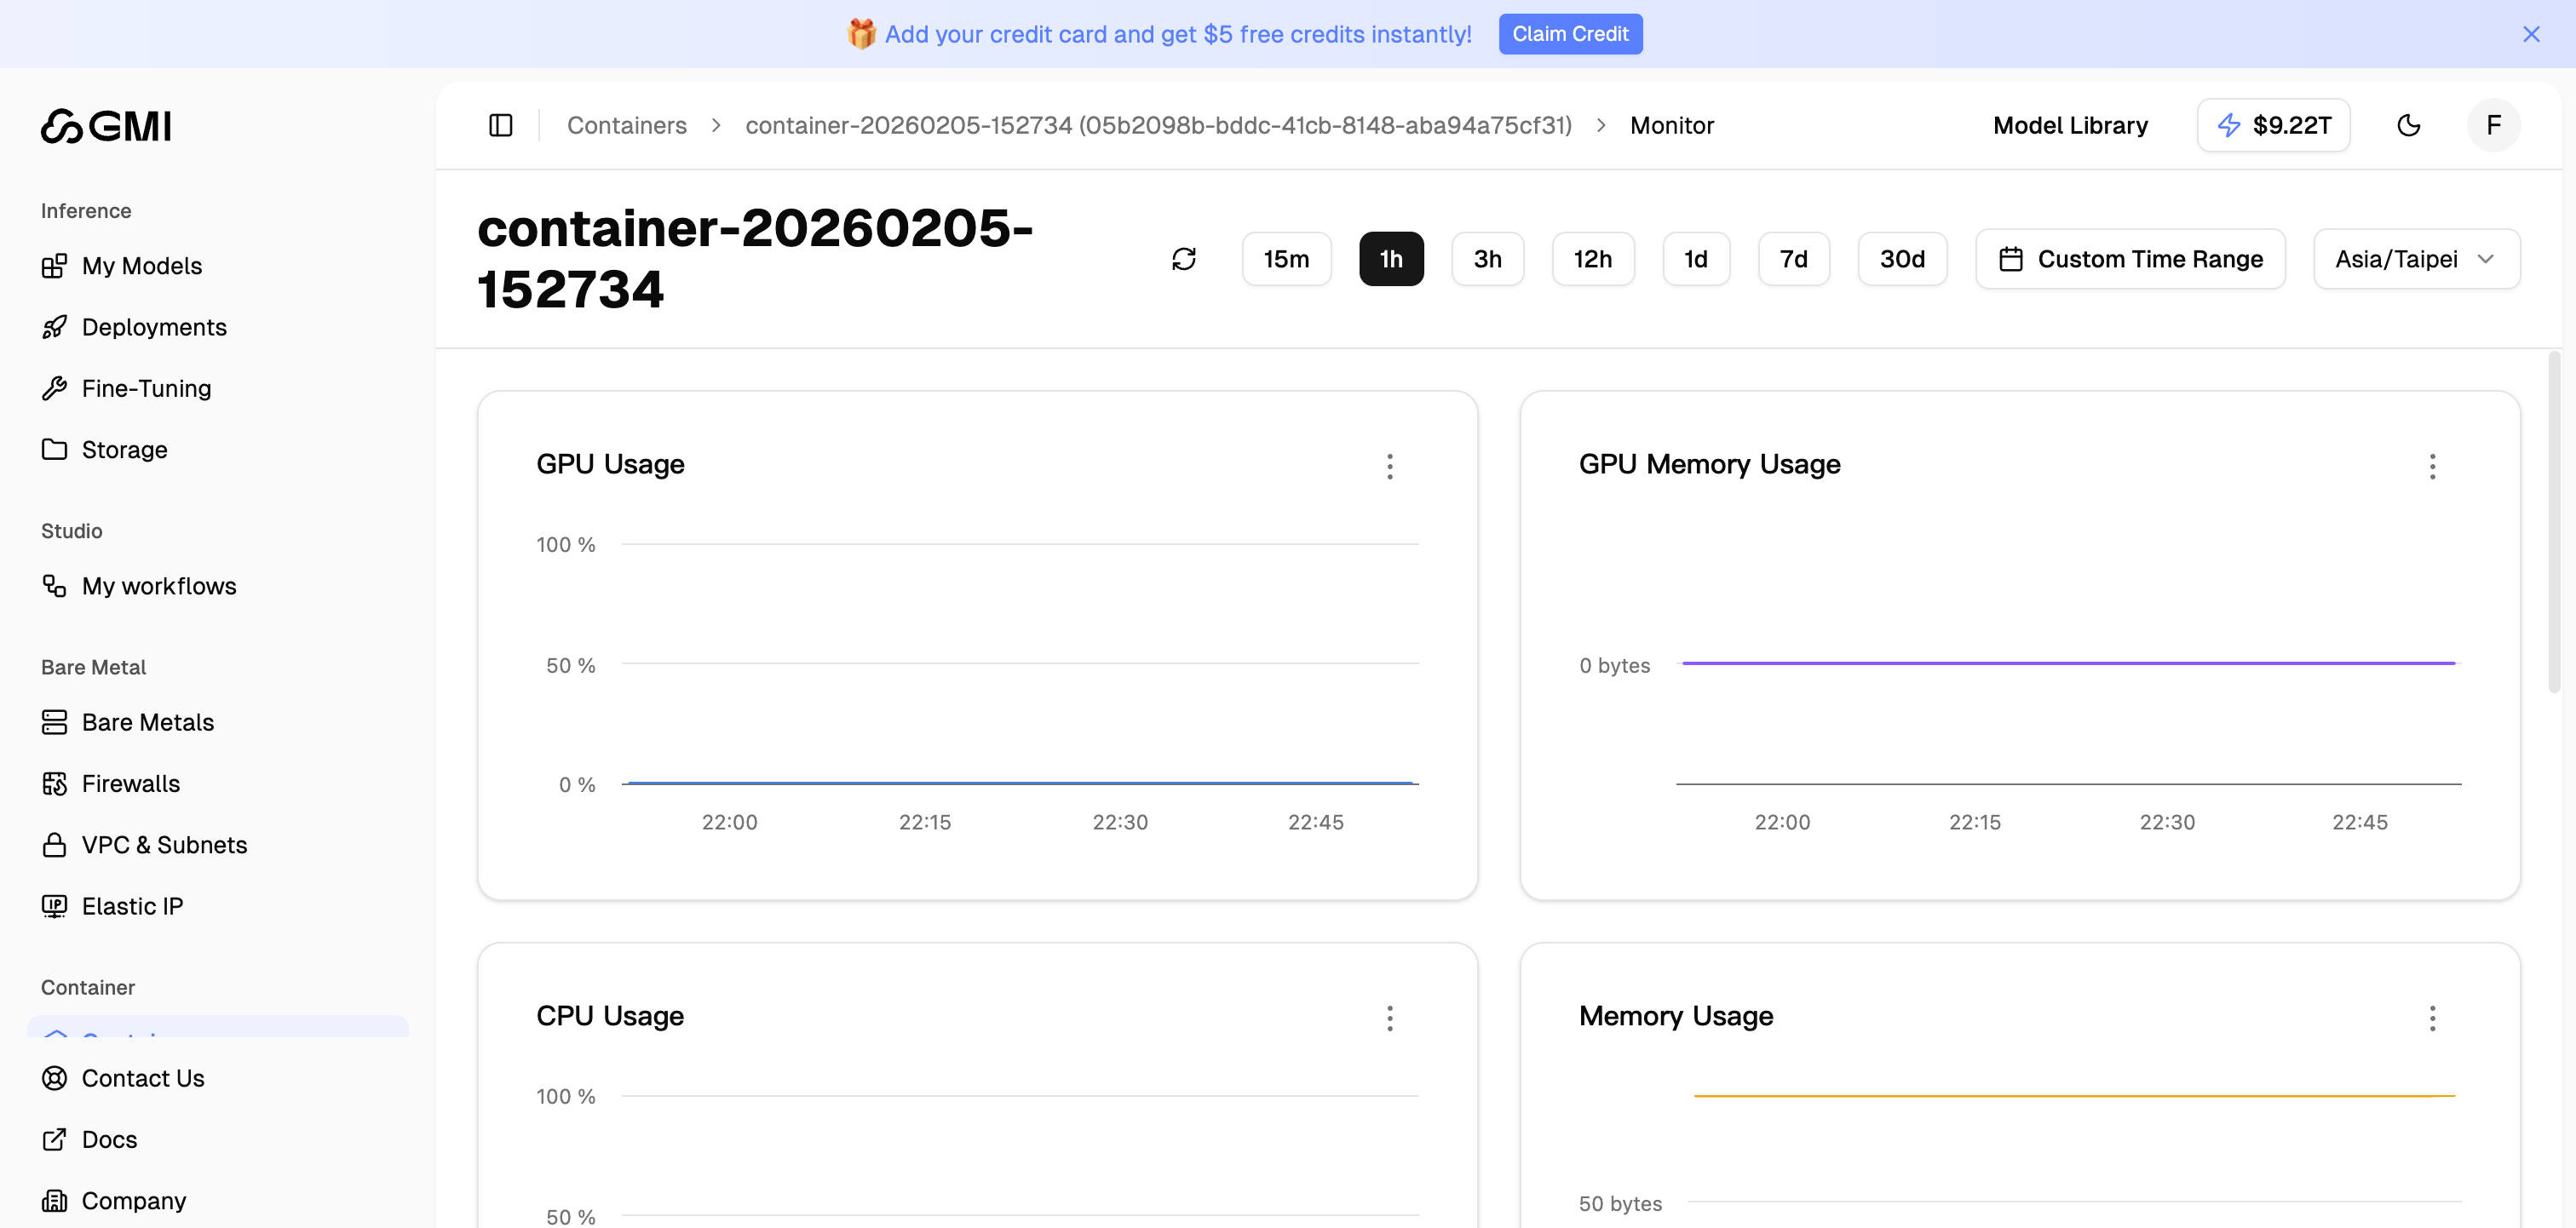 Use the time range selector (15m, 1h, 3h, 12h, 1d, 7d, 30d) to view historical metrics. You can also set a custom time range for more specific analysis.
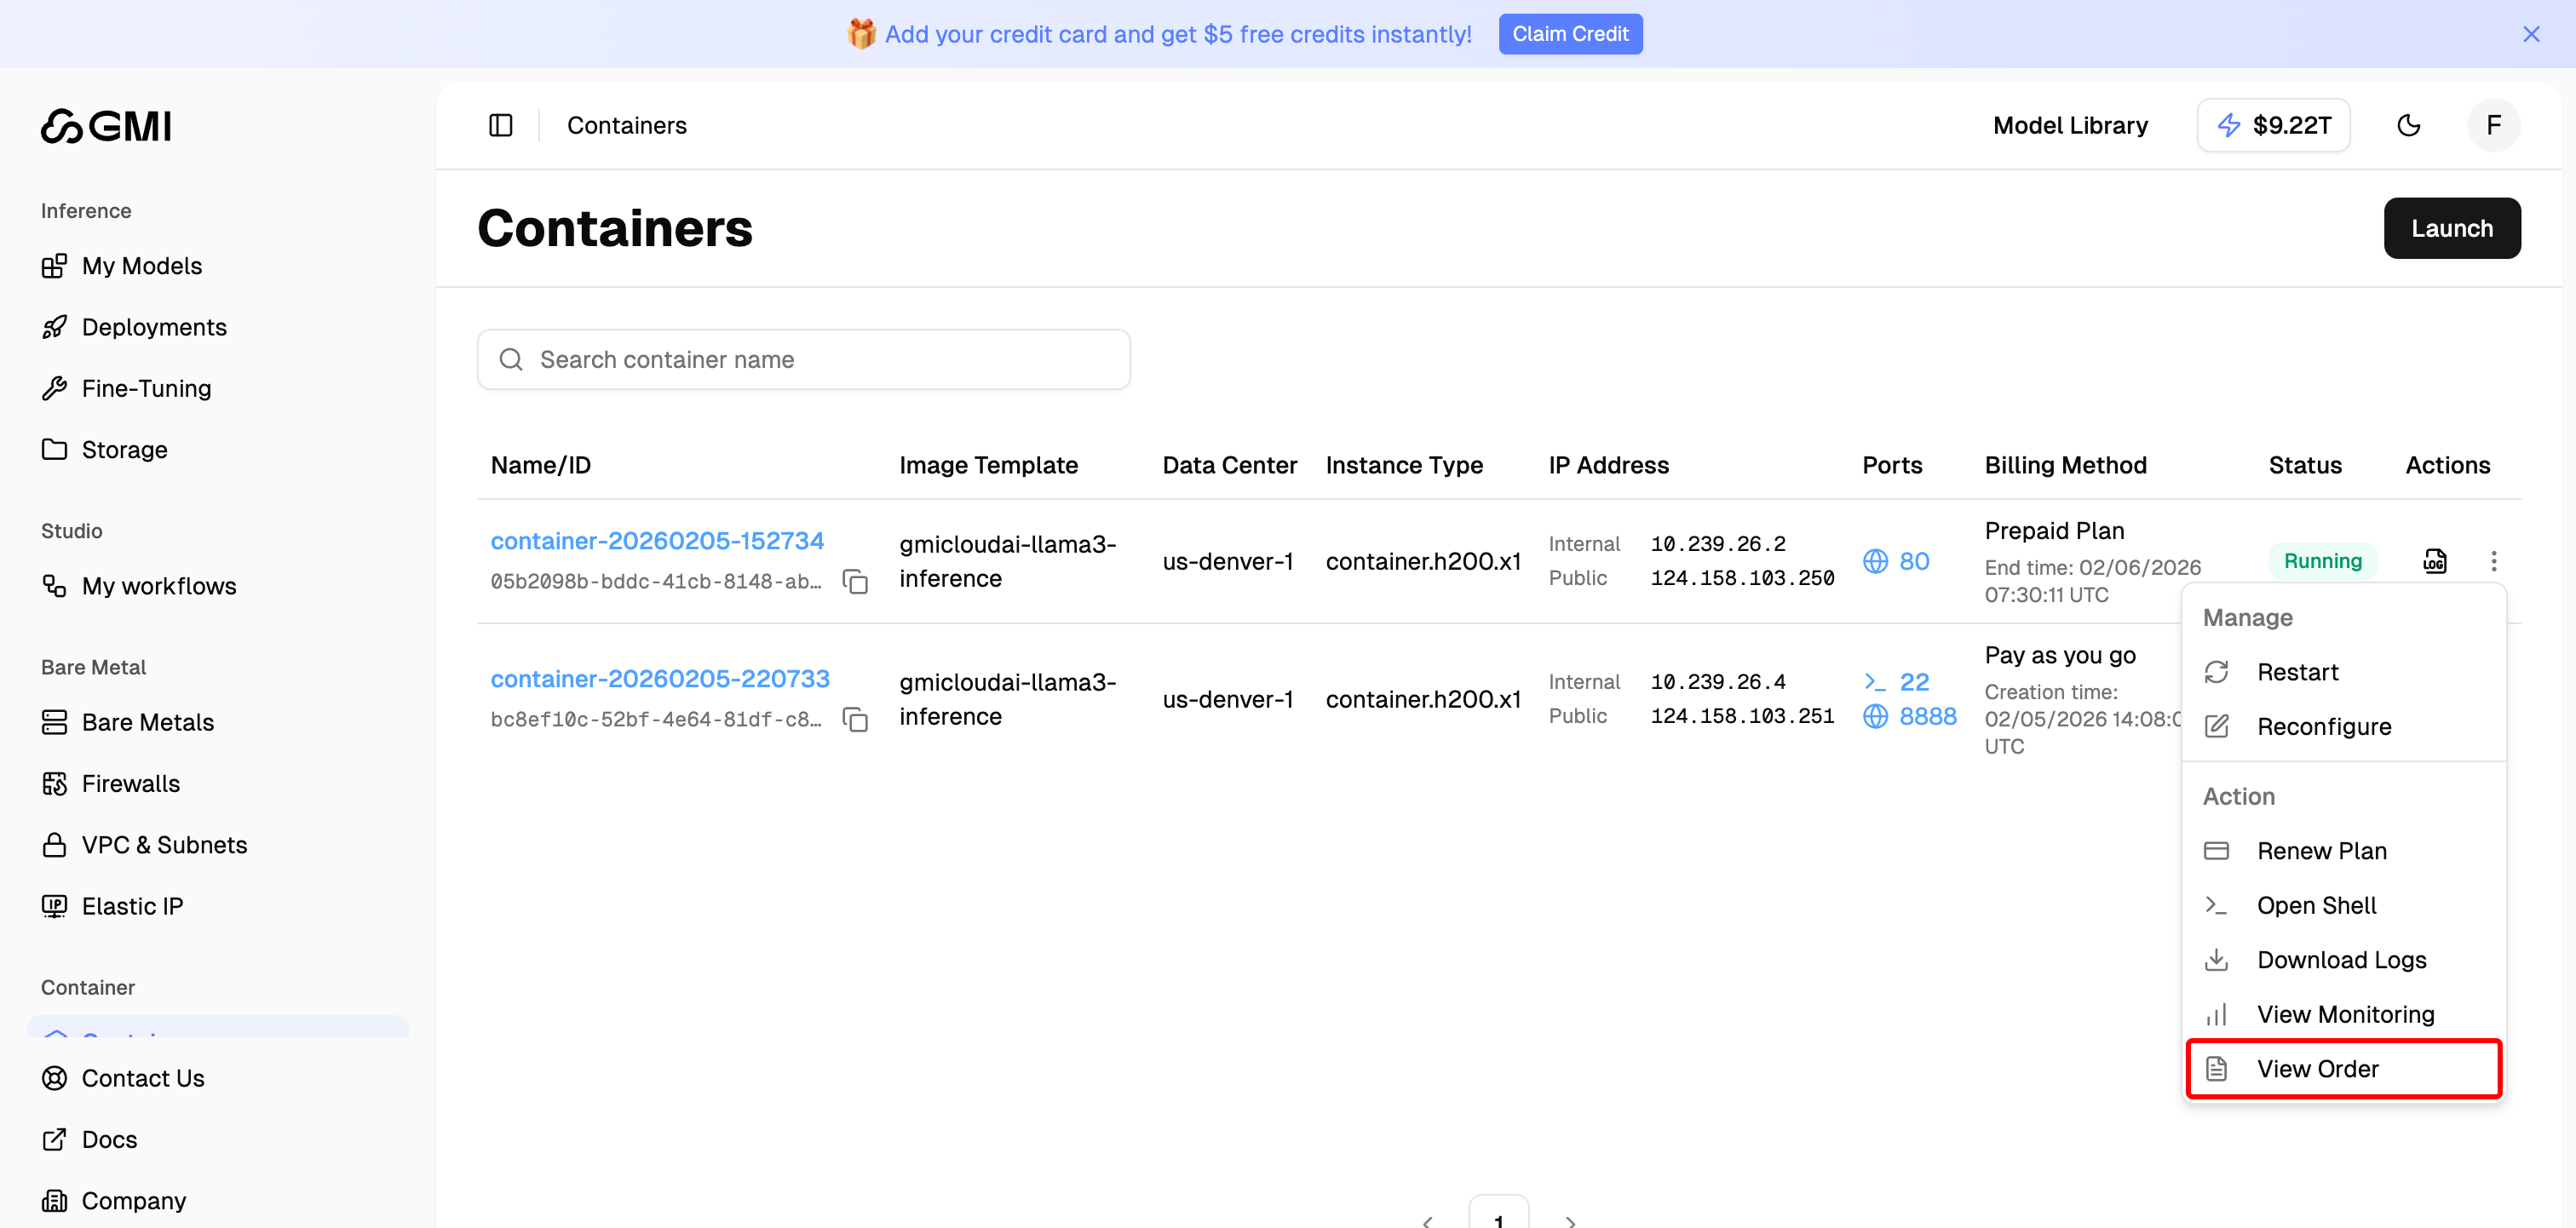
### View Order
View the billing and payment details for your container.
1. Locate the container whose order you want to view
2. Click the "**More actions**" button (three dots icon)
3. Select "**View Order**" from the dropdown menu
Use the time range selector (15m, 1h, 3h, 12h, 1d, 7d, 30d) to view historical metrics. You can also set a custom time range for more specific analysis.
### View Order
View the billing and payment details for your container.
1. Locate the container whose order you want to view
2. Click the "**More actions**" button (three dots icon)
3. Select "**View Order**" from the dropdown menu
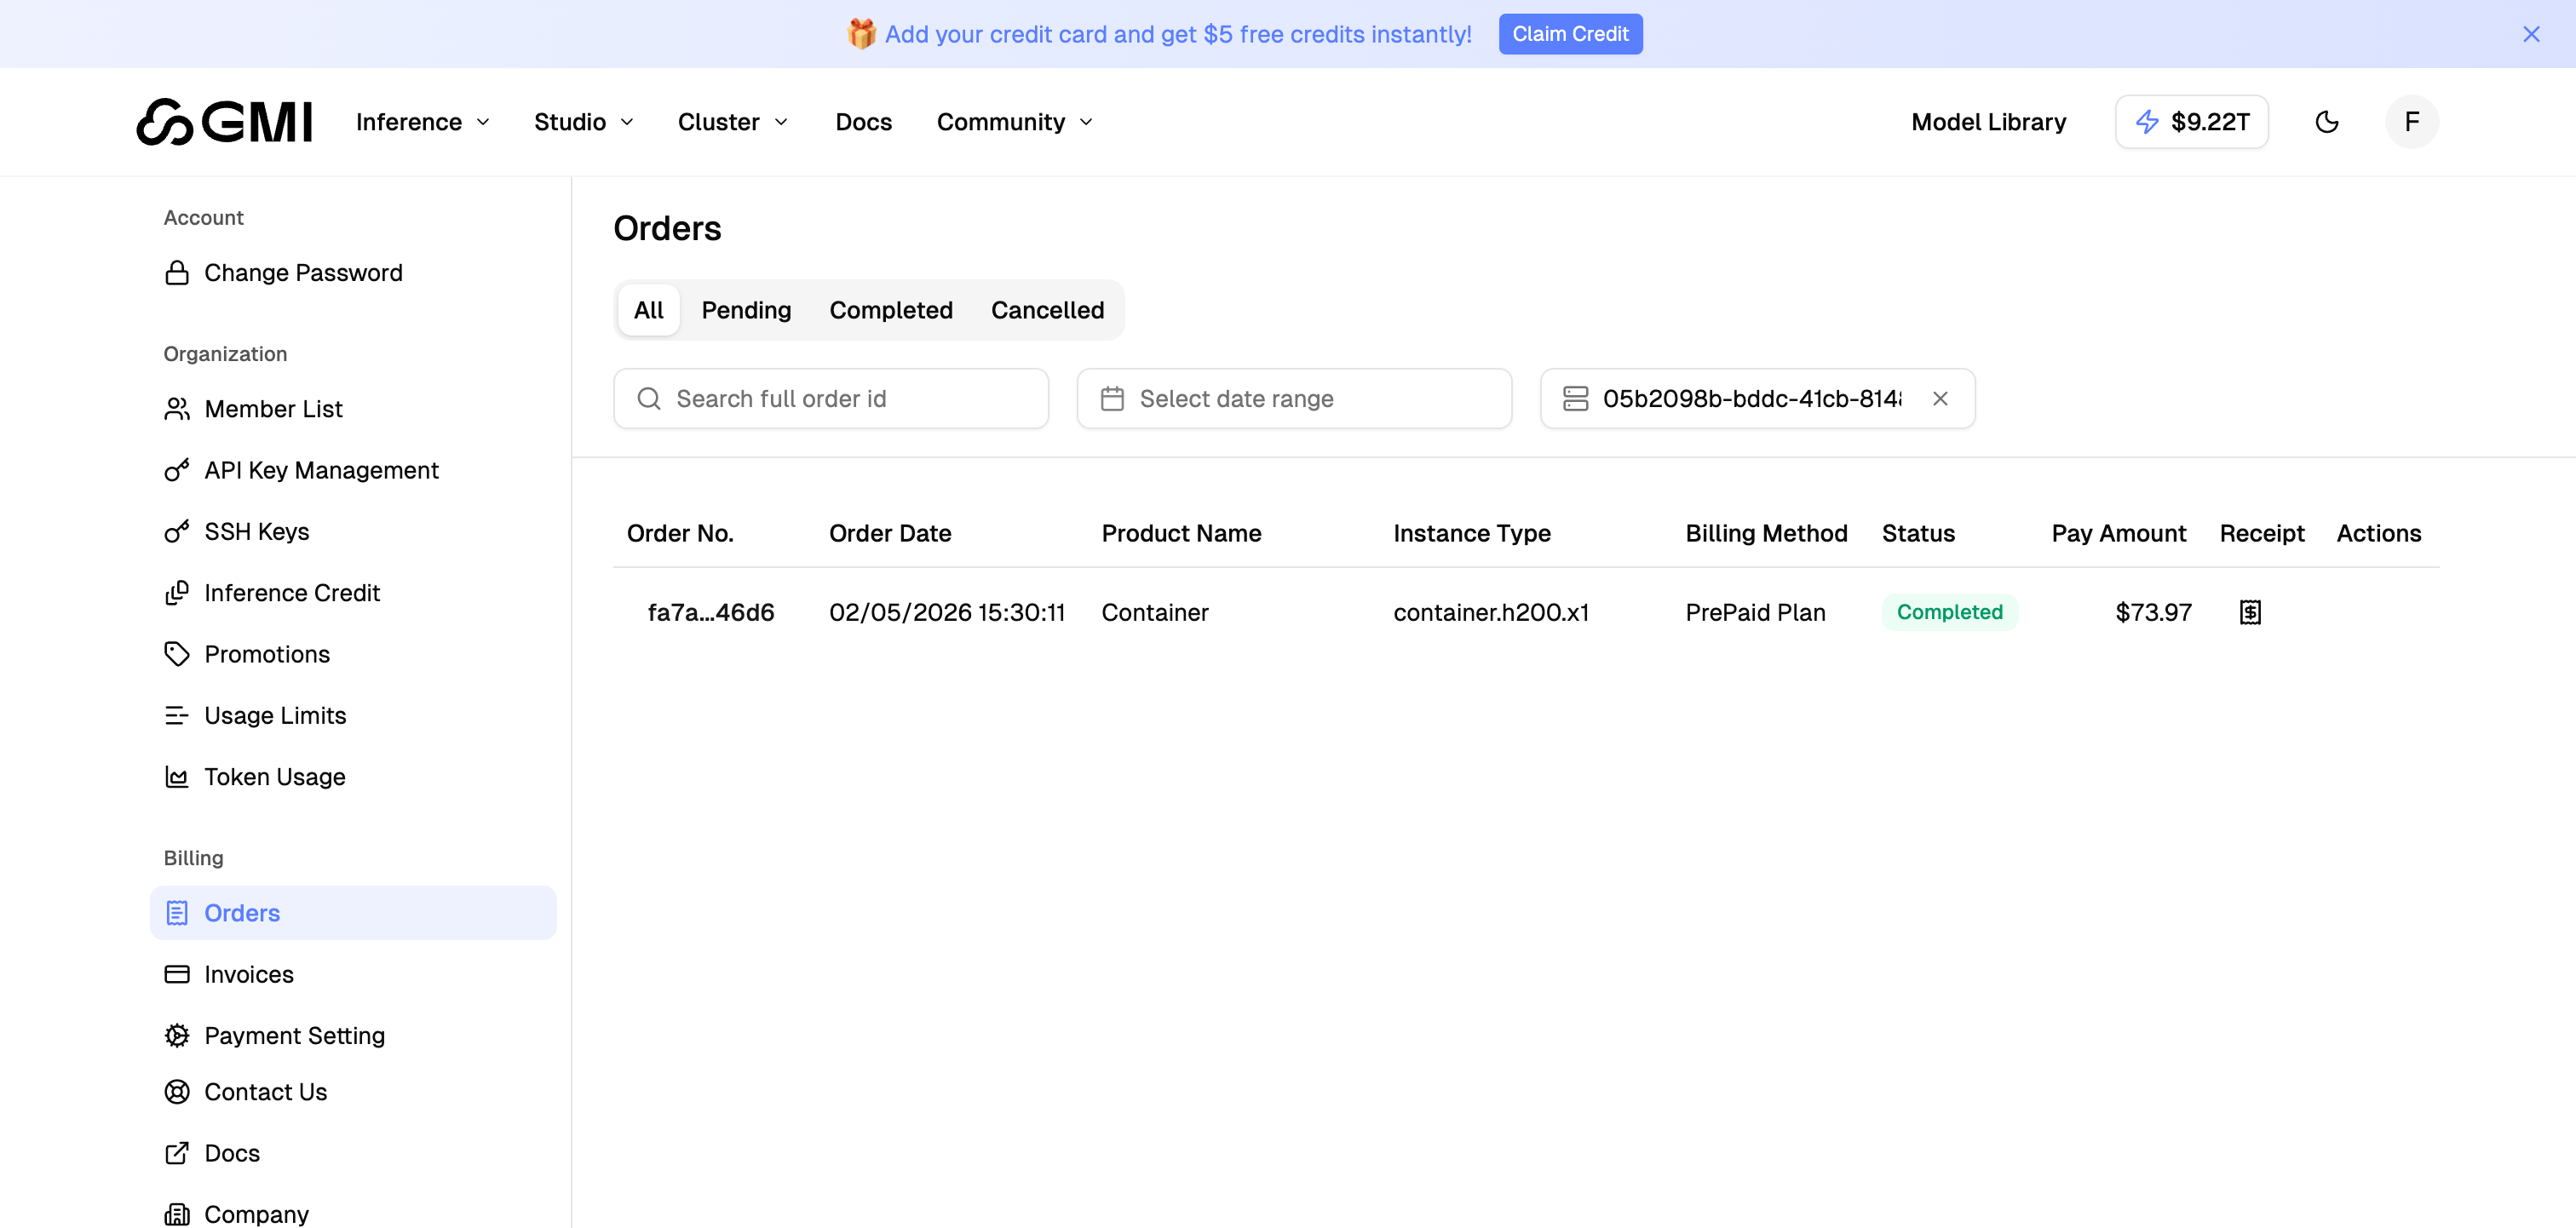
 4. The Orders page displays your container's order information including:
* **Order No.**: Unique order identifier
* **Order Date**: When the order was placed
* **Product Name**: Type of resource (Container)
* **Instance Type**: The container instance specification
* **Billing Method**: Prepaid Plan or Pay as you go
* **Status**: Order status (Completed, Pending, Cancelled)
* **Pay Amount**: Total amount charged
* **Receipt**: Download receipt for the order
4. The Orders page displays your container's order information including:
* **Order No.**: Unique order identifier
* **Order Date**: When the order was placed
* **Product Name**: Type of resource (Container)
* **Instance Type**: The container instance specification
* **Billing Method**: Prepaid Plan or Pay as you go
* **Status**: Order status (Completed, Pending, Cancelled)
* **Pay Amount**: Total amount charged
* **Receipt**: Download receipt for the order