> ## Documentation Index
> Fetch the complete documentation index at: https://docs.gmicloud.ai/llms.txt
> Use this file to discover all available pages before exploring further.
# Workflow Canvas
> Tour of the GMI Studio editor: canvas, palettes, inspector, and toolbars.
The canvas is a ComfyUI-based visual editor. Workflows are graphs of **nodes** wired together by their **input / output sockets**.
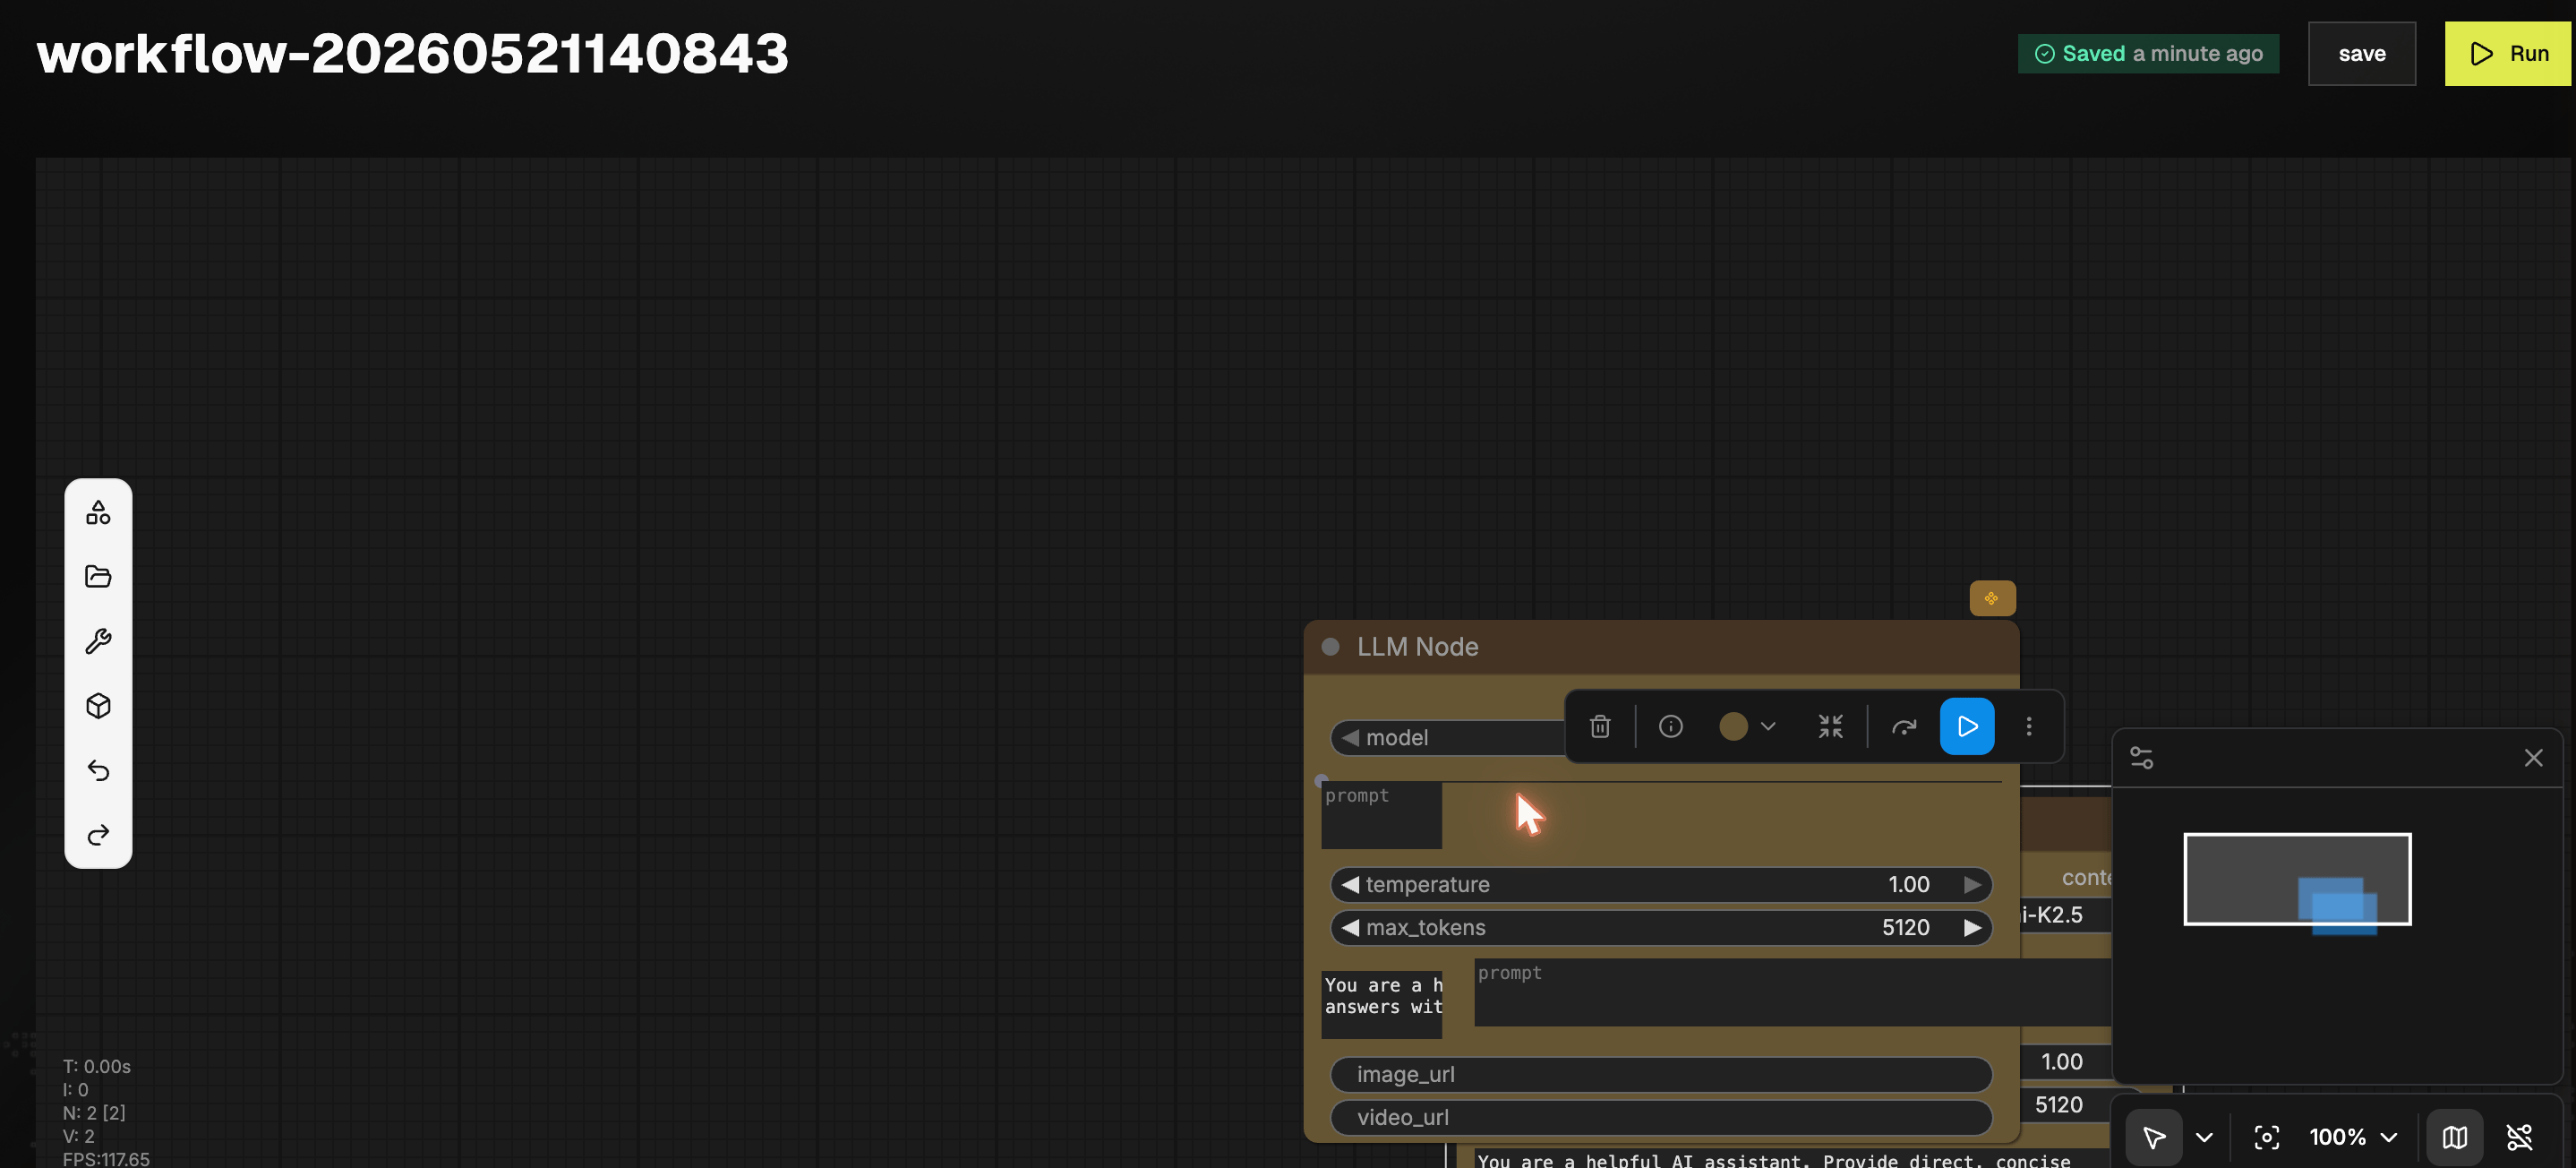 ## Editor surface
The editor has six concurrent surfaces.
| Surface | Where | Purpose |
| ------------------------- | ---------------------------------------------- | ---------------------------------------------------------------------- |
| **Top bar** | Above canvas | Workflow name, save status, **save**, **Run** |
| **Inner side toolbar** | Strip at the canvas left edge | Six icons: Library, Assets, Toolbox, Comfy Library, Undo, Redo |
| **Left palette** | Flips out from the inner toolbar | Browse and place nodes (Model Library, Assets, Toolbox, Comfy Library) |
| **Canvas** | Center | Nodes, wires, group boxes |
| **Right inspector** | Slides in when a node or the canvas is clicked | Per-node Parameters / Info / Settings, or the Workflow Overview |
| **Bottom-right controls** | Below canvas | Cursor mode, zoom %, fit-to-view, minimap, hide-overlays |
A stats panel at bottom-left shows `T` (run time), `I` (iteration), `N` (nodes / selected), `V` (views), and `FPS`.
## Inner side toolbar
Six icons stacked vertically against the canvas:
1. **Library**, the Model Library palette (Audio / Image / Video / LLM / Task).
2. **Assets**, the Assets palette (Save / Load Image, Save Audio (FLAC / MP3 / Opus), Load 3D & Animation, Preview 3D & Animation).
3. **Toolbox**, image / LLM / video tools plus Comfy Library entries.
4. **Comfy Library**, the full Comfy node tree (Audio, latent, image, …).
5. **Undo** (`Cmd+Z`).
6. **Redo** (`Cmd+Shift+Z`).
Click an active icon again to collapse the palette.
## Model Library
The default palette has five category tabs.
### Audio
## Editor surface
The editor has six concurrent surfaces.
| Surface | Where | Purpose |
| ------------------------- | ---------------------------------------------- | ---------------------------------------------------------------------- |
| **Top bar** | Above canvas | Workflow name, save status, **save**, **Run** |
| **Inner side toolbar** | Strip at the canvas left edge | Six icons: Library, Assets, Toolbox, Comfy Library, Undo, Redo |
| **Left palette** | Flips out from the inner toolbar | Browse and place nodes (Model Library, Assets, Toolbox, Comfy Library) |
| **Canvas** | Center | Nodes, wires, group boxes |
| **Right inspector** | Slides in when a node or the canvas is clicked | Per-node Parameters / Info / Settings, or the Workflow Overview |
| **Bottom-right controls** | Below canvas | Cursor mode, zoom %, fit-to-view, minimap, hide-overlays |
A stats panel at bottom-left shows `T` (run time), `I` (iteration), `N` (nodes / selected), `V` (views), and `FPS`.
## Inner side toolbar
Six icons stacked vertically against the canvas:
1. **Library**, the Model Library palette (Audio / Image / Video / LLM / Task).
2. **Assets**, the Assets palette (Save / Load Image, Save Audio (FLAC / MP3 / Opus), Load 3D & Animation, Preview 3D & Animation).
3. **Toolbox**, image / LLM / video tools plus Comfy Library entries.
4. **Comfy Library**, the full Comfy node tree (Audio, latent, image, …).
5. **Undo** (`Cmd+Z`).
6. **Redo** (`Cmd+Shift+Z`).
Click an active icon again to collapse the palette.
## Model Library
The default palette has five category tabs.
### Audio
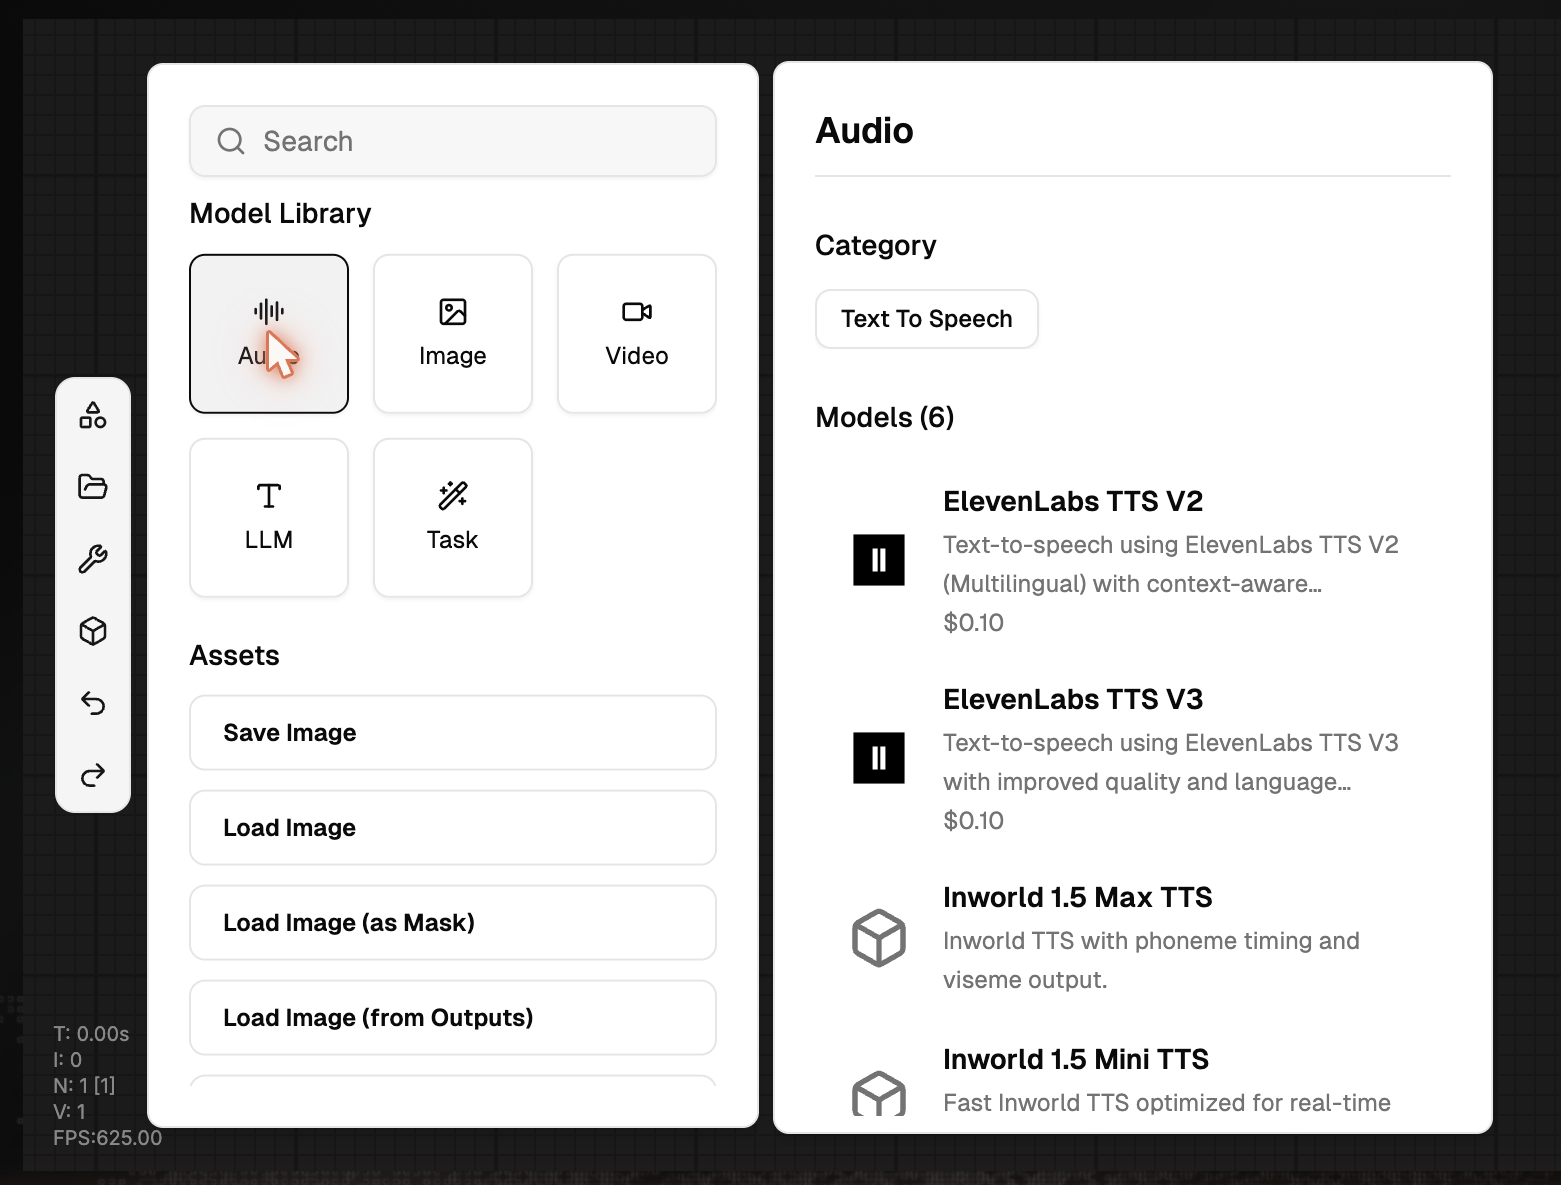 Text-to-speech models. Cards include ElevenLabs TTS V3 / V2, Inworld 1.5 Mini / Max TTS, and more. Each card shows the provider, short description, and per-request price.
| Input Type | What it does | Example Models |
| :-------------------------- | :--------------------------------------- | :--------------------------- |
| Text → Audio | Converts text to natural-sounding speech | Inworld, MiniMax, ElevenLabs |
| Text + Voice Sample → Audio | Clones a voice and speaks the given text | Inworld, MiniMax, Step Audio |
Only WAV and MP3 file formats are supported for audio uploads.
### Image
Text-to-speech models. Cards include ElevenLabs TTS V3 / V2, Inworld 1.5 Mini / Max TTS, and more. Each card shows the provider, short description, and per-request price.
| Input Type | What it does | Example Models |
| :-------------------------- | :--------------------------------------- | :--------------------------- |
| Text → Audio | Converts text to natural-sounding speech | Inworld, MiniMax, ElevenLabs |
| Text + Voice Sample → Audio | Clones a voice and speaks the given text | Inworld, MiniMax, Step Audio |
Only WAV and MP3 file formats are supported for audio uploads.
### Image
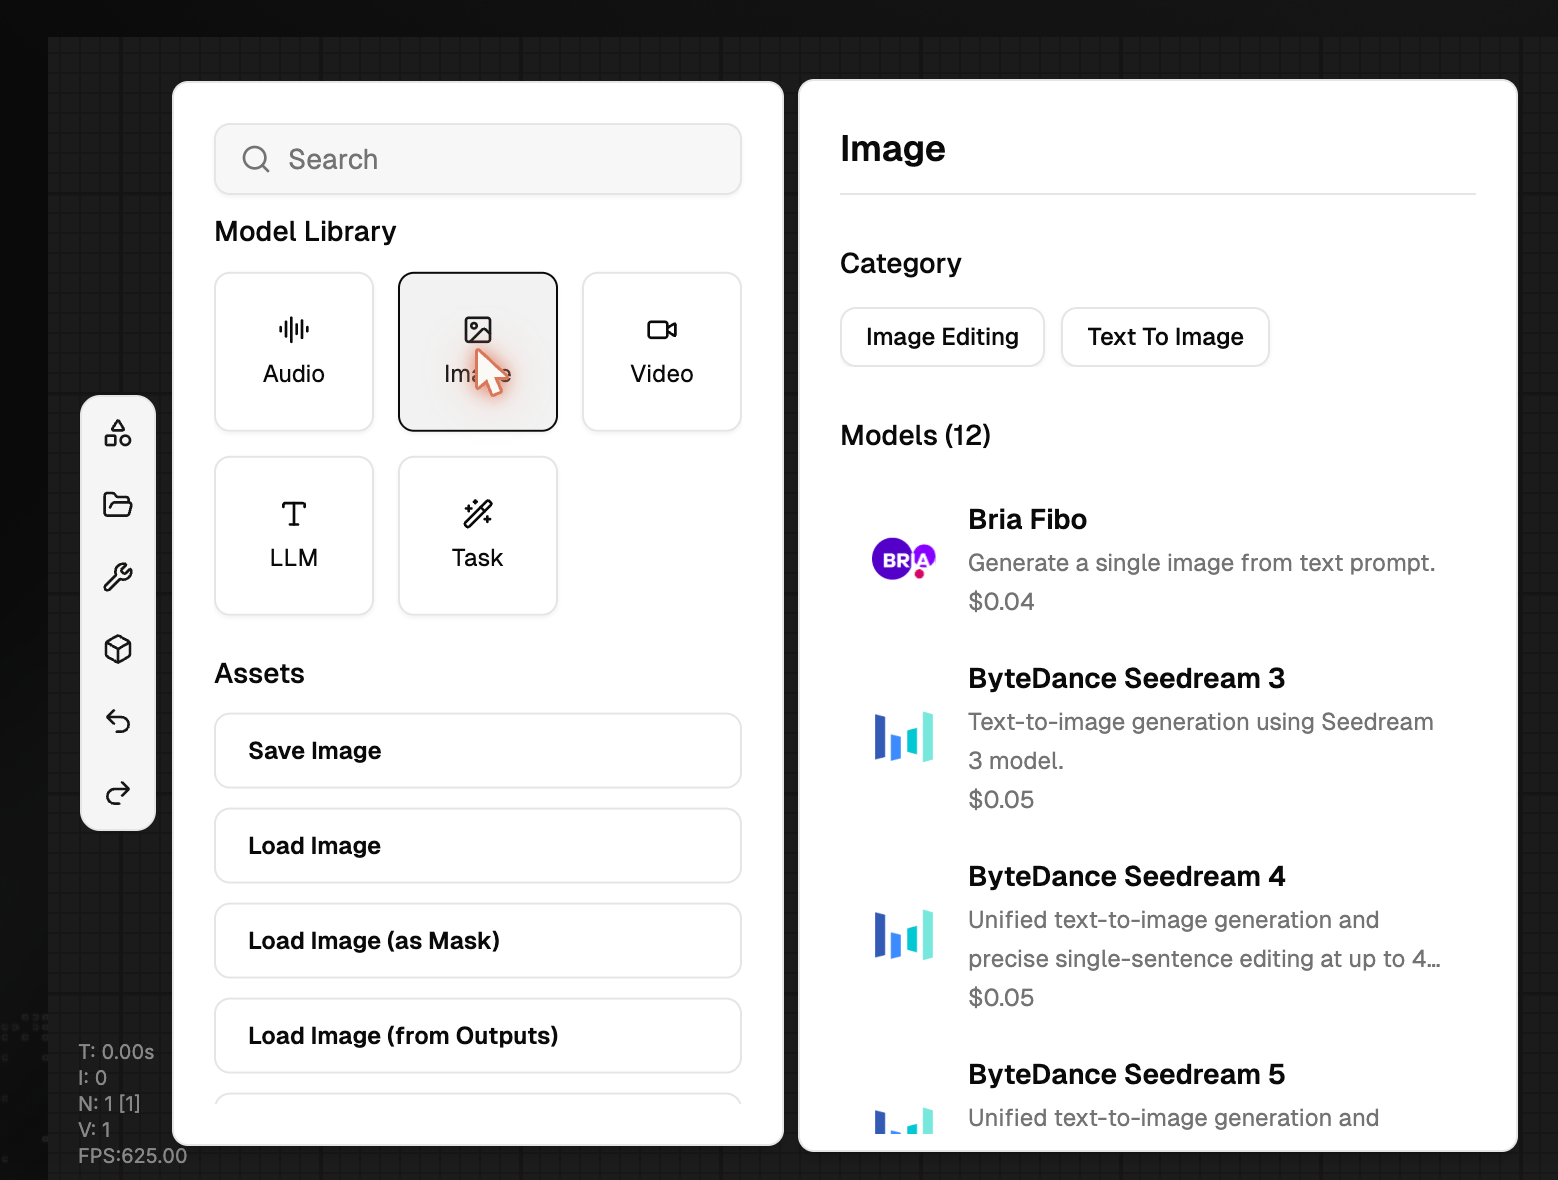 Categories: Image Editing, Text-to-Image. Models include Bria Fibo, ByteDance Seedream 3 / 4 / 5, Google Gemini image, GPT-Image-2, Hunyuan, Luma Uni, Reve, and more.
| Input Type | What it does | Example Models |
| :------------------- | :---------------------------------- | :--------------------------------------------- |
| Text → Image | Generates an image from a prompt | Gemini, Seedream, Tongyi (Alibaba), Reve, BRIA |
| Image → Image | Edits or transforms an image | SeedEdit, Reve, BRIA |
| Image + Mask → Image | Fills or replaces a selected region | BRIA |
### Video
Categories: Image Editing, Text-to-Image. Models include Bria Fibo, ByteDance Seedream 3 / 4 / 5, Google Gemini image, GPT-Image-2, Hunyuan, Luma Uni, Reve, and more.
| Input Type | What it does | Example Models |
| :------------------- | :---------------------------------- | :--------------------------------------------- |
| Text → Image | Generates an image from a prompt | Gemini, Seedream, Tongyi (Alibaba), Reve, BRIA |
| Image → Image | Edits or transforms an image | SeedEdit, Reve, BRIA |
| Image + Mask → Image | Fills or replaces a selected region | BRIA |
### Video
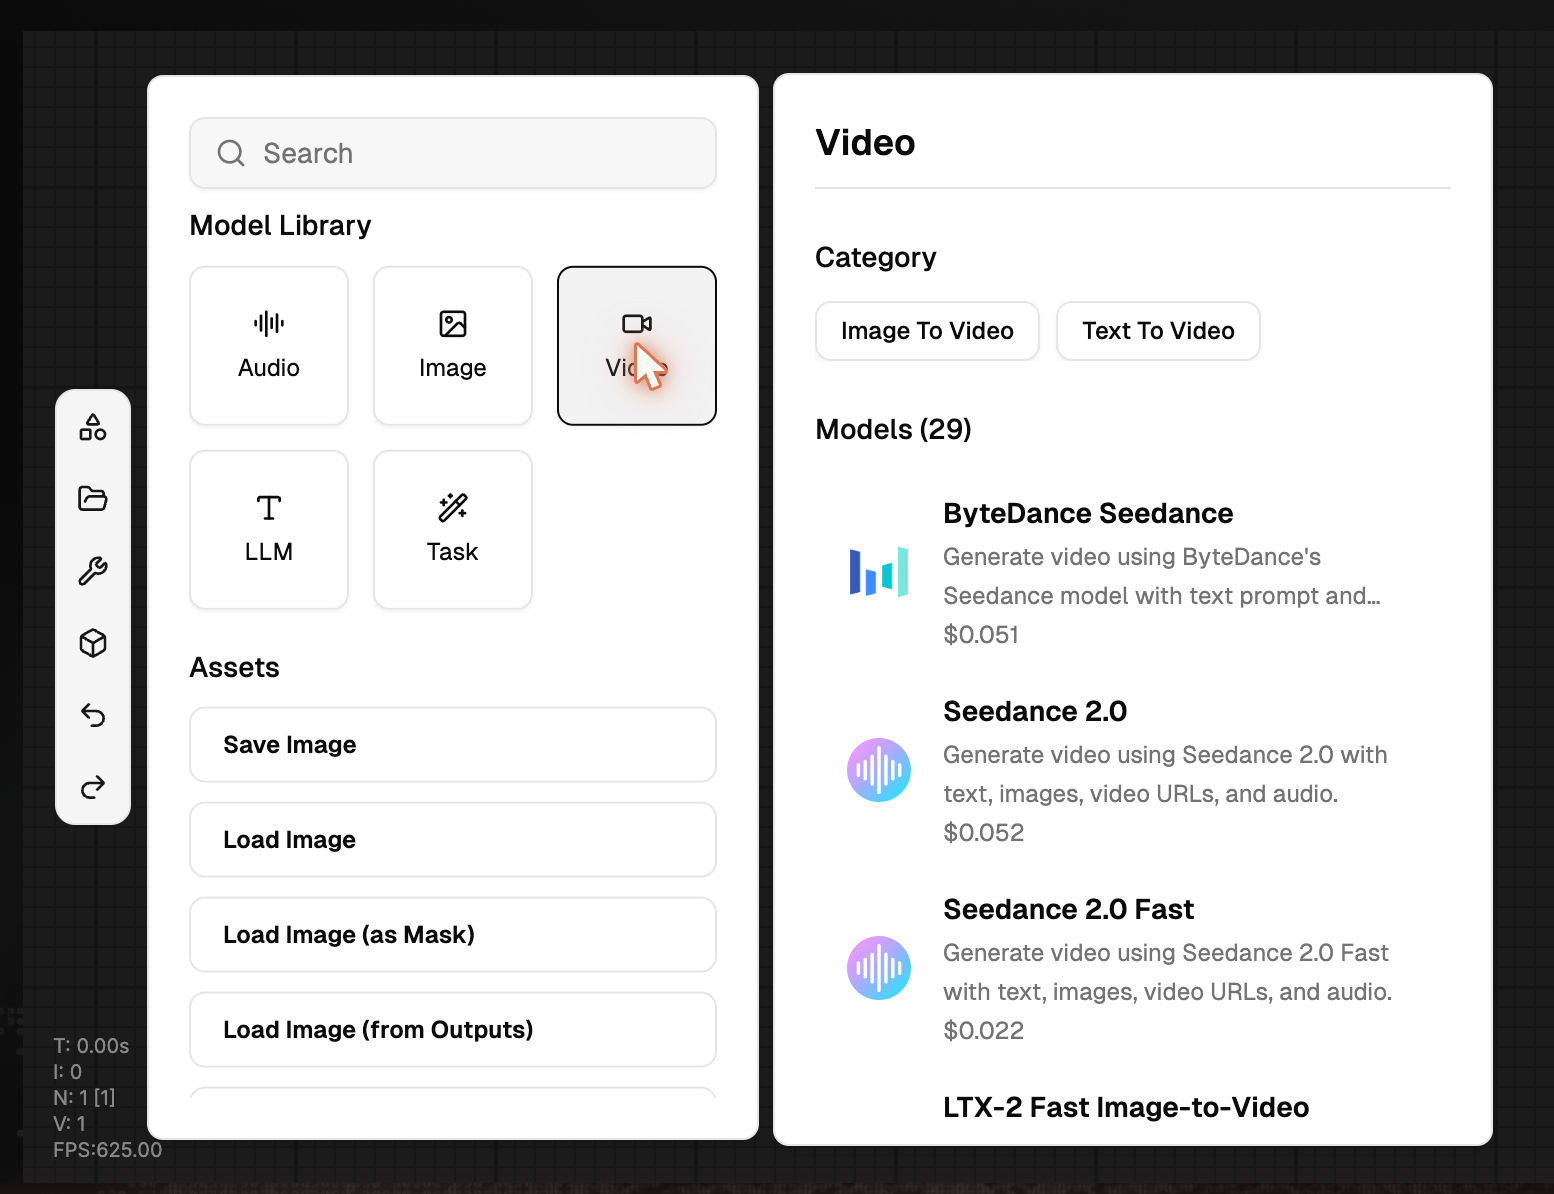 Categories cover Text-to-Video, Image-to-Video, Video-to-Video, Audio-to-Video. Providers: Veo3, Sora-2 / 2-Pro, Kling, Aliyun Wan, BytePlus Seedance, PixVerse, MiniMax Hailuo, LTX-2, Vidu, Luma Ray, SkyReels, HeyGen, GMI workflow models, Bria video tools.
| Input Type | What it does | Example Models |
| :------------ | :------------------------------------ | :-------------------------------------------------------------- |
| Text → Video | Generates a video from a text prompt | Wan, Veo, Sora, Kling, MiniMax Hailuo, PixVerse, Seedance, Luma |
| Image → Video | Animates a still image into a video | Wan, Kling |
| Video → Video | Edits or transforms an existing video | Wan, Kling, BRIA |
### LLM
Categories cover Text-to-Video, Image-to-Video, Video-to-Video, Audio-to-Video. Providers: Veo3, Sora-2 / 2-Pro, Kling, Aliyun Wan, BytePlus Seedance, PixVerse, MiniMax Hailuo, LTX-2, Vidu, Luma Ray, SkyReels, HeyGen, GMI workflow models, Bria video tools.
| Input Type | What it does | Example Models |
| :------------ | :------------------------------------ | :-------------------------------------------------------------- |
| Text → Video | Generates a video from a text prompt | Wan, Veo, Sora, Kling, MiniMax Hailuo, PixVerse, Seedance, Luma |
| Image → Video | Animates a still image into a video | Wan, Kling |
| Video → Video | Edits or transforms an existing video | Wan, Kling, BRIA |
### LLM
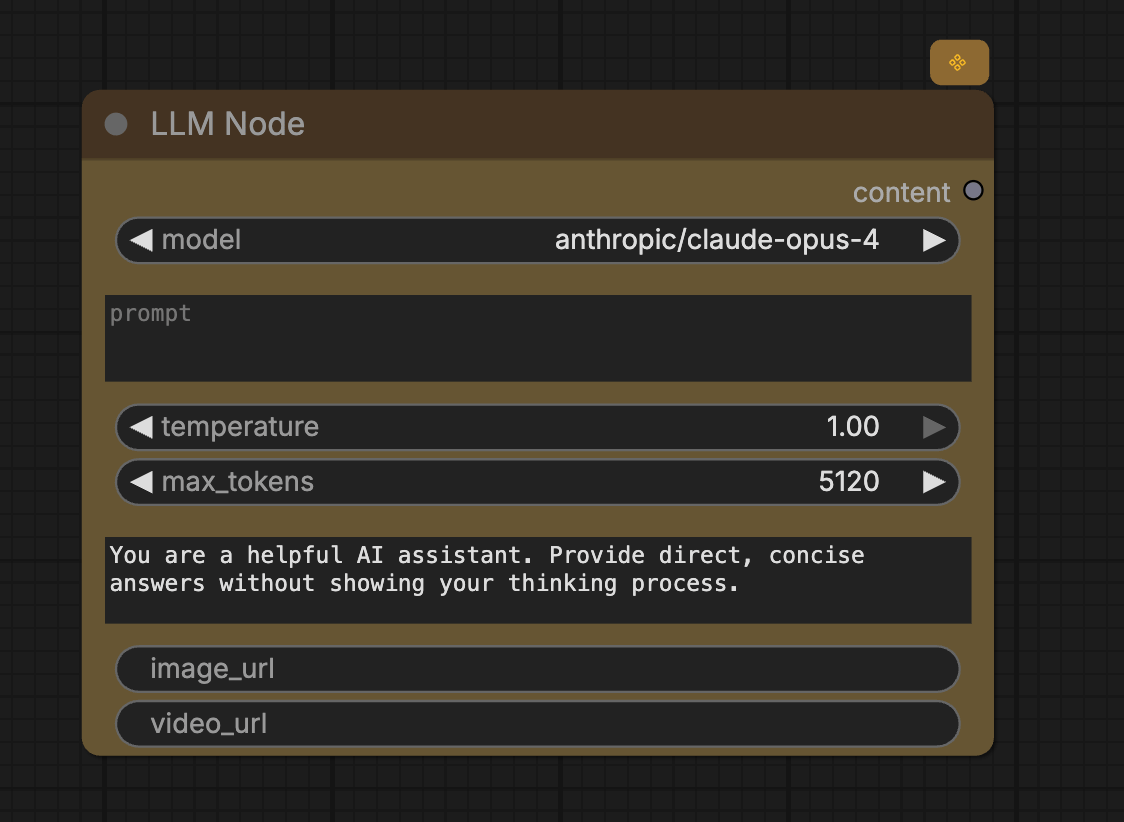 All inference-side language models, grouped by category. This is the same catalog you see on the [Inference Model Hub](/inference-engine/ie-intro#model-hub).
### Task
All inference-side language models, grouped by category. This is the same catalog you see on the [Inference Model Hub](/inference-engine/ie-intro#model-hub).
### Task
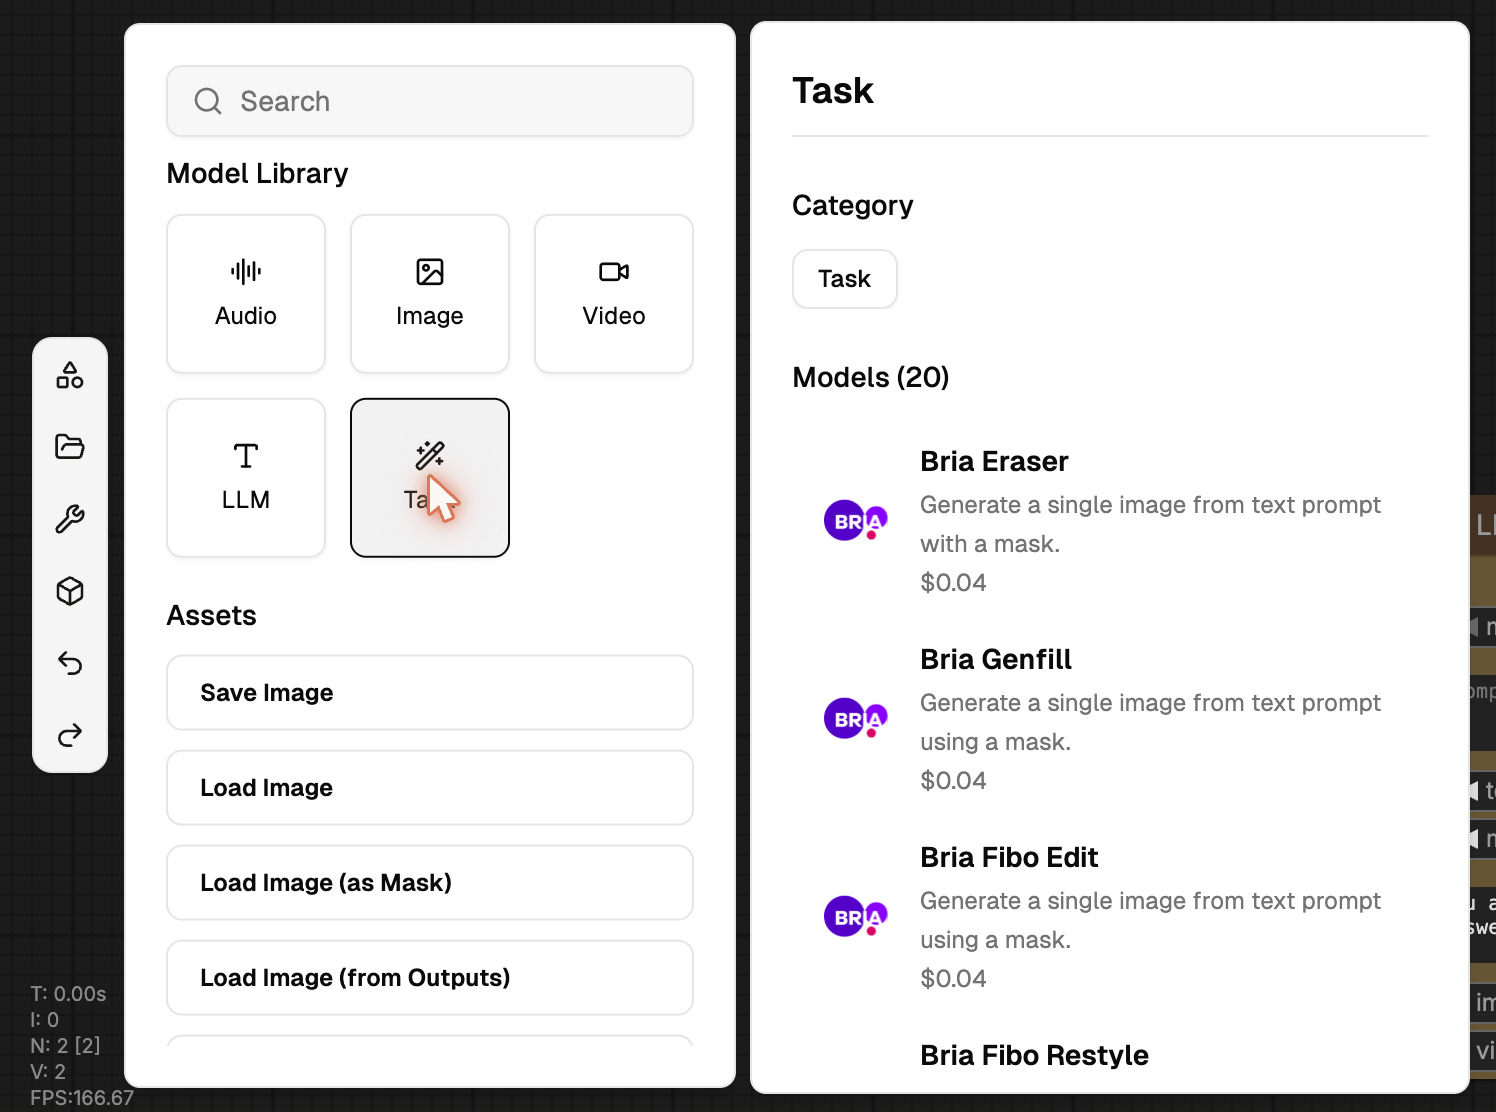 Task-specific image operations such as Bria Eraser, Bria Genfill, Bria Fibo Edit, Bria Fibo Restyle, Bria Fibo Recolor.
Click any model card to place that node at the canvas cursor. For the universal search across every catalog, see [Library, Search & Blueprints](/gmi-studio/gmi-studio-user-manual/library-and-search).
## Assets palette
Task-specific image operations such as Bria Eraser, Bria Genfill, Bria Fibo Edit, Bria Fibo Restyle, Bria Fibo Recolor.
Click any model card to place that node at the canvas cursor. For the universal search across every catalog, see [Library, Search & Blueprints](/gmi-studio/gmi-studio-user-manual/library-and-search).
## Assets palette
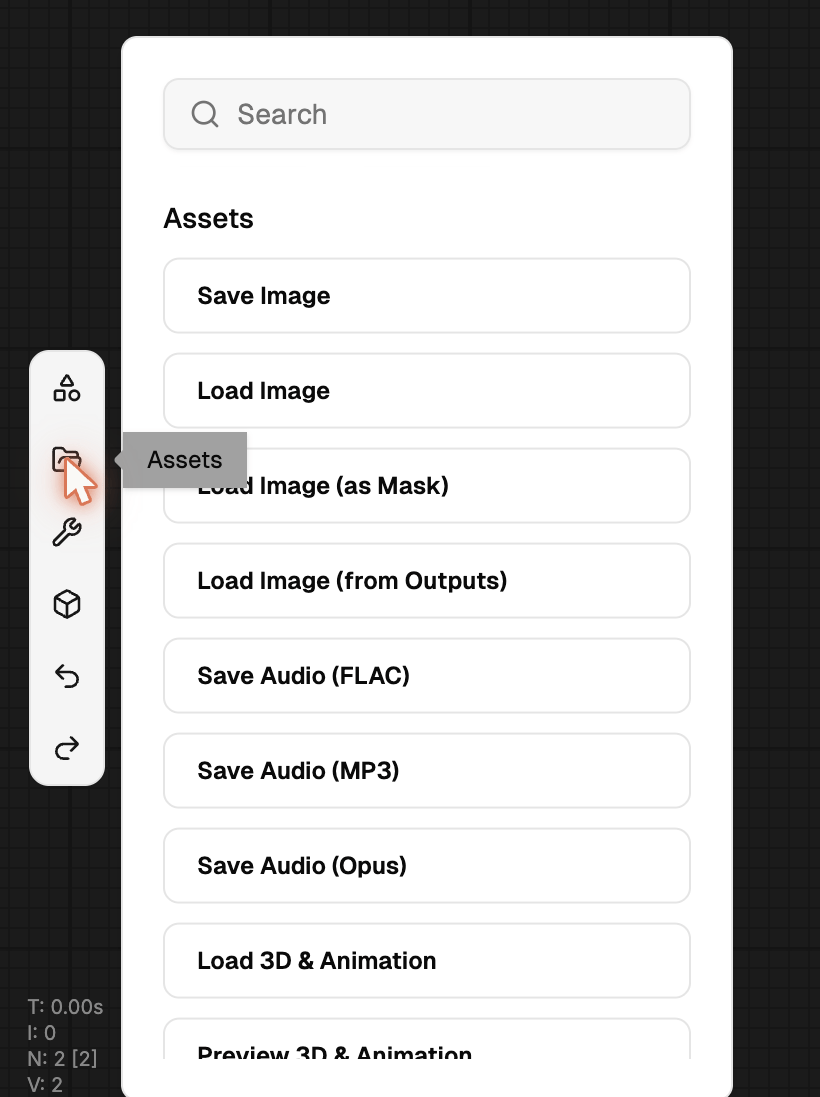 Holds the I/O building blocks: Save Image, Load Image, Save Audio variants (FLAC / MP3 / Opus), Load 3D & Animation, Preview 3D & Animation, and document loaders.
## GMI Official vs ComfyUI nodes
| | GMI Official Nodes | ComfyUI Nodes |
| :---------------- | :----------------------------- | :--------------------------------- |
| **Best for** | Quick setup, managed inference | Fine-grained control, custom logic |
| **Control level** | Simplified inputs / outputs | Full node-level customization |
| **Performance** | Optimized, fully managed | Depends on workflow configuration |
GMI Official nodes wrap each model behind a clean input / output surface and run on managed infrastructure. ComfyUI nodes are sourced directly from the upstream Comfy repo for users who need lower-level building blocks.
## Right inspector, per node
Click a node and the right inspector opens with three tabs.
### Parameters
Holds the I/O building blocks: Save Image, Load Image, Save Audio variants (FLAC / MP3 / Opus), Load 3D & Animation, Preview 3D & Animation, and document loaders.
## GMI Official vs ComfyUI nodes
| | GMI Official Nodes | ComfyUI Nodes |
| :---------------- | :----------------------------- | :--------------------------------- |
| **Best for** | Quick setup, managed inference | Fine-grained control, custom logic |
| **Control level** | Simplified inputs / outputs | Full node-level customization |
| **Performance** | Optimized, fully managed | Depends on workflow configuration |
GMI Official nodes wrap each model behind a clean input / output surface and run on managed infrastructure. ComfyUI nodes are sourced directly from the upstream Comfy repo for users who need lower-level building blocks.
## Right inspector, per node
Click a node and the right inspector opens with three tabs.
### Parameters
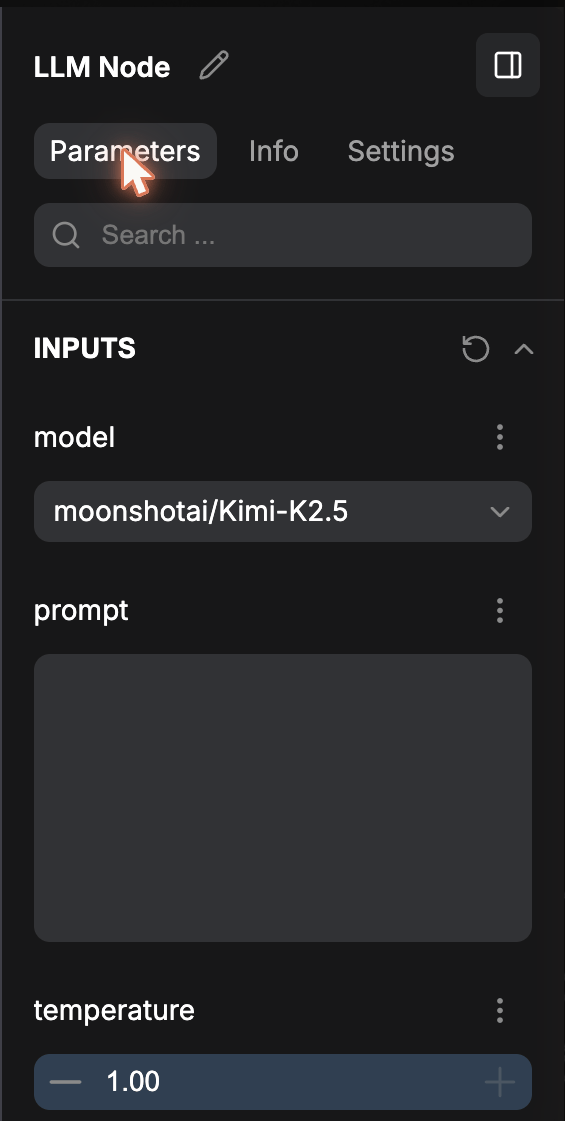 Every input the node exposes. For an LLM node: `model`, `prompt`, `temperature`, `max_tokens`, system prompt, `image_url`, `video_url`. Each row has a `⋮` menu to **favorite** the input (it then shows up at Workflow Overview > Parameters).
### Info
Every input the node exposes. For an LLM node: `model`, `prompt`, `temperature`, `max_tokens`, system prompt, `image_url`, `video_url`. Each row has a `⋮` menu to **favorite** the input (it then shows up at Workflow Overview > Parameters).
### Info
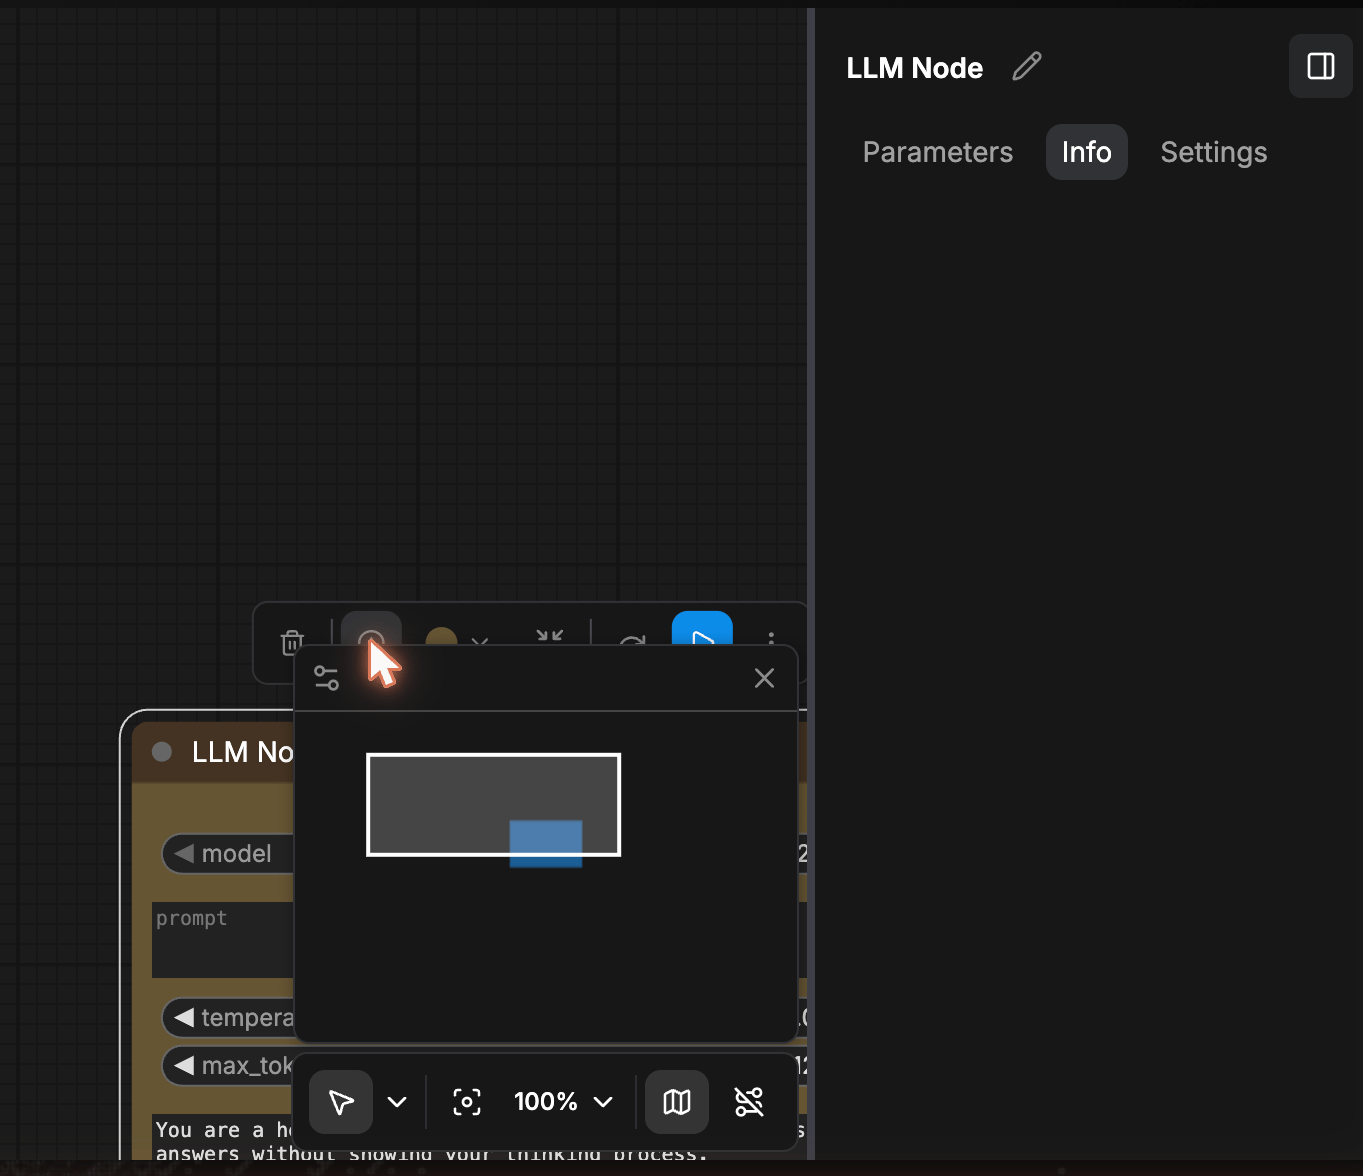 Node header, identifier, and (when present) a description of what the node does. Some nodes show pricing here.
### Settings
Node header, identifier, and (when present) a description of what the node does. Some nodes show pricing here.
### Settings
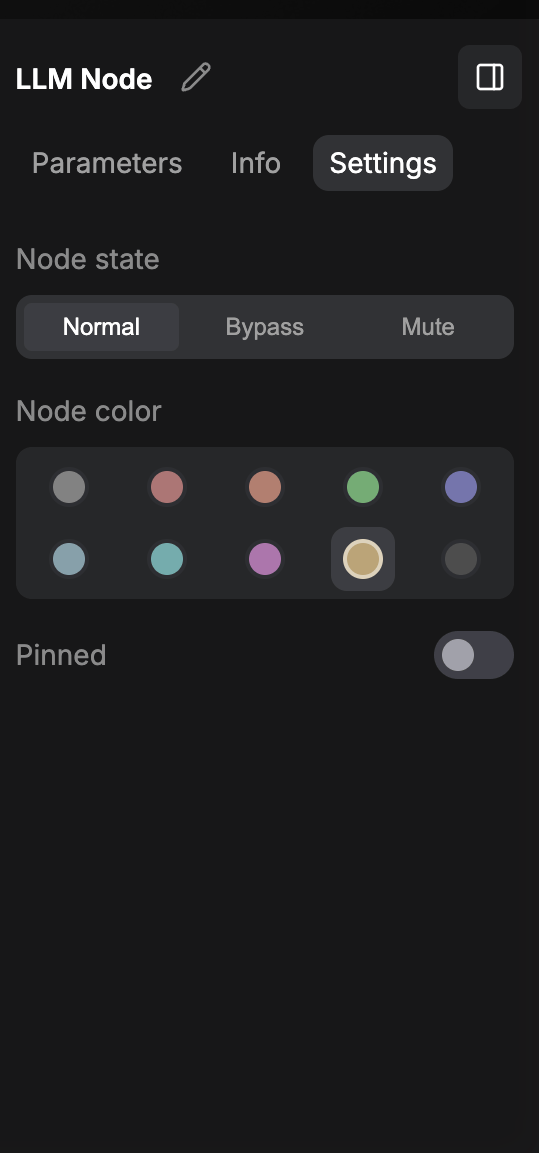
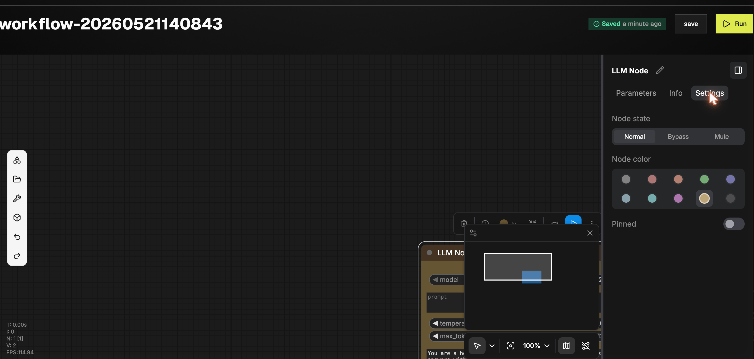 * **Node state**: `Normal`, `Bypass`, `Mute`.
* **Node color**: 10 preset swatches.
* **Pinned**: toggle.
## Selected node toolbar
Clicking a node header pops a contextual toolbar above it.
* **Node state**: `Normal`, `Bypass`, `Mute`.
* **Node color**: 10 preset swatches.
* **Pinned**: toggle.
## Selected node toolbar
Clicking a node header pops a contextual toolbar above it.
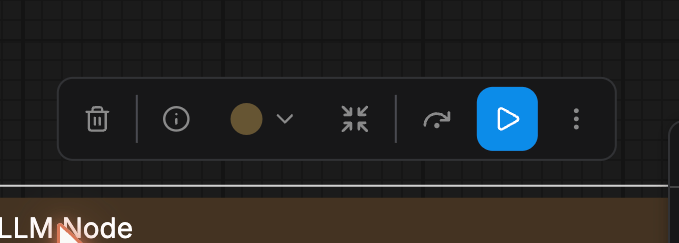 | Icon | Action |
| ---- | -------------------------------------------- |
| 🗑️ | Delete node |
| ⓘ | Toggle Info / open Inspector |
| 🟡 ▾ | Node color picker |
| ⤓ | Collapse / Resize |
| ↪ | Bypass |
| ▶ | Run Branch (run just this node and upstream) |
| ⋮ | More menu (see below) |
### Node "More" menu
| Icon | Action |
| ---- | -------------------------------------------- |
| 🗑️ | Delete node |
| ⓘ | Toggle Info / open Inspector |
| 🟡 ▾ | Node color picker |
| ⤓ | Collapse / Resize |
| ↪ | Bypass |
| ▶ | Run Branch (run just this node and upstream) |
| ⋮ | More menu (see below) |
### Node "More" menu
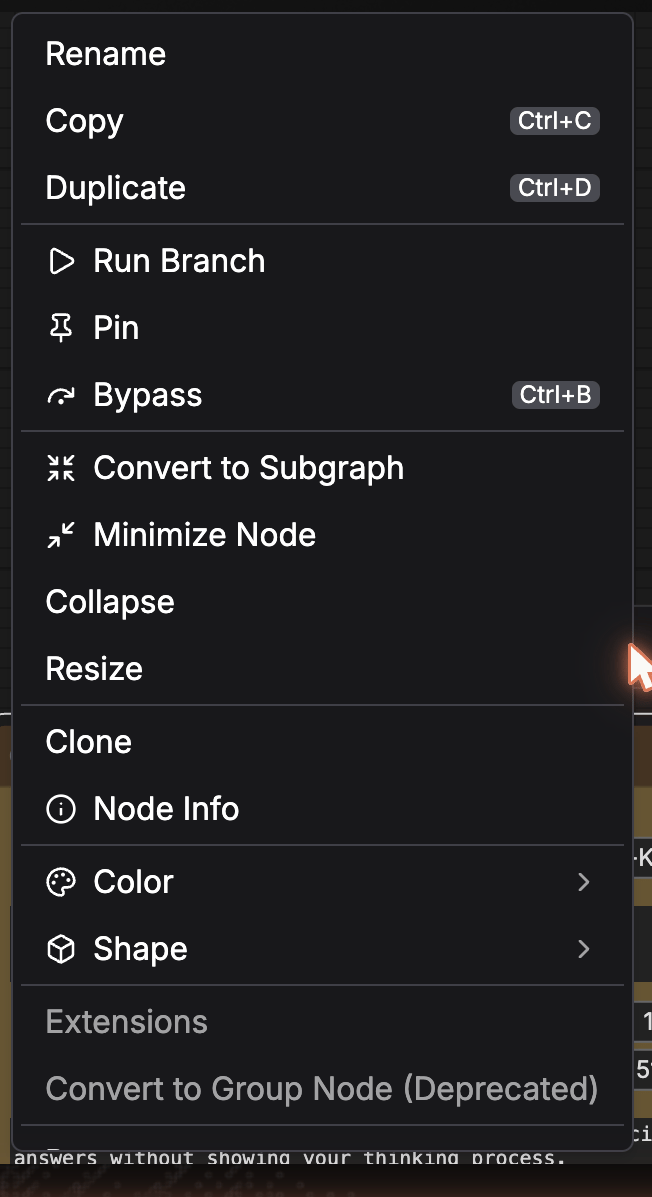 Per-node actions: **Rename**, **Copy** `Ctrl+C`, **Duplicate** `Ctrl+D`, **Clone**, **Run Branch**, **Pin**, **Bypass** `Ctrl+B`, **Convert to Subgraph**, **Minimize Node**, **Collapse**, **Resize**, **Node Info**, **Color**, **Shape**, **Extensions**.
### Widget right-click
Right-clicking a widget input (e.g. `image_url`) exposes widget-level actions:
Per-node actions: **Rename**, **Copy** `Ctrl+C`, **Duplicate** `Ctrl+D`, **Clone**, **Run Branch**, **Pin**, **Bypass** `Ctrl+B`, **Convert to Subgraph**, **Minimize Node**, **Collapse**, **Resize**, **Node Info**, **Color**, **Shape**, **Extensions**.
### Widget right-click
Right-clicking a widget input (e.g. `image_url`) exposes widget-level actions:
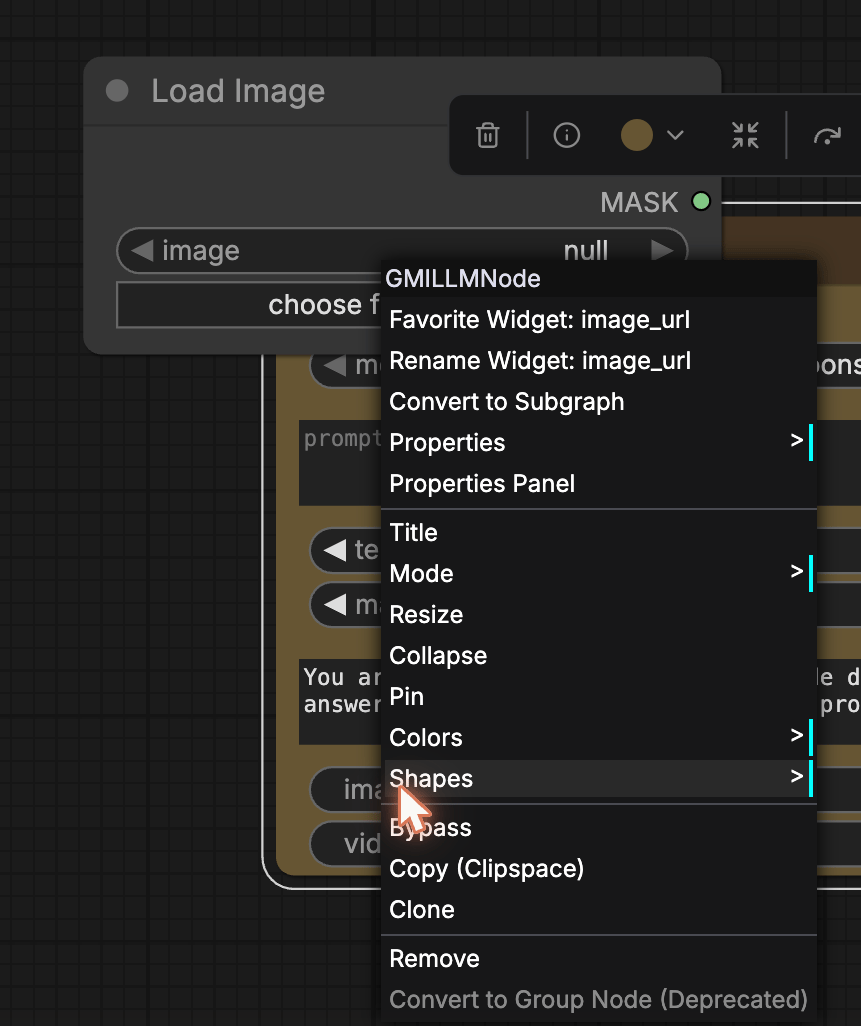 Highlights: **Favorite Widget** (pin to Workflow Overview > Parameters), **Rename Widget**, **Convert to Subgraph**, **Convert Widget to Input** (so it accepts a wired connection instead of inline editing).
## Workflow Overview
Click the canvas background with no node selected and the inspector switches to **Workflow Overview** with three tabs.
### Parameters
Highlights: **Favorite Widget** (pin to Workflow Overview > Parameters), **Rename Widget**, **Convert to Subgraph**, **Convert Widget to Input** (so it accepts a wired connection instead of inline editing).
## Workflow Overview
Click the canvas background with no node selected and the inspector switches to **Workflow Overview** with three tabs.
### Parameters
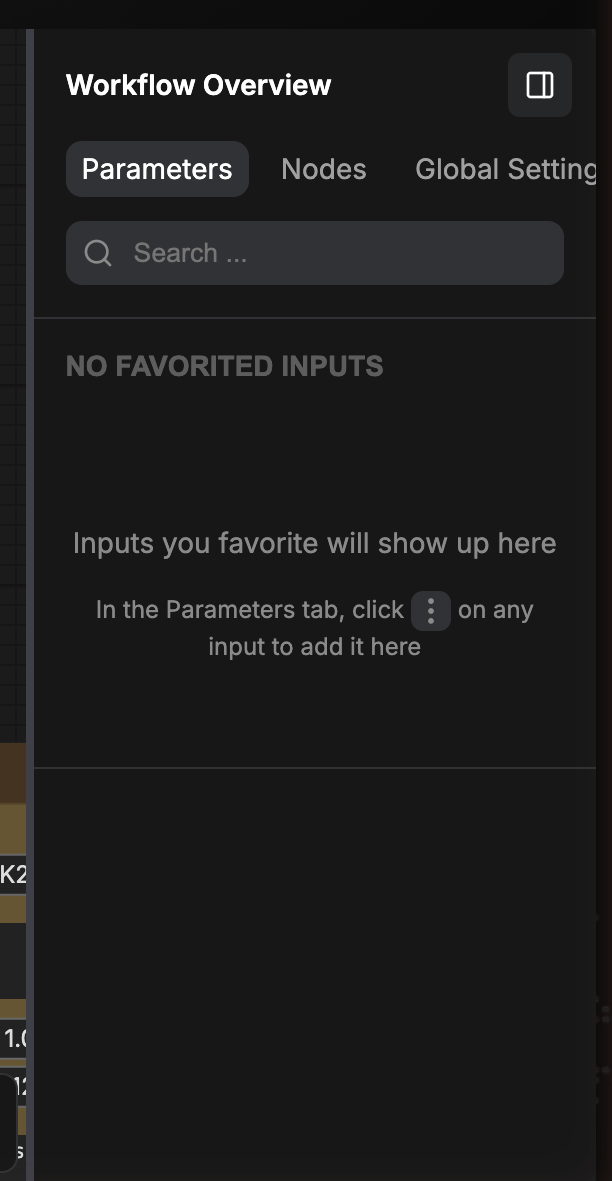 Lists every input you've **favorited** from individual node Parameters. This is the workflow's parameter surface, what a consumer of the workflow (or someone running it via API) actually has to fill in.
Empty state: "NO FAVORITED INPUTS. Inputs you favorite will show up here. In the Parameters tab, click `⋮` on any input to add it here."
### Nodes
Lists every input you've **favorited** from individual node Parameters. This is the workflow's parameter surface, what a consumer of the workflow (or someone running it via API) actually has to fill in.
Empty state: "NO FAVORITED INPUTS. Inputs you favorite will show up here. In the Parameters tab, click `⋮` on any input to add it here."
### Nodes
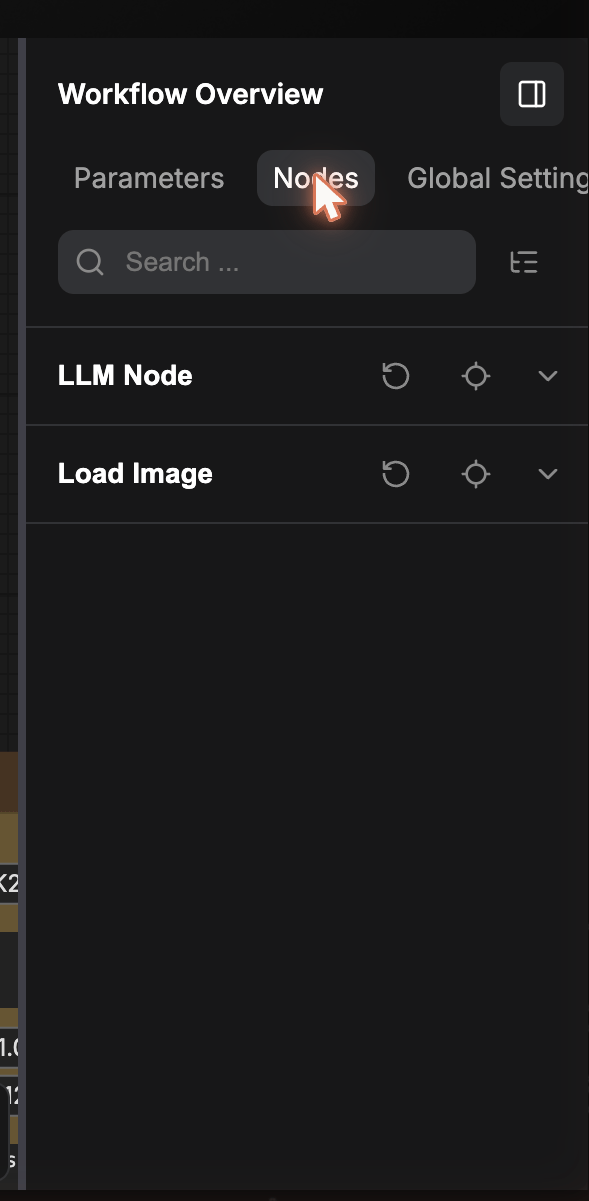 Flat list of every node in the workflow. Each row has quick actions: reset, target (center camera on node), expand details.
### Global Settings
Flat list of every node in the workflow. Each row has quick actions: reset, target (center camera on node), expand details.
### Global Settings
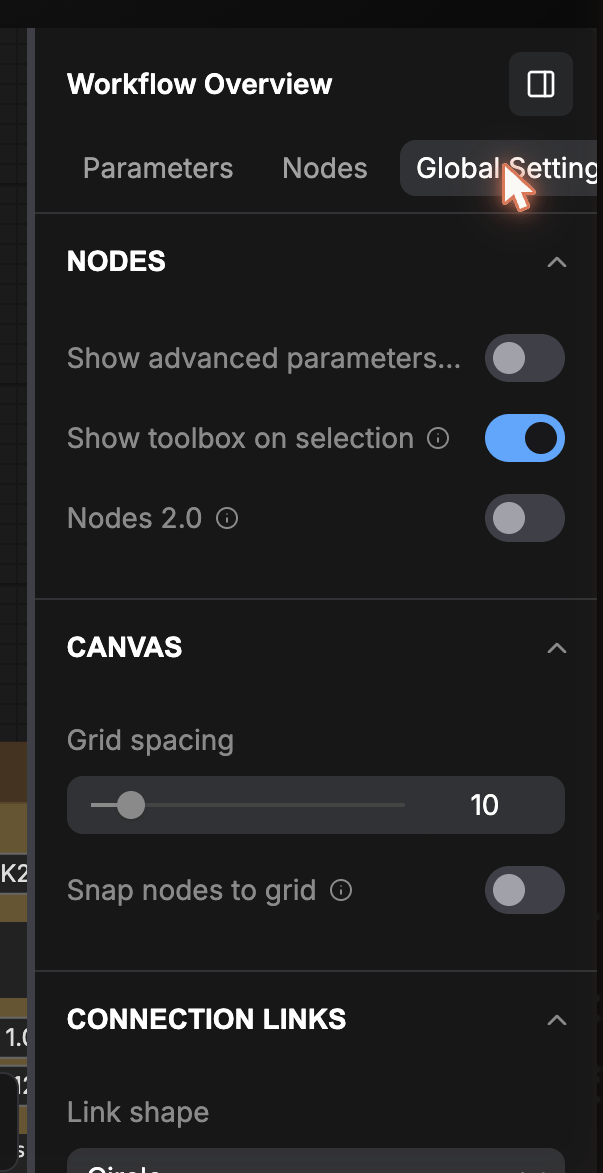 * **NODES**: Show advanced parameters, Show toolbox on selection, Nodes 2.0.
* **CANVAS**: Grid spacing (default 10), Snap nodes to grid.
* **CONNECTION LINKS**: Link shape, Show connected links.
* **View all settings** opens the full app settings.
## Wiring nodes
Each node exposes:
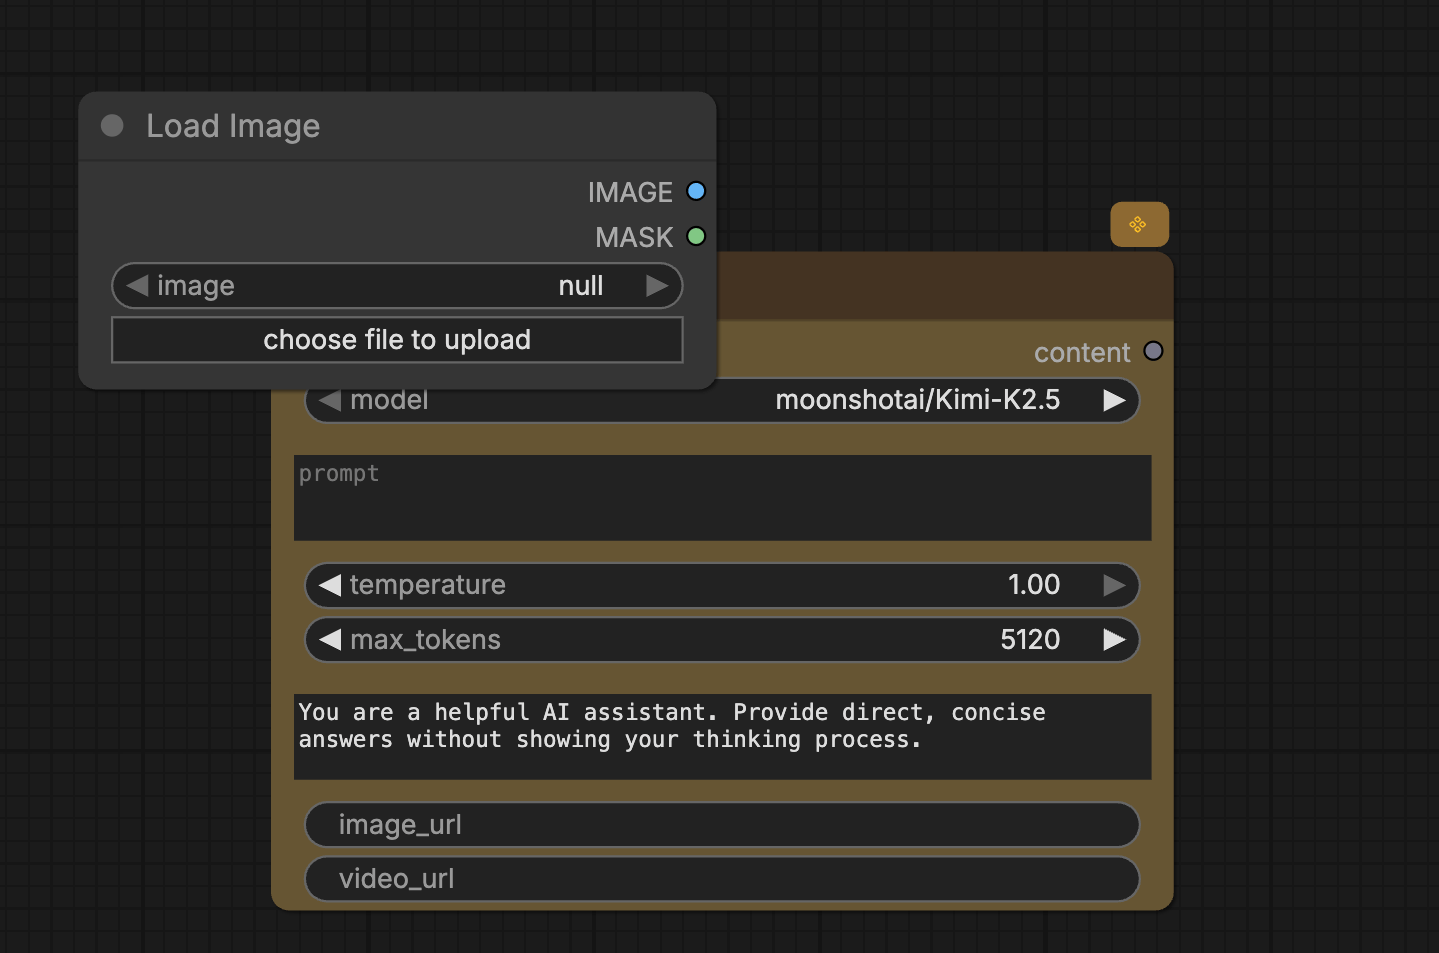
* **Output sockets** on the right edge, coloured dots labelled by their data type (`IMAGE`, `MASK`, `LATENT`, `STRING`, `content`, …).
* **Input sockets or widgets** on the left edge, either small dots for raw inputs, or full-width widget bars (`image_url`, `video_url`, `model`, `prompt`) that double as both editable widget and connection point.
To wire two nodes, drag from an output socket to a compatible input socket. The cursor shows a coloured curve as you drag, and only matching types accept the drop.
* **NODES**: Show advanced parameters, Show toolbox on selection, Nodes 2.0.
* **CANVAS**: Grid spacing (default 10), Snap nodes to grid.
* **CONNECTION LINKS**: Link shape, Show connected links.
* **View all settings** opens the full app settings.
## Wiring nodes
Each node exposes:
* **Output sockets** on the right edge, coloured dots labelled by their data type (`IMAGE`, `MASK`, `LATENT`, `STRING`, `content`, …).
* **Input sockets or widgets** on the left edge, either small dots for raw inputs, or full-width widget bars (`image_url`, `video_url`, `model`, `prompt`) that double as both editable widget and connection point.
To wire two nodes, drag from an output socket to a compatible input socket. The cursor shows a coloured curve as you drag, and only matching types accept the drop.
 A widget input shows its tooltip on hover:
 If you want a widget to behave purely as a linked input (no inline editing), right-click and pick **Convert Widget to Input**.
## Canvas right-click menu
Right-click on empty canvas to add nodes, groups, paste, or save selections as templates.
If you want a widget to behave purely as a linked input (no inline editing), right-click and pick **Convert Widget to Input**.
## Canvas right-click menu
Right-click on empty canvas to add nodes, groups, paste, or save selections as templates.
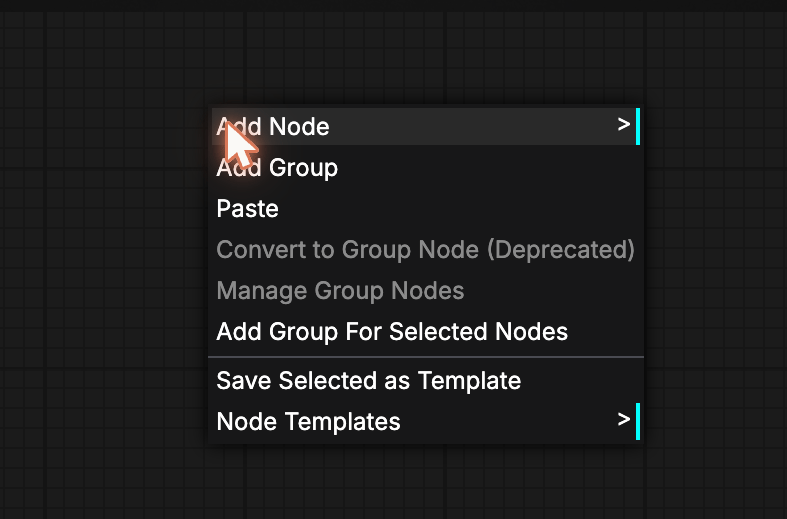 * **Add Node** (submenu of every node category)
* **Add Group**
* **Paste**
* **Manage Group Nodes**
* **Add Group For Selected Nodes**
* **Save Selected as Template** (becomes a Blueprint, see [Library, Search & Blueprints](/gmi-studio/gmi-studio-user-manual/library-and-search))
* **Node Templates**
## Top bar
* Workflow name, click the breadcrumb to rename.
* **Saved a few seconds ago** live save indicator (auto-save fires on every change).
* **save**, force-save now.
* **Run**, execute the entire workflow.
Saving never overwrites a published workflow without confirmation. Runs spend credits according to the model nodes in the graph.
## Bottom-right controls
* **Cursor mode**: selection vs pan.
* **Fit-to-view** (crosshair): re-frames the canvas around every node.
* **Zoom %**: preset zoom levels.
* **Minimap toggle**: show or hide the floating minimap.
* **Hide overlays**: temporarily clear UI overlays for a clean canvas.
## Next steps
* [Library, Search & Blueprints](/gmi-studio/gmi-studio-user-manual/library-and-search) for the universal node search.
* [Running a Workflow](/gmi-studio/gmi-studio-user-manual/running-a-workflow) to execute and retrieve outputs.
* Per-node docs: [Image Nodes](/gmi-studio/nodes/image/overview), [Video Nodes](/gmi-studio/nodes/video/overview), [LLM Node](/gmi-studio/nodes/llm/llm-node).
* **Add Node** (submenu of every node category)
* **Add Group**
* **Paste**
* **Manage Group Nodes**
* **Add Group For Selected Nodes**
* **Save Selected as Template** (becomes a Blueprint, see [Library, Search & Blueprints](/gmi-studio/gmi-studio-user-manual/library-and-search))
* **Node Templates**
## Top bar
* Workflow name, click the breadcrumb to rename.
* **Saved a few seconds ago** live save indicator (auto-save fires on every change).
* **save**, force-save now.
* **Run**, execute the entire workflow.
Saving never overwrites a published workflow without confirmation. Runs spend credits according to the model nodes in the graph.
## Bottom-right controls
* **Cursor mode**: selection vs pan.
* **Fit-to-view** (crosshair): re-frames the canvas around every node.
* **Zoom %**: preset zoom levels.
* **Minimap toggle**: show or hide the floating minimap.
* **Hide overlays**: temporarily clear UI overlays for a clean canvas.
## Next steps
* [Library, Search & Blueprints](/gmi-studio/gmi-studio-user-manual/library-and-search) for the universal node search.
* [Running a Workflow](/gmi-studio/gmi-studio-user-manual/running-a-workflow) to execute and retrieve outputs.
* Per-node docs: [Image Nodes](/gmi-studio/nodes/image/overview), [Video Nodes](/gmi-studio/nodes/video/overview), [LLM Node](/gmi-studio/nodes/llm/llm-node).